
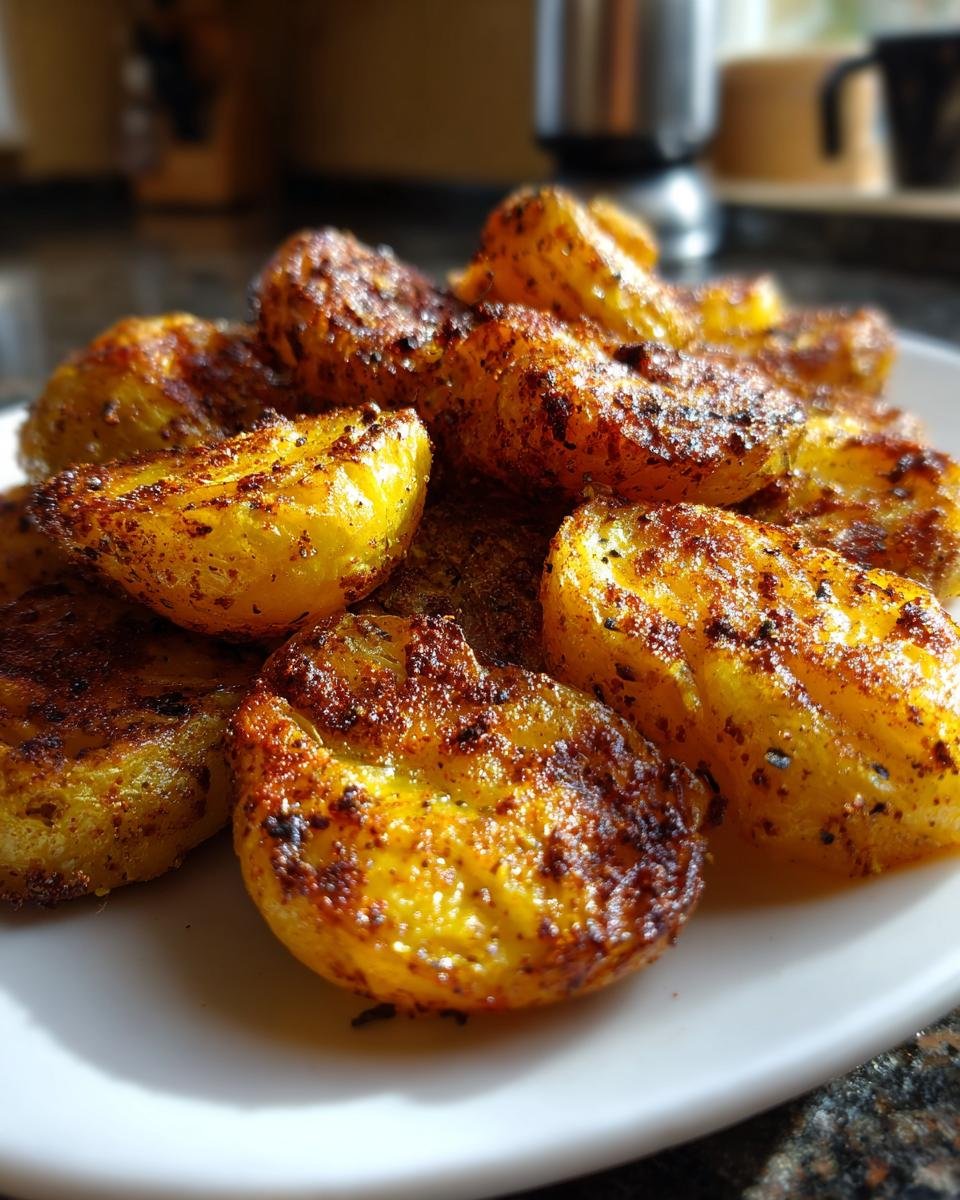
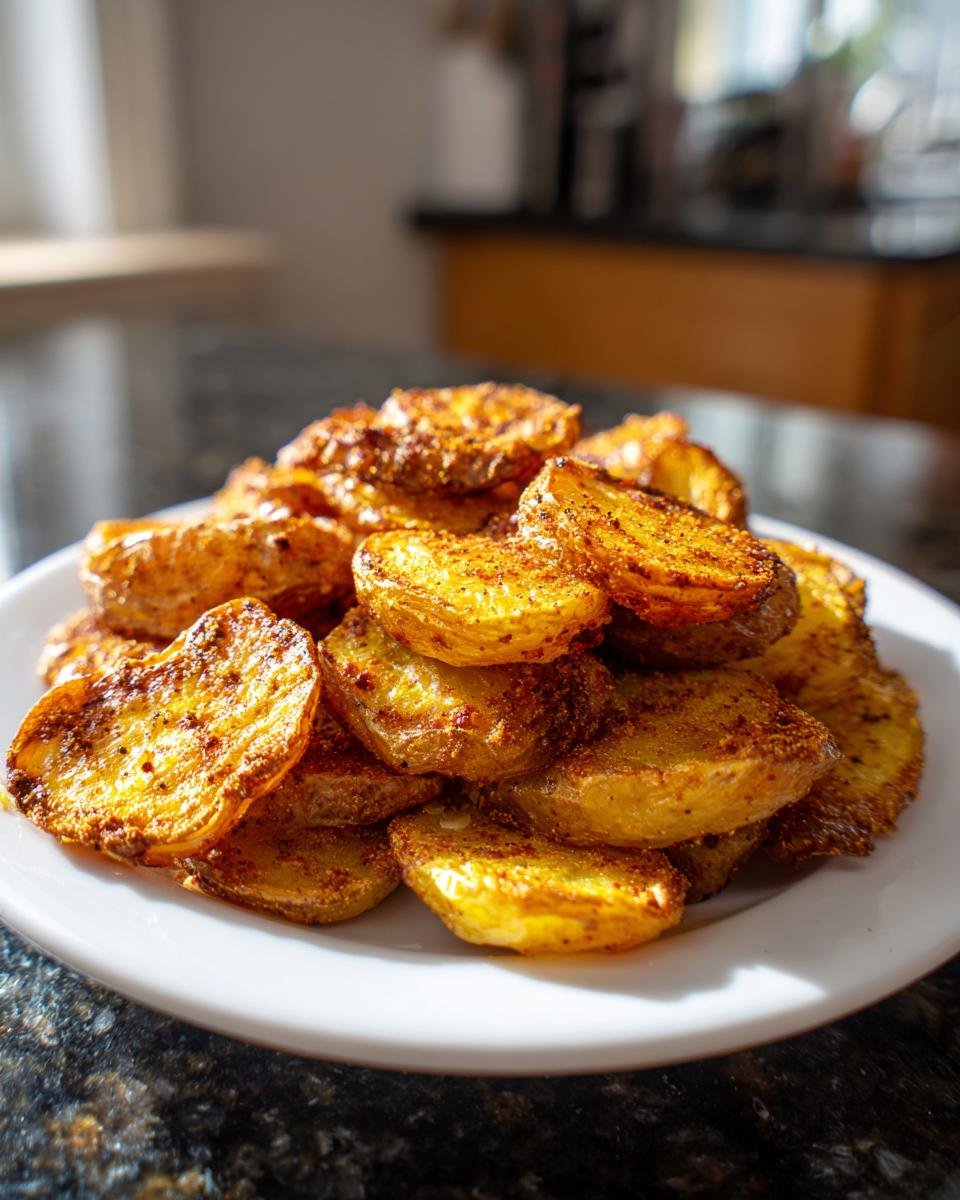
I’m going to let you in on a secret: I used to think crispy roasted potatoes were impossible to master at home. They always ended up soggy or completely scorched, never hitting that sweet spot. Then I cracked the code! I finally perfected the ultimate Crispy Smashed Fingerling Potatoes, and trust me, they are the only side dish you’ll ever need.
The magic is all in the *smash*—you have to flatten them just right so you get a creamy inside and shatteringly crisp edges. My first attempt was a disaster; I pressed too hard and they just blended into a messy pile. But now? Every time I pull these beauties out of the oven, smelling of garlic and paprika, the house fills up. They are truly perfect for practically anything.

Why You Will Love These Smashed Fingerling Potatoes
Honestly, what’s not to love about a side dish that requires minimal hands-on time and delivers maximum flavor payoff? These potatoes are my go-to for weeknights and big holidays because they just work every single time. Forget fussy roasting methods!
Here are the top reasons you need to stop reading and start boiling potatoes right now:
- The Texture Contrast is Outrageous: You get that thin, papery crispness on the outside—you know, the bits that turn dark golden brown—paired with an interior that’s unbelievably soft and fluffy. They practically melt.
- They Are Weeknight Heroes: Seriously, once the potatoes are boiled, the rest is just oil, spices, and bake time. It’s the easiest way to get restaurant-quality texture without needing a deep fryer.
- Fingerlings Are the Best Shape: Because fingerlings are naturally small and elongated, they smash into the perfect size for dipping or scooping. They also hold that seasoning so much better than a big Russet!
- So Versatile, It’s Crazy: Serve them next to a fancy steak, toss them alongside a vegetarian lentil loaf, or just eat them plain standing over the sink (don’t judge me, we all do it). They pair with everything.
Essential Ingredients for Perfect Smashed Fingerling Potatoes
You don’t need a ton of fancy stuff for these, which is why I love them so much! The secret here is really the potato itself. Make sure you grab those little fingerlings—they are worth seeking out. They hold up better to the smash than bigger potatoes do, which keeps them from turning to mush!
Here’s exactly what you’ll need to gather up before we start boiling. Don’t think about skipping the garlic powder; it really helps build that savory crust!
- 1.5 pounds of good, firm fingerling potatoes (just give them a wash, no need to peel!).
- 3 tablespoons of nice olive oil.
- 1 teaspoon of salt (I usually use kosher salt here).
- Half a teaspoon of freshly cracked black pepper.
- Half a teaspoon of garlic powder.
- A quarter teaspoon of sweet paprika for color and warmth.
Equipment Needed for Making Smashed Fingerling Potatoes
You don’t need any high-tech gear for these babies, which is another big plus when you’re trying to get dinner on the table fast. Having the right tools makes the difference between a perfectly flattened potato and a sad, mushy lump, so let’s make sure you have these basics ready!
I always pull these items out right before I start boiling the water. It helps keep my workflow smooth. You need something to boil them in, something to bake them on, and the crucial smashing tool.
- A large pot for boiling those fingerlings until they are just right.
- A standard baking sheet. Don’t use a flimsy one; you need something sturdy so the potatoes crisp up evenly.
- Parchment paper is an absolute must! Trust me, it saves you a world of cleanup later when the oil starts sizzling.
- The smashing tool! I prefer the bottom of a heavy glass—it gives a better, wider smash. If you don’t have a glass handy, that potato masher you usually save for mashed potatoes will work, but just be gentle!
- A small bowl for mixing up our awesome spice blend.
Step-by-Step Instructions for Crispy Smashed Fingerling Potatoes
Okay, this sounds like a multi-step process, but truly, it’s straightforward once you get the rhythm down. The key here is patience during the boiling stage and radical delicacy during the smashing stage. Remember, we aren’t aiming for baby food; we want fully cooked potatoes ready to embrace that crispiness! I always preheat the oven while the potatoes are boiling to save a few minutes. If you want to dig deeper into baking science in general, check out my guide on baking tips to make you a better baker.
Boiling the Fingerling Potatoes Until Tender
First thing’s first: get a big pot of water going. Toss in a good pinch of salt—it should taste a little like the sea, not just plain water. Drop in your washed fingerlings and bring that water to a rolling boil. You want them tender, but not falling apart! This usually takes about 15 to 20 minutes. Test one with a fork; if it slides in without resistance, they are ready. Drain them *really* well—we don’t want extra water hanging around to steam the potatoes later.
The Art of Smashing Your Smashed Fingerling Potatoes
Lay the slightly cooled, drained potatoes onto your parchment-lined baking sheet. Now, for the fun part! Grab the bottom of a sturdy glass (the wider base works better) or your potato masher. You press down *gently* right in the center of each potato. Don’t push until they are flat as pita bread! We are looking for them to flatten out into a rustic disc, maybe half an inch thick, but they absolutely must stay mostly intact at the edges. You want structure there to catch all those beautiful crispy bits.

Seasoning and Achieving Maximum Crispiness in Smashed Fingerling Potatoes
Once they are smashed, drizzle everything liberally with that olive oil. Take your salt, pepper, garlic powder, and paprika blend and sprinkle it evenly over the surface of every flattened potato. Make sure they are well coated! Pop them into your preheated 400°F oven for about 20 to 25 minutes. If you are feeling extra bold and want maximum crunch, pull them out for the final minute or two and turn on the broiler. Watch them constantly, though! Broilers are sneaky and will burn things faster than you can say “delicious!”
Tips for Making the Best Smashed Fingerling Potatoes
I’ve made these so many times now that I know all the little tricks that take these from good to absolutely legendary. It’s usually the fine details that separate a decent side dish from the one everyone asks for the recipe for! Don’t skip these suggestions; they really matter for that perfect shatter-crisp texture we are chasing.
The Importance of Letting Them Cool Slightly
This might seem minor, but don’t rush straight from the boiling water to the smashing! If the potatoes are piping hot, they steam themselves to mush the second you touch them, and all that steam ruins the chance of getting crispy edges. Let them sit on the draining rack or the baking sheet for a good five or ten minutes. They should still be warm enough that you can barely handle them, but cool enough that you aren’t burning your fingertips. That slight cooling firms up the starches just enough to support the smash.
Temperature Control is Your Secret Weapon
When it comes to roasting potatoes, temperature is everything. Your oven needs to be humming along at a solid 400°F, no cheating! If the heat isn’t high enough, the oil just soaks into the potato instead of immediately starting to sizzle around the edges, and you end up with greasy, rubbery potatoes. Make sure your oven is fully preheated before those babies even think about going in. Seriously, give it an extra five minutes after the oven tells you it’s ready.
Don’t Go Too Thin on the Smash
I mentioned this before, but I have to hit it again because it’s where most people go wrong. If you flatten your Smashed Fingerling Potatoes until they look like tortilla chips, they burn on the edges before the center is even warm, or they turn totally brittle. We want texture variation! You’re aiming for about half an inch thick, maybe a little thicker in the middle. You need volume left so you get that creamy interior. A good, heavy glass helps distribute the pressure evenly without totally obliterating the structure.
How to Choose the Right Potato Size
While the recipe calls for fingerlings, if you can only find slightly larger ones, that’s okay! Just know that you might need to shorten your boiling time slightly, or cut the larger ones in half before boiling so they cook evenly. Consistency is key when you’re cooking a sheet pan full of things. If you have one giant potato next to five tiny ones, the giant one will come out raw while the tiny ones turn to dust. Find ones that are relatively similar in size before you start!
Smashed Fingerling Potatoes: Ingredient Substitutions and Notes
We all have those nights where the pantry looks a little sad, or maybe you just can’t find those perfect little fingerlings at the store. Don’t panic! This recipe is pretty flexible, but we do need to talk about the swaps so you maintain that ultimate crispy-fluffy texture.
First up, those dried herbs mentioned in the notes? Absolutely! If you don’t have garlic powder on hand, toss in about half a teaspoon of dried rosemary or thyme instead. Rosemary, especially, plays so nicely with potatoes and olive oil, giving it a wonderful, rustic smell while baking. Just make sure whatever dried herb you use is fresh enough to still have some punch!
Swapping Out Fingerling Potatoes
Fingerlings are my favorite because they are naturally small and sturdy, meaning they handle the boil and smash beautifully. But what if you only have Yukon Golds or maybe even small Red Potatoes? You can totally make it work!
If you use larger Yukon Golds, you need to be more careful when boiling. They take longer, so check them frequently. More importantly, you’ll need to cut them down to about a 1.5-inch chunk before boiling. If you smash a whole large potato, you end up with way too much soft interior and not enough crispy surface area relative to the size. Smaller, uniform pieces are always your friend here.
Oil Substitutions—And Why Olive Oil is Best
I swear by olive oil for this recipe because it has a lower smoke point than some high-heat oils, which helps it brown everything delicately before it burns black. But butter is a no-go here unless you clarify it first; the milk solids will burn up fast at 400°F.
If you simply don’t like olive oil, use avocado oil! It’s got a high smoke point and a neutral flavor. If you’re already in the mood to swap out basic pantry items, I wrote a whole piece on make buttermilk substitutions, which is great for baking, but you can apply that thinking here—if you swap an oil, think about what flavor profile you want!
Adjusting Heat and Spice Levels
That paprika is just for color, but if you want a kick, you can swap the sweet paprika for smoked paprika or even add a tiny pinch of cayenne pepper to your seasoning mix. Just taste that spice blend before you sprinkle it on. If you want to use fresh herbs like parsley or chives, save those for garnish *after* they come out of the oven. Fresh, delicate herbs burn right up in high heat roasting, and we want that green pop on the end!
Serving Suggestions for Smashed Fingerling Potatoes
Part of the problem with perfect side dishes is figuring out what to serve them with! These Smashed Fingerling Potatoes are so much more exciting than plain baked potatoes, so you can totally get away with serving them alongside almost anything. They soak up sauces like little sponges, which is why they need a protein that has some good flavor or jus!
Seriously, these roast up so beautifully golden brown that they deserve a spot right next to your main event. Here are my top three ways I usually end up eating these throughout the week:
The Perfect Steakhouse Partner
If you are making a nice steak—maybe a grilled ribeye or a simple pan-seared sirloin—you need something with texture. Skip the mashed potatoes this time! These smashed fingerlings are hardy enough to stand up to those big, savory steak flavors. If you are looking for a seriously amazing dry rub for that steak, I have a fantastic one you might want to check out my fave steak seasoning dry rub. The smoky, peppery crust on the steak pairs perfectly with the garlic and paprika on the potatoes!
Roast Chicken Companion
You cannot beat a classic roast chicken, right? The chicken skin gets that amazing crispness, and then you have these potatoes underneath, soaking up all those incredible pan drippings—the chicken fat, the onion juices, maybe some herbs you tossed in the roasting pan. It’s like making instant, ridiculously flavorful pan gravy without the extra work. Just make sure you toss the potatoes into the roasting pan for the last 15 minutes of cooking if you want them to truly absorb all that roasted goodness.
Elevated Vegetarian Dinner
If you’re keeping it meat-free, these smashed potatoes are just as happy making a vegetarian meal feel special. They are hearty enough to stand in for grains or rice. They are wonderful served next to thick slices of roasted halloumi cheese or some deeply caramelized roasted carrots and mushrooms. They bring all the satisfying starchiness without feeling heavy. Plus, you can load them up with sour cream, fresh chives, and bacon bits (if you swing that way) and call it a meal!
Storage and Reheating Smashed Fingerling Potatoes
Okay, so you made a huge batch (because you know you shouldn’t try to half this recipe—who gets perfect results then?), and now you have leftovers! That’s great news, because these Smashed Fingerling Potatoes are actually fantastic the next day, provided you know how to treat them right when reheating. The biggest enemy of crispy leftovers is the microwave, so we are banning that appliance from this procedure immediately!
If stored correctly, these potatoes will keep well for a few days. I usually find they are best eaten within three days, maximum. You need to make sure they are completely cooled before you store them, too. If you seal up hot, steamy potatoes in a container, they’ll essentially steam themselves, wiping out all that hard-earned crispiness we worked for.
Storing Your Crispy Potatoes Properly
Once the potatoes have reached room temperature—seriously, let them sit out for an hour or so—transfer them to an airtight container. Here’s the critical part: I try not to stack them too tightly. If you have a shallow container, lay a paper towel down first, add a single layer of potatoes, then another paper towel on top before the next layer. This helps absorb any residual moisture that might try to creep in overnight.
Do *not* try to reheat a giant pile of them at once if you want them to crisp up again. If you try to reheat too many at once, the moisture gets trapped in the middle of the pile, and you’re back to square one. They are best reheated in small batches so that every potato gets direct contact with the hot, dry air.
Bringing Back That Golden Crunch
If you own an air fryer, you’ve hit the jackpot here. The air fryer is your absolute best friend for reviving these because it mimics deep frying without the oil mess. Pop your small batch of cooled, leftover Smashed Fingerling Potatoes in the air fryer basket (don’t overcrowd it!) and cook at about 375°F for 5 to 7 minutes. They come out looking and tasting almost freshly baked. If you’re interested in exploring more air frying magic, I’ve got a great guide on air fryer garlic herb yucca fries recipe that will give you heaps of ideas.
If you don’t have an air fryer, the oven is still a fantastic backup. Preheat your oven back up to 400°F. Spread the potatoes out on your baking sheet again (line it if you want, but it’s not strictly necessary), and bake them for about 8 to 10 minutes. Since they are already cooked, you’re just heating them through and drying out the surface layers again. You might even turn the broiler on for the last 60 seconds, but watch them like a hawk because that extra paprika we put on there can go from golden to black pretty fast when broiling!
Frequently Asked Questions About Smashed Fingerling Potatoes
I always get questions when people try this recipe for the first time, and that just tells me how many of you are trying to master that perfect crispy surface! Here are some of the top things people ask about these super satisfying smashed potatoes, especially if you are deviating from the classic recipe.
Can I use sweet potatoes instead of fingerlings?
You totally can, but you have to be way more careful! Sweet potatoes are naturally much softer and have more sugar, so they caramelize—and then burn—much faster than regular white or yellow potatoes. If you swap them in, boil them for just about 10 to 12 minutes instead of the full 15 to 20. We need them just barely tender. Also, you need to reduce the baking temperature slightly, maybe down to 375°F, or keep it at 400°F but check them after just 15 minutes. You won’t get that classic fluffy interior quite the same way, but they will still be delicious and wonderfully sweet!
What is the best oil to use for the maximum crispiness?
I insist on good quality olive oil because it adds such a great flavor profile that complements the paprika and garlic powder perfectly. However, if you are worried about the smoke point—especially if you plan on using the optional broiler trick—then avocado oil is your next best bet. It has a very high smoke point and a totally neutral flavor, meaning it lets the spices shine through without interfering. Whatever oil you choose, make sure you use enough of it—don’t skimp! The oil is what turns the smashed surface golden brown, not the heat alone.
Can I make these ahead of time?
Yes, you absolutely can prepare these ahead of time, which is a lifesaver when you’re hosting! The trick here is to complete Step 1 and Step 2, which means you boil and gently smash fingerling potatoes, oil them, and season them. Then, cover the baking sheet tightly and stick them in the fridge for up to 24 hours. When you are ready to eat, just preheat your oven to 400°F and bake them straight from the fridge. You might need to add about 5 to 8 extra minutes onto the baking time since they start out cold. Just make sure you don’t let them sit smashed on the counter for long, or they’ll start drying out!
Why are my potatoes turning out soggy instead of crispy?
Nine times out of ten, sogginess comes down to one of two things: either you didn’t drain the boiling water off thoroughly enough, or you crowded the baking sheet. If the potatoes are sitting too close together, the steam they release during baking gets trapped between them, and they end up steaming instead of roasting. Make sure you give them plenty of space on that sheet. Every potato needs its own patch of parchment paper to truly crisp up nicely!
Estimated Nutritional Information for Smashed Fingerling Potatoes
I always feel a little funny talking about nutrition when the food is this delicious, but knowledge is power, right? You deserve to know what you’re putting into your body when you enjoy these Crispy Smashed Fingerling Potatoes. Since these are made with simple, whole ingredients—potatoes, olive oil, and spices—they come out surprisingly reasonable for a satisfying side dish!
Remember, these numbers are just averages. I’ve based the calculations on the ingredients called for in the main recipe. If you double the olive oil because you like them extra rich (and I totally get it if you do!), the fat content will go up! So take this as a good guideline rather than a hard fact.
Here is the approximate breakdown per serving (assuming the recipe yields 4 generous servings):
- Serving Size: 1 serving
- Calories: Around 250
- Fat: About 10g (with 1.5g being saturated fat)
- Carbohydrates: Roughly 38g
- Fiber: A solid 4g! That’s great for a potato dish.
- Protein: 5g
- Sugar: Very low, only about 1g.
- Sodium: Calculated at about 450mg. Remember to adjust this based on how much salt you personally use when boiling and seasoning!
- Cholesterol: Zero, which is fantastic for a vegetarian dish.
Quick Note on Accuracy: I like to be upfront—this is an estimate based on the averages of the ingredients I used. This isn’t a guarantee based on lab testing, so if you are counting macros strictly for medical reasons, you might want to adjust the oil downward slightly. But for everyone else just trying to eat good, honest food? These numbers look great for such a satisfying snack!
Share Your Crispy Success!
Now that you’ve successfully created the crispiest batch of smashed fingerling potatoes known to humankind, I absolutely need to hear about it! Seriously, nothing makes me happier than knowing my treasured techniques have made it into your kitchen and resulted in crispy perfection on your table.
Did you try leaving them smashed a little thicker? Did you add a pinch of cayenne pepper? Or maybe you stuck them near that steak I mentioned earlier? Don’t be shy! Drop a comment below and let me know how they turned out for you. I read every single one, and your feedback helps me keep testing and refining recipes for everyone.
If you loved this recipe, please take a quick second to leave a star rating right at the top of the page. It truly helps other home cooks find these delicious secrets!
If you have any lingering questions that I didn’t cover above, or maybe you need to get in touch about something else, you can always reach out via my direct contact form over at contact. Happy smashing, and enjoy those crunchy edges!
Print
Smashed Fingerling Potatoes
- Total Time: 45 min
- Yield: 4 servings 1x
- Diet: Vegetarian
Description
Crispy smashed fingerling potatoes seasoned and baked until golden brown.
Ingredients
- 1.5 lb fingerling potatoes
- 3 tbsp olive oil
- 1 tsp salt
- 0.5 tsp black pepper
- 0.5 tsp garlic powder
- 0.25 tsp paprika
Instructions
- Preheat your oven to 400 degrees Fahrenheit (200 degrees Celsius).
- Place the fingerling potatoes in a large pot and cover them with cold, salted water.
- Bring the water to a boil and cook the potatoes until they are tender when pierced with a fork, about 15 to 20 minutes.
- Drain the potatoes well and let them cool slightly until you can handle them.
- Place the boiled potatoes on a baking sheet lined with parchment paper.
- Use the bottom of a glass or a potato masher to gently smash each potato until it is flattened but still mostly intact.
- Drizzle the smashed potatoes with olive oil.
- In a small bowl, mix together the salt, pepper, garlic powder, and paprika.
- Sprinkle the seasoning mixture evenly over the potatoes.
- Bake for 20 to 25 minutes, or until the edges are crispy and golden brown.
- Serve immediately.
Notes
- For extra crispiness, you can broil them for the last 1 to 2 minutes, watching carefully to prevent burning.
- You can substitute dried herbs like rosemary or thyme for the garlic powder if you prefer.
- Prep Time: 10 min
- Cook Time: 35 min
- Category: Side Dish
- Method: Baking
- Cuisine: American
Nutrition
- Serving Size: 1 serving
- Calories: 250
- Sugar: 1
- Sodium: 450
- Fat: 10
- Saturated Fat: 1.5
- Unsaturated Fat: 8.5
- Trans Fat: 0
- Carbohydrates: 38
- Fiber: 4
- Protein: 5
- Cholesterol: 0
Keywords: smashed potatoes, fingerling potatoes, roasted potatoes, crispy potatoes, side dish