
Oh my gosh, you HAVE to make these this year! I swear, the second these little guys appear, everyone stops chatting because they are just too cute. We made a huge batch last year for a neighbor potluck, and they disappeared before the punch bowl was half empty! Forget complicated cookies; these are the easiest, cutest themed treats around. Seriously, get ready for the joy that comes with making my recipe for Delightful Grinch Cake Pops For Your Holiday Parties!
Why You Will Love These Delightful Grinch Cake Pops For Your Holiday Parties
When the holidays hit, who has time for fussy baking that takes all day? That’s why I adore these cake pops. They bring massive visual impact with minimal fuss, and honestly, the kids (and adults!) absolutely light up when they see the grumpy green face. I love having these ready to go when unexpected guests pop by!

They just scream holiday fun, and if you want to brush up on your dipping skills, check out some of my general baking advice here baking tips to make you a better baker. Trust me, once you get the candy melt consistency right, you’re golden.
Quick Assembly and Festive Fun
Once the cake base is mixed and chilled—which is the longest part, really—the decorating flies by! You can get the dipping done surprisingly fast once you have your assembly line set up. It’s truly the best part of making them, peeling off that plastic wrap and getting those sticks ready for dipping.
Perfectly Portioned Holiday Treats
Cake pops are genius for parties because they are entirely self-contained. No messy slices, no serving utensils needed! Everyone can just grab one, socialize, and enjoy their perfectly sized little dose of holiday cheer. They make cleanup so much easier, which is a major win during Christmas rush!
Essential Ingredients for Delightful Grinch Cake Pops For Your Holiday Parties
Okay, getting the right stuff is non-negotiable here, but the list is deceptively simple! We’re relying on box mixes and store-bought frosting for speed, which is my little secret for keeping the prep time down. You simply cannot achieve this speed without the right coatings, though. The magic totally relies on those candy melts!
For the base, you’ll need one standard box of your favorite cake mix—I usually stick to vanilla or chocolate, whatever looks good that week—and one full tub of matching frosting. That ratio of cake crumb to frosting is key for getting that perfect, moldable dough. If you ever need help whipping up homemade frosting, I have a great little guide here on how to make white frosting easy, but for these, the tub method saves the day.
Now for the colors! You need 2 cups of white candy melts for the boot/mouth area, 1 cup of bright green for the face, and just a little bit of red for that tiny hat brim detail. Don’t forget the yellow melts for the eyes before we add the pupils. About 1/4 cup of vegetable oil is essential; we use that to thin down the thick coating so everything dips beautifully without tearing the cake ball apart. Lastly, grab your lollipop sticks and a tiny bit of black food coloring gel for those signature grumpy pupils!
Step-by-Step Instructions for Delightful Grinch Cake Pops For Your Holiday Parties
This is where the magic happens, but remember, patience is key, especially with chilling! We want structural integrity against that warm candy coating. If you want to read up on the science of good baking structures before we start coating, I’ve got some great info here on baking tips to make you a better baker.
Preparing the Cake Base and Rolling
First, bake that cake mix totally according to the box—don’t get fancy now! Once it’s completely cool, you need to crumble it up really fine into a giant bowl. Next, add the entire tub of frosting. Use your hands or a sturdy spatula and just mix, mix, mix! You’re aiming for something that feels exactly like thick, slightly sticky playdough. Once it holds together when you squeeze a bit, you’re ready to roll! Scoop out about one inch in diameter for each pop. These little balls need to be uniform so they look cohesive later.
Chilling and Dipping the White Base
This step is absolutely crucial! Before you even think about melting the coating, stick those rolled balls onto a parchment-lined tray with the sticks inserted firmly at the bottom, and chill them in the fridge for at least half an hour. They must be cold! Melt your white candy melts with just a tiny splash of oil (about a tablespoon) until smooth. Dip the bottom half of each chilled pop into the white coating, let the excess drip off gently, and lay them back down. Don’t cover the top half—that’s where the green is going!
Creating the Grinch Face with Green Melts
Once the white base is set, melt your green candy melts with another splash of oil. Now, hold the stick and dip the remaining exposed cake portion into the green, being careful to leave a small strip of white visible at the bottom, like a little white collar or mouth opening. Let this layer set up fully before moving on—don’t rush this!
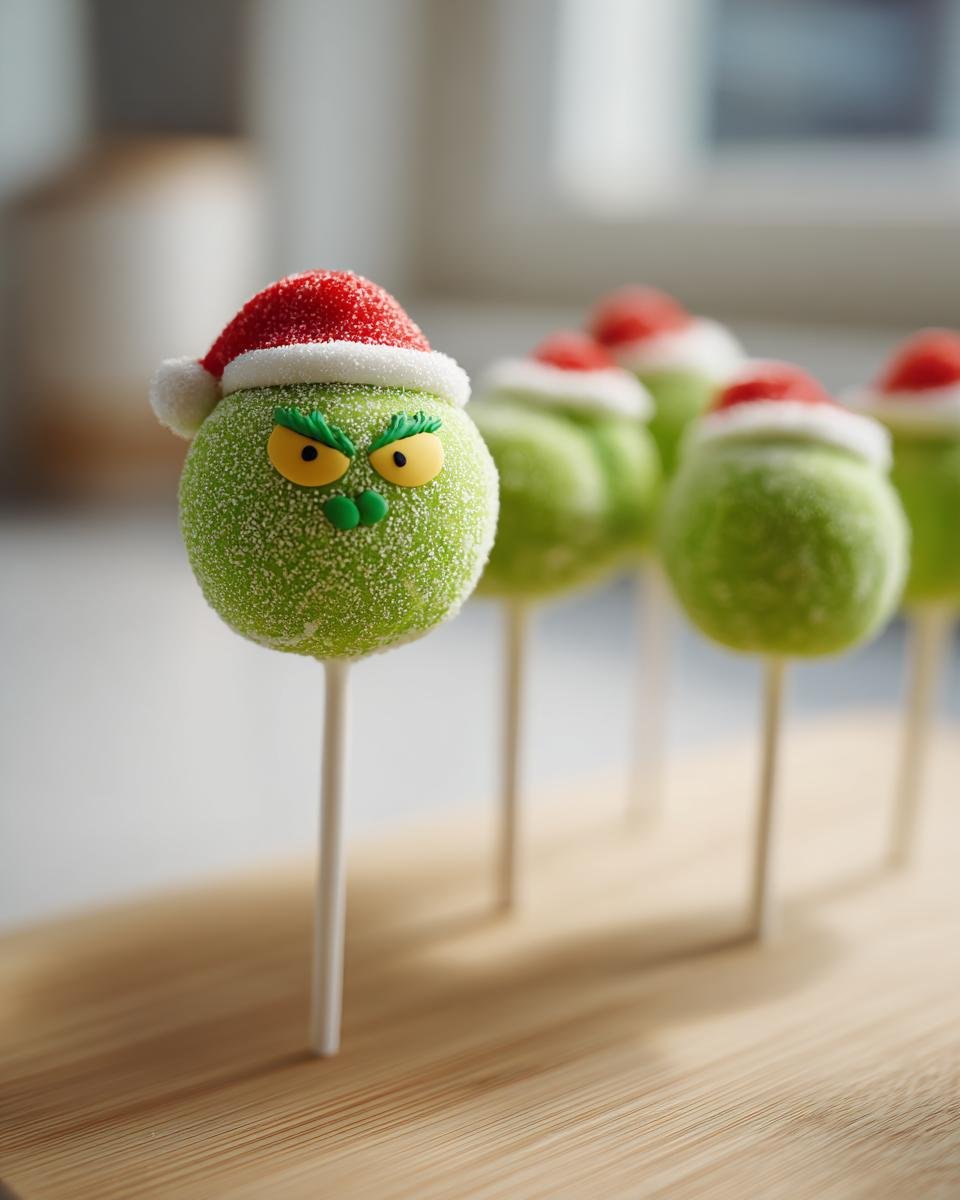
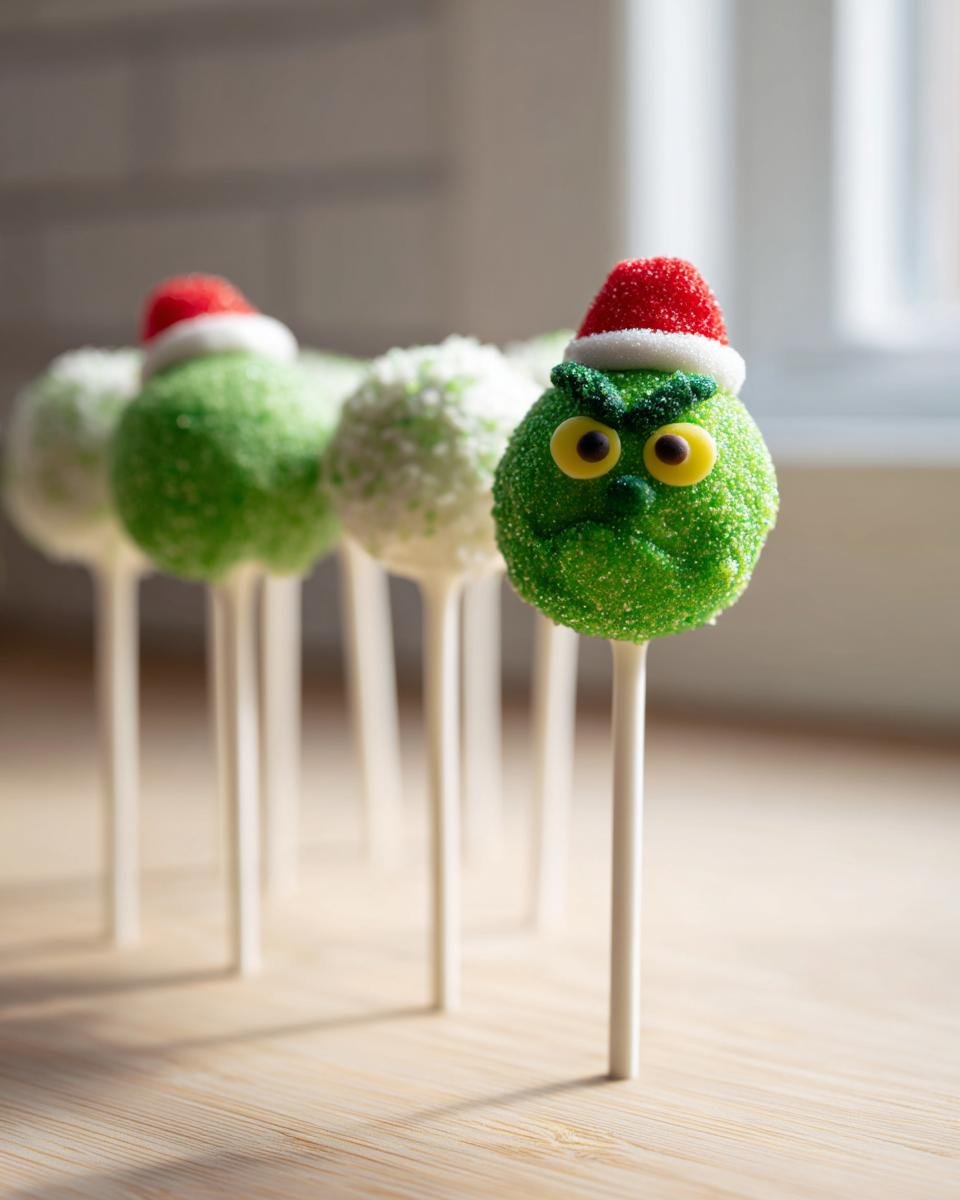
Adding the Festive Details: Hat Brim, Eyes, and Pupils
Time for precision! Melt your red candy melts with your last splash of oil. Using a tiny spoon or even the very tip of a piping bag, carefully drizzle thin, curved lines of red right across the top edge of the green section—that’s the hat brim! Next, melt your yellow melts. You need a toothpick for this part; dip the very tip in the yellow and place two small dots where you want the eyes. Finally, the final touch: mix a drop of black food coloring gel with a tiny bit of oil, and use a sharpened toothpick to dot those perfectly small, grumpy pupils right in the center of the yellow!
Tips for Perfect Delightful Grinch Cake Pops For Your Holiday Parties
Even though these are pretty straightforward, let’s talk about getting that coating smooth. A thick, clumpy coating ruins the whole cute effect! If your candy melts start looking stiff or refusing to flow nicely off the pop, don’t panic! That little bit of vegetable oil or even some vegetable shortening we added makes a world of difference. If they’re still too thick for your liking, stir in another half-teaspoon of oil until it flows like slow-moving honey. You seriously want that perfect drape!
Temperature control during the dipping phase is everything, and this is where I think a lot of folks go wrong. If your chilled cake balls are too cold, the warm coating hits them, seizes up, and you get a bumpy, ugly texture, or worse, the coating cracks when it sets! If you want to see more on how temperature affects ingredients, I talk a bit about that in my general baking tips to make you a better baker guide.
My trick for keeping things steady? I set up my dipping station right next to the fridge. I only take out about six cake pops at a time. I dip those six, tap off the excess, set them back on the parchment paper to set, and then rush the next six out of the cold. It keeps the coating pliable and prevents the cake balls from warming up too much before they get coated. This batch work method keeps everything neat!
Also, for those teeny-tiny yellow eyes? Don’t try to pipe them immediately after you do the red brim! Make sure the red is fully dry and firm. If you try to rush the eyes while the red is still soft, the heat from your toothpick is going to drag trails through the red, and then your Grinch just looks messy instead of marvelous. Let everything breathe between color changes!
Variations on Your Delightful Grinch Cake Pops For Your Holiday Parties
While the classic green, white, and red scheme is truly Grinch royalty, sometimes I like to shake things up just a tiny bit depending on the crowd! You can keep the theme strong but play with the interior flavor profile. This keeps everyone guessing!
Since we are using a basic cake mix, switching flavors is so easy! Forget plain vanilla; try using a chocolate cake base. Seeing that dark cake peeking out under the white coating definitely gives a funny contrast, almost like a shadow under his big white collar. Or, if you love spice during winter, try using a gingerbread or even a chocolate peppermint cake mix! If you’re curious about mixing chocolate flavors, I’ve got a fun read on making chocolate and candy cane cake that gives you some ideas for winter flavors.
For the green part—the face—you absolutely have to try adding some sparkle. Once the green coating is melted but before you dip, stir in just a pinch of edible green glitter or some tiny green nonpareils. It catches the light perfectly, making his face look textured and extra magical. You don’t need much, just enough so it sparkles when the party lights hit it!
Another fun swap is for the hat brim! Instead of using plain red melts, melt the red with a couple of crushed peppermint candies. It gives the brim this fantastic crunchy texture and a little minty zing that complements the main cake flavor so well. It just elevates the whole look without taking away from that iconic Grinch silhouette. See? Easy party upgrades!
Serving Suggestions for Your Delightful Grinch Cake Pops For Your Holiday Parties
Presentation is EVERYTHING for these little guys! You don’t want to hide all that hard work in a utilitarian Tupperware container, trust me. They deserve to be upfront and center where everyone can admire their perfectly grumpy little faces.
My favorite way to serve them is standing straight up! You can buy tiered cake pop stands online—they look like little white trees or modern wire circles—which turns your dessert table into a miniature visual feast. If you don’t have a fancy stand, grab a large, sturdy pineapple or even a block of floral foam wrapped tightly in festive foil or red felt. Just poke the sticks right into the base, and they stand tall and proud, ready for grabbing!
I always like to place a few extra green M&Ms or maybe some red and white sprinkles around the base of the stand for color. It looks intentional and pulls the whole theme together. And since these are sweeter treats, they pair beautifully with something warm and cozy for the adults. Last year, I served mine alongside my recipe for cozy hot buttered rum, and honestly, the spiced rum complemented the sweetness of the cake perfectly. It just felt like the holidays!
Keep them slightly cool right up until serving time, but make sure they are on display where people can see them. They are the first thing people comment on, every single time!
Storage and Make-Ahead Tips for Delightful Grinch Cake Pops For Your Holiday Parties
The best part about these cake pops is that you absolutely do not have to make them the day of the party! Planning ahead is crucial during the holidays, and these are perfect candidates for making early. Doing the prep work beforehand means less stress when it’s time to decorate the rest of the house.
If you’ve finished the whole process—cake base rolled, sticks inserted, and fully coated—you want to get them stored as soon as that candy coating is rock hard. The coating acts like a seal, keeping the cake part fresh, but temperature matters for the coating itself.
Keeping Them Fresh at Room Temperature
If your party is only one or two days away, you can keep them out on the counter, provided your house isn’t ridiculously warm! Make sure they are in a container where they won’t get bumped around, and definitely keep them away from direct sunlight. Room temperature storage is fine for about 48 hours. Honestly, if you used oil to thin your melts, they tend to stay a little softer and taste fresher than when they are bone-chillingly cold.
When to Use the Refrigerator
If you need them to last closer to a week, or if your kitchen is already warm from all the Christmas baking, pop them in the fridge. But, and this is important, ALWAYS store them in a partially airtight container. If you seal them too tightly, the moisture difference between the cold fridge and the warm room later can cause condensation, which makes the candy melt coating look dull or even weep.
When you pull them out before the party, give them at least an hour out on the counter. Trying to serve them straight from the fridge makes the cake inside dense and the coating brittle. We want them slightly softer for that perfect bite!
Freezing Your Grinch Cake Pops
Yes, you can totally freeze these! This is my go-to trick for saving time. The key here is protecting the cute decorations. Once the coating is totally firm, place the pops on a baking sheet lined with parchment paper, leaving a little space between each one. Pop that sheet into the freezer for about an hour until they are solid little frozen pops.
Once frozen solid, you can transfer them into a heavy-duty zip-top freezer bag. I always wrap the bag securely in a layer of plastic wrap first—double protection against freezer burn. They last great for up to three weeks this way! Just plan ahead: defrost them in the refrigerator overnight before you plan to serve them, and let them come to room temperature for an hour before the guests arrive. They’ll look and taste just as fresh as the day you decorated them!
Frequently Asked Questions About Making Grinch Cake Pops
I get so many messages asking quick questions once people start diving into this recipe, so I figured it’s easier just to put all the most common little sticking points right here. Don’t worry if you have questions—every baker does when trying a new themed treat!
Can I use chocolate chips instead of candy melts for these Delightful Grinch Cake Pops?
You totally can, but you’re going to get a different result, so you have to know what you’re signing up for! The recipe notes mention this, but candy melts are designed to be super fluid and dry hard without much fuss. If you use regular chocolate chips, you’ll need to thin them down a lot more, usually with shortening or cocoa butter, because standard chocolate gets really thick fast. Plus, they lose that super vibrant color pop of green and red that makes these cakes look so festive! If you do use chocolate, be sure to check out my general baking tips to make you a better baker post because temperature management with real chocolate is way trickier.
What is the best way to get the candy coating smooth for my Grinch Cake Pops?
Smooth coating is the key to making those features look sharp, right? If it looks chunky or too thick when you dip, it’s going to pull crumbs off your cake ball, and nobody wants that! Make sure you are melting the melts slowly, usually in short 30-second bursts in the microwave, stirring well between each burst. Don’t overheat them! The magic trick we rely on is stirring in a tiny bit of vegetable oil—about a tablespoon for every two cups of melts. That oil loosens everything up, making it flow right off the pop. If you dip and you still see streaks, just stir in another 1/2 teaspoon of oil until it’s streaming off evenly.
How many Delightful Grinch Cake Pops For Your Holiday Parties does this recipe make?
This recipe is built to handle a decent-sized crowd, which is perfect for big holiday gatherings! Based on rolling the dough balls to about one inch each, you should get a yield of approximately 24 pops. That’s two dozen tiny, adorable treats ready to disappear fast! If you’re making these for a huge event, just double up on the cake mix and frosting, and you’ll have plenty!
Nutritional Snapshot of Your Delightful Grinch Cake Pops
Now, I always feel a little nervous sharing nutrition facts because, let’s be real, these are total holiday treats, not salad toppers! We aren’t aiming for low-calorie when we’re making something this festive. But, for those of you who like to keep track, I went ahead and compiled the estimates from the ingredients list.
Remember, these numbers are just based on the standard box mix and tub frosting, so if you swap out for a lighter cake flavor or use a different kind of frosting, these figures will definitely shift. Use these as a general guide, not a hard rule, because life is too short to count calories when you’re eating a Grinch face!
- Serving Size: 1 pop
- Calories: Roughly 180
- Sugar: About 20 grams (Those candy melts add up!)
- Fat: Around 10 grams
- Carbohydrates: Approximately 22 grams
- Protein: 2 grams
The sodium content is low, around 120mg, which is good news. What you’re really getting here is a perfect, bite-sized dose of holiday joy wrapped up in sugary coating. Enjoy them responsibly, and don’t forget that the real festive value is in the smiles they create!
Print
Delightful Grinch Cake Pops
- Total Time: 75 min
- Yield: 24 pops 1x
- Diet: Vegetarian
Description
Simple recipe for making Grinch-themed cake pops perfect for holiday gatherings.
Ingredients
- 1 box (15.25 oz) cake mix (any flavor)
- 1 tub (16 oz) frosting (any flavor)
- 2 cups white candy melts
- 1 cup green candy melts
- 1/2 cup red candy melts
- 1/4 cup vegetable oil
- 1 bag lollipop sticks
- 1/4 cup yellow candy melts (for eyes)
- Black food coloring gel (for pupils)
Instructions
- Bake the cake according to the box directions. Let the cake cool completely.
- Crumble the cooled cake into fine crumbs in a large bowl.
- Mix the frosting into the cake crumbs until a dough forms.
- Roll the dough into small balls, about 1 inch in diameter.
- Insert a lollipop stick into the bottom of each cake ball. Place them on a parchment-lined tray.
- Chill the cake pops in the refrigerator for at least 30 minutes.
- Melt the white candy melts with 1 tablespoon of vegetable oil according to package directions.
- Dip each chilled cake pop into the melted white coating, covering the bottom half. Let the excess drip off. Place back on the tray.
- Melt the green candy melts with 1 tablespoon of vegetable oil.
- Dip the remaining exposed cake pop portion into the melted green coating to create the Grinch face shape. Let set.
- Melt the red candy melts with 1 tablespoon of vegetable oil.
- Use a small spoon or piping bag to drizzle thin lines of red coating across the green section for the hat brim.
- Melt the yellow candy melts with the remaining oil.
- Use a toothpick to place two small dots of yellow coating for the eyes on the green section.
- Use a tiny amount of black food coloring mixed with a drop of oil or clear extract to pipe small pupils onto the yellow dots.
- Allow all coatings to set completely before serving.
Notes
- If the candy melts are too thick, add a small amount of vegetable oil or shortening to thin them.
- You can use melted chocolate chips instead of candy melts if preferred, but the texture will change.
- Keep the cake pops chilled until just before dipping for best results.
- Prep Time: 45 min
- Cook Time: 30 min
- Category: Dessert
- Method: No Bake (Assembly)
- Cuisine: American
Nutrition
- Serving Size: 1 pop
- Calories: 180
- Sugar: 20
- Sodium: 120
- Fat: 10
- Saturated Fat: 5
- Unsaturated Fat: 5
- Trans Fat: 0
- Carbohydrates: 22
- Fiber: 0
- Protein: 2
- Cholesterol: 15
Keywords: Grinch cake pops, holiday treats, Christmas dessert, cake balls, party food