
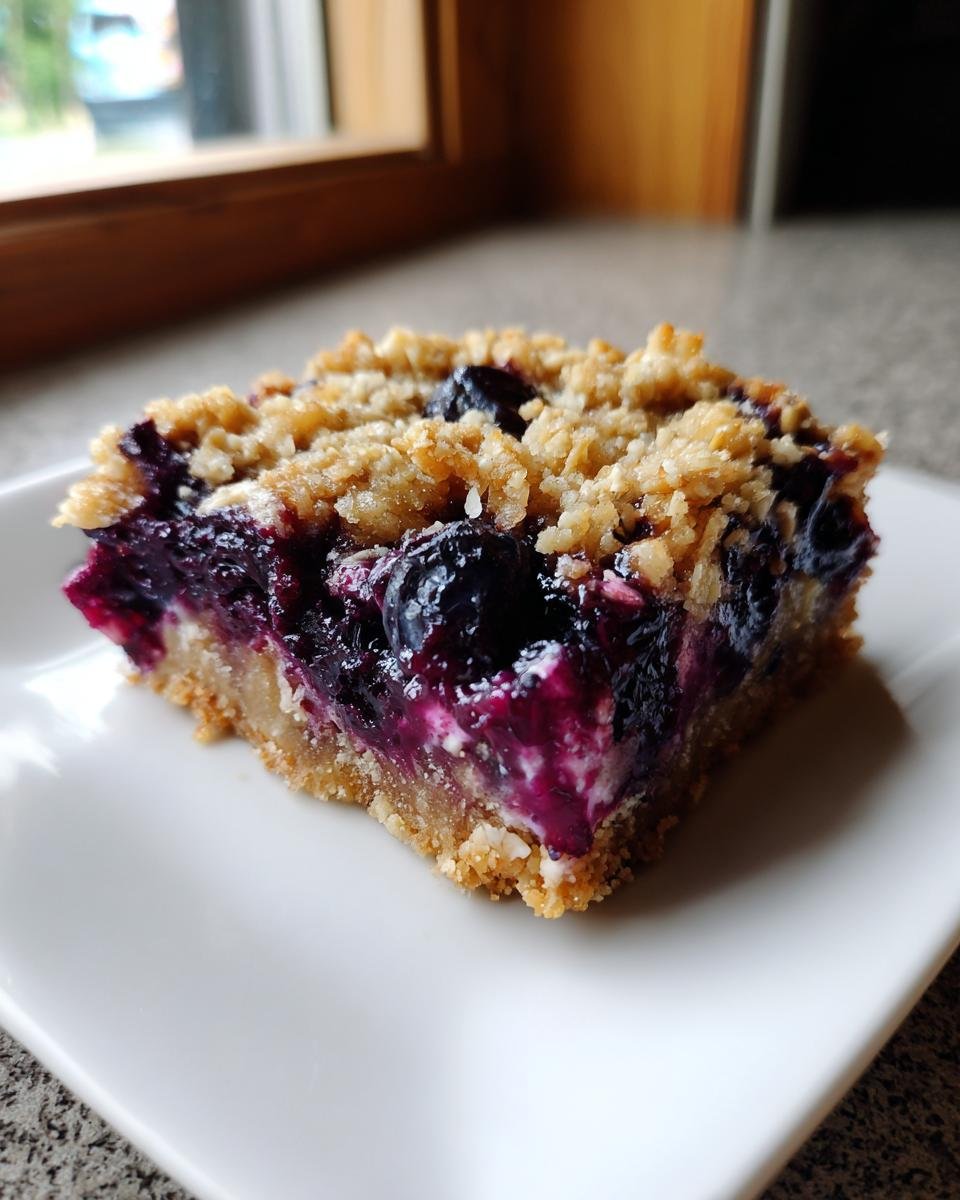
Oh my goodness, if you love that perfect marriage of tart fruit bursting through a sweet, buttery blanket, you are going to obsess over this recipe! These are, without a doubt, the easiest and most satisfying Blueberry Crumble Bars you will ever attempt. I remember the first time I made these—it was a gloomy Tuesday, and I just needed something cozy with that sweet-and-sour zing. Within an hour, my kitchen smelled incredible, and I knew I had found a true keeper. Forget fussy pies!

Why You Will Love These Easy Blueberry Crumble Bars
Seriously, I keep coming back to this recipe because it checks every single box on my baking dream list. You want flavor? You got it. You want easy cleanup? Absolutely! It’s the perfect, satisfying treat without any fussiness. Here’s why you need to make these immediately, trust me:
- The crust and topping are nearly identical, meaning less measuring and mixing! They stay incredibly buttery and tender, never turning hard or crumbly after baking.
- The blueberry filling achieves that magical sweet spot—it’s got that bright, tart punch from the berries balanced perfectly by just enough sugar.
- That jammy filling gets wonderfully bubbly while baking, but thanks to the cornstarch, it sets up beautifully when cool. No soupy messes here!
- Parchment paper handles the cleanup, and the whole thing comes together faster than you can decide what to watch on TV.
- They travel beautifully! Pack these up for picnics or potlucks, and everyone will ask for the recipe.
Gathering Ingredients for Perfect Blueberry Crumble Bars
Okay, this dessert is fantastic because it doesn’t ask for anything weird from the pantry! It’s mostly staples, but the quality of a few things really makes a difference when we talk about those incredible buttermilk substitutes if you get low on cream—though that’s for another day! You need everything ready to go because the mixing part is so fast. We’re splitting this list into two parts: the glorious, buttery stuff for the crust and topping, and the bright, fruity powerhouse for the middle.
Remember, the cold butter is non-negotiable for that crumble texture—don’t swap it for softened, or you’ll get cake, not crumbly bars!
For the Buttery Crust and Crumble Topping
This is what makes the bar structure so amazing. We need the butter to stay chilly so it steams just right in the oven, creating those lovely pockets.
- 1 1/2 cups of all-purpose flour (It forms the backbone!)
- 1/2 cup of rolled oats (These give us that nice chew.)
- 1/2 cup packed brown sugar (Make sure it’s packed tight!)
- 1/4 teaspoon salt (Crucial for balancing the sweetness.)
- 1/2 cup (which is one full stick!) of cold unsalted butter, cut into tiny little pieces.
For the Sweet and Tart Blueberry Filling
This is where the zing comes in. The cornstarch isn’t optional; it grabs all those delicious blueberry juices and turns them into a thick, luscious sauce instead of a puddle.
- 1 1/2 cups of fresh or frozen blueberries (Don’t thaw the frozen ones if you use them!)
- 1/4 cup granulated sugar
- 1 tablespoon cornstarch (Our secret weapon for thickening.)
- 1 teaspoon lemon juice (Just a splash for that extra bright pop.)
Step-by-Step Instructions for Making Blueberry Crumble Bars
The timing here is super important, so having your ingredients ready is half the battle! Once you get the hang of it, this whole process flies by. We are aiming for that perfect contrast of crunchy topping and warm, gooey fruit underneath. Follow these steps exactly, particularly around the cooling part—it’s the hardest step because they smell so good coming out of the oven!
Preparing the Pan and Crust Base for Blueberry Crumble Bars
First things first: turn that oven on to 375 degrees F (190 C). Now, grab that 8×8 inch pan. I always line mine with parchment paper, and here’s the secret: let the paper hang over two sides like little handles. Those handles are your best friends later! In a medium bowl, mix your flour, oats, brown sugar, and salt until everything is buddies.
Next, toss in the cold, cubed butter. You need to cut that in until it looks like coarse sand or tiny peas. I prefer using my fingers for this because I can feel the texture better than with a pastry blender. Once you have those coarse crumbs, press about two-thirds of the mixture firmly and evenly into the bottom of your prepared pan. Nice and compact!
Assembling and Baking Your Blueberry Crumble Bars
Time for the filling! In a separate bowl—don’t mix this with the crumble mixture—gently toss your blueberries with the granulated sugar, cornstarch, and that teaspoon of lemon juice. You want to coat everything without crushing the berries too much. Spread this gorgeous blueberry mixture right over the crust base you just patted down.

Take that last remaining one-third of your crumble mixture and sprinkle it lightly over the top of those blueberries. Like a gentle blanket! Pop it into the oven for 35 to 40 minutes. You’ll know they are done because the topping will be beautifully golden brown, and if you sneak a peek, the filling underneath should be bubbling happily, like a little fruit volcano. For more baking inspiration, check out my simple blueberry cake if you need more fruit inspiration!
Cooling and Cutting the Finished Blueberry Crumble Bars
This is where patience pays off, so try to listen to me on this one! You must, absolutely *must*, let these bars cool completely in the pan on a wire rack. I know, they smell amazing, but if you try to cut them warm, that jammy filling will just ooze out everywhere, and you’ll end up with blueberry mush instead of clean squares.
Once they’ve cooled down—I usually wait a couple of hours, or stick them in the fridge for an hour to speed things up—use those parchment paper handles to lift the entire slab out in one piece. Then, slicing them is ridiculously easy! You get those perfect, neat bars every single time.
Expert Tips for Perfect Blueberry Crumble Bars Every Time
Baking is fun until you pull something out of the oven that looks like a deconstructed mess, right? I’ve been there! If you want these blueberry oat bars to be absolutely perfect—crisp on the edges, buttery crumb, and zero sogginess—you need to pay attention to a few little tricks I picked up over the years. These tips will elevate your simple crumble bars into something truly special.
One rookie mistake people make is fussing too much with the topping. You actually want the topping to look slightly dry and uneven before it goes in. That way, it toasts nicely instead of melting into the fruit!
For more ways to improve your overall baking game, I’ve gathered a lot of my favorite advice in this piece about baking tips to make you a better baker.
Handling Frozen Blueberries Like a Pro
If you’re using frozen berries because that’s what you had on hand—don’t sweat it! The key thing here is that you do not thaw them first. If the berries start to weep juice before they even hit the pan, they’ll make your bottom crust wet. Just toss the frozen berries straight into the sugar and cornstarch mixture. They will thaw out and release their juices perfectly inside the oven, thickening up just as they should.
Subtle Flavor Adjustments in the Dry Mix
While the provided recipe relies on all-purpose flour, I often find that swapping out just half of it for whole wheat flour, like I mentioned in my notes, gives the topping a lovely, slightly nuttier, richer flavor profile. It adds a hint of wholesome depth without changing the texture drastically. It’s a very subtle game-changer!
Avoiding the Soggy Bottom Syndrome
This is my biggest pet peeve: a wet bottom layer! The best way I found to combat this, even more than just using cold butter, is to take a sheet of parchment paper and slightly toast the crust mixture *before* adding the fruit. Just press the bottom two-thirds of the crumb firmly into the pan, bake it empty for about 10 minutes at 350 degrees, let it cool for five minutes, then top with the fruit and the rest of the crumble. It creates a tiny waterproof seal!
Ingredient Substitutions for Blueberry Crumble Bars
Sometimes you open the fridge and realize you’re missing one key thing, or maybe you just want to tweak the flavor profile a bit! That’s totally fine with this recipe because the structure is already so forgiving. Don’t panic if you’re out of blueberries, either; these bars are happy to take on other fruits!
The best part about the crust and crumble topping is that it uses simple pantry staples, so substituting the flour is easy if you want a different texture or just have different flour on hand. I also wanted to remind you that if you ever need a quick substitute for something like buttermilk in another recipe—maybe you want to make a quick glaze topping someday—you can check out some handy tips on buttermilk substitutions!
Swapping Out the Berries
Blueberries are classic, but honestly, this formula works beautifully with almost any firm fruit. If you have raspberries, use them! They give you an even brighter tartness. Blackberries work wonderfully too, though they tend to bleed a bit more color, so expect your crumble topping to have a pinkish hue.

If you want a real flavor explosion, try mixing your berries! A cup of blueberries and a cup of chopped strawberries or even sliced rhubarb would be fantastic. Just make sure that whatever fruit you choose, you still toss it with that little bit of cornstarch and sugar so the filling sets up nicely between the crust layers.
Adjusting the Flour in the Crumble
As I mentioned earlier, I sometimes like to use half all-purpose flour and half whole wheat flour in the dry mixture. It gives the bars a slightly earthier, nuttier flavor and a bit more chew. But if you want to go fully gluten-free, you can usually substitute the all-purpose flour cups for a good quality 1:1 gluten-free baking blend. Just be aware that the texture might be a tiny bit more fragile. Also, if you have oat flour, you can swap out some of the all-purpose flour for oat flour, but keep the rolled oats separate for that texture we love so much!
Don’t Forget the Lemon Juice Trick!
In the filling, that teaspoon of lemon juice is purely for brightening the flavor. If you don’t have lemon juice, a tiny splash of white vinegar or even lime juice will achieve the same goal. It tricks your palate into thinking the berries taste even more vibrant than they already do. It’s a little secret I use in almost all my fruit desserts!
Storage and Reheating for Leftover Blueberry Crumble Bars
Now for the hard part: waiting to eat the leftovers! The good news is that these Blueberry Crumble Bars keep really well, which is great because unless you’re feeding a small army, you usually have some left over. I actually think they taste even better the second day when the fruit filling has completely settled into the crust.
The best way to keep them fresh is totally simple, which is just how I like things. Forget sealing them airtight in the fridge! All that moisture can turn that beautiful crumble topping a little soft overnight. We want to keep that buttery snap!
The Best Way to Keep Your Crumble Bars Fresh
Store your cooled bars tightly covered at room temperature for up to three days. I just place them in the original 8×8 pan, cover the top tightly with plastic wrap, and then slip the whole thing into a larger zip-top bag just to be extra sure. I aim for a cool, dry spot on the counter, not near the stove!
If you absolutely must keep them longer than three days, you can freeze them, which is great for making ahead for holidays! Wrap your squares individually in plastic wrap first, and then tuck those wrapped bars into a freezer-safe container or bag. They are excellent straight from the freezer if you like a colder, chewier bite, kind of like a frozen treat!
A Quick Note on Reheating
If you like them warmed up just a touch—maybe with a scoop of melting vanilla ice cream (oh, that contrast!)—you can reheat them quickly. Pop a single square on a microwave-safe plate for about 10 to 15 seconds. That’s usually enough time to warm the fruit filling back up without turning the crust completely soft.
For the best results, try the oven if you have a bit more time. Wrap the bars loosely in a little foil packet and heat at about 300 degrees F for about 8 minutes. That warms them through while keeping the topping wonderfully crisp. If you love those crumbly edges, you should definitely check out my recipe for caramel crumb bars—they share a similar sturdy structure!
Frequently Asked Questions About Blueberry Crumble Bars
It’s funny how every batch brings up the same fantastic questions! I get it; sometimes the difference between a good batch of oat bars and a *great* one comes down to one tiny technique change. I’ve pulled together the most common things folks ask me about these blueberry babies. Hopefully, this clears everything up so you can bake with total confidence!
Can I use a different type of sugar in the crumble topping?
You sure can! The recipe calls for brown sugar because that molasses content does wonders for keeping the topping tender and adding that rich, caramel-y depth. If you swap it all out for plain granulated sugar, the topping will be slightly crunchier and maybe a little drier—think more like shortbread crumbs. It’s still delicious, but you lose a bit of that luxurious melt-in-your-mouth quality the brown sugar gives it. I suggest keeping at least half brown sugar if you can!
Why are my Blueberry Crumble Bars soggy on the bottom?
Ugh, soggy bottoms are the worst, aren’t they? This almost always comes down to two things: either you didn’t use cold, hard butter for the crust, which means the fat melted right into the flour before it could form those steam pockets; OR, you pulled them out of the oven too soon. If the filling isn’t bubbly and the topping isn’t golden, the bottom hasn’t had time to set. Always stick to that 35 to 40-minute baking time and wait patiently for the edges to look perfectly toasted!
What is the best way to serve these oat bars?
Honestly, they are fantastic just cut into squares straight from the counter once they’ve cooled completely. They hold their shape perfectly then. But if you want to turn your afternoon snack into a real event, serving them slightly warm is divine. Pop one of those soft, chewy oat bars onto a plate and put a scoop of really good vanilla bean ice cream right on top. The contrasting temperatures? Heaven!
Nutritional Estimate for Blueberry Crumble Bars
Now, I always tell friends that baking for love is far more important than counting calories, but I know some of you are curious about what’s inside these amazing little treats! Since we’re using real butter and plenty of fruit, these are definitely on the indulgent side, but they are worth every single crumb.
I pulled these numbers together based on the batch yield of 16 bars using standard measurements. Please take these figures with a grain of salt, though! Every brand of flour, every slightly different size of berry, and whether you use salted or unsalted butter can change the final count slightly. These are just good estimates so you know what you’re working with!
Here is a general breakdown of what you can expect per bar:
- Serving Size: 1 bar
- Calories: 210
- Fat: 11g
- Saturated Fat: 6g
- Trans Fat: 0g
- Cholesterol: 25mg
- Sodium: 55mg
- Carbohydrates: 28g
- Fiber: 2g
- Sugar: 18g
- Protein: 3g
See? Plenty of flavor, plenty of energy to get you through the afternoon! The natural sugars from the fruit keep things balanced, and those oats always add a little something extra that you won’t find in standard, plain desserts.
Share Your Delicious Blueberry Crumble Bars Creations
Alright, now you’ve got the power in your hands to make the absolute best Blueberry Crumble Bars on the block! Don’t keep that pure joy to yourself! I seriously want to see what you create. When you pull that golden, bubbly pan out of the oven, snap a quick photo—I live for seeing your baking triumphs.
If you tried this recipe, please hop back here and leave me a rating! I always check the star ratings to see how you liked the balance of the tart blueberries and the buttery crumble. Even a simple 5-star rating lets me know I nailed it!
And hey, if you’re already craving more crumbly goodness, you know where to find me! While these blueberry bars are fantastic, don’t forget to check out some of my other favorite fruit crumble recipes, like my incredibly popular raspberry crumble bars. They use the exact same easy-to-follow framework; you just swap the fruit!
Keep baking, keep experimenting, and most importantly, keep sharing! Happy baking, everyone!
Print
Blueberry Crumble Bars
- Total Time: 55 min
- Yield: 16 bars 1x
- Diet: Vegetarian
Description
Simple recipe for sweet and tart blueberry crumble bars with a buttery crust and topping.
Ingredients
- 1 1/2 cups all-purpose flour
- 1/2 cup rolled oats
- 1/2 cup packed brown sugar
- 1/4 teaspoon salt
- 1/2 cup (1 stick) cold unsalted butter, cut into pieces
- 1 1/2 cups fresh or frozen blueberries
- 1/4 cup granulated sugar
- 1 tablespoon cornstarch
- 1 teaspoon lemon juice
Instructions
- Preheat your oven to 375 degrees F (190 degrees C). Line an 8×8 inch baking pan with parchment paper, leaving an overhang on two sides for easy removal.
- In a medium bowl, combine the flour, oats, brown sugar, and salt for the crust/crumble.
- Cut in the cold butter using a pastry blender or your fingers until the mixture resembles coarse crumbs.
- Press two-thirds of the crumb mixture evenly into the bottom of the prepared baking pan.
- In a separate bowl, gently toss the blueberries with the granulated sugar, cornstarch, and lemon juice.
- Spread the blueberry mixture evenly over the crust layer.
- Sprinkle the remaining one-third of the crumb mixture over the blueberries.
- Bake for 35 to 40 minutes, or until the topping is golden brown and the filling is bubbly.
- Let the bars cool completely in the pan on a wire rack before lifting them out using the parchment overhang and cutting into squares.
Notes
- If using frozen blueberries, do not thaw them before mixing with the sugar and cornstarch.
- For a richer flavor, substitute half of the all-purpose flour with whole wheat flour.
- You can store leftover bars tightly covered at room temperature for up to three days.
- Prep Time: 15 min
- Cook Time: 40 min
- Category: Dessert
- Method: Baking
- Cuisine: American
Nutrition
- Serving Size: 1 bar
- Calories: 210
- Sugar: 18
- Sodium: 55
- Fat: 11
- Saturated Fat: 6
- Unsaturated Fat: 5
- Trans Fat: 0
- Carbohydrates: 28
- Fiber: 2
- Protein: 3
- Cholesterol: 25
Keywords: blueberry, crumble bars, dessert, oat bars, baked fruit