
When the weather turns cool, or honestly, when the mood just strikes, there’s nothing that beats a genuinely comforting baked fruit dessert. And I mean *nothing*. Forget fussy crusts or complicated layers; that’s why I guard this recipe so closely. This is, hands down, the simplest and most reliable way to get yourself the most amazing, bubbly, utterly classic Cherry Cobbler you’ve ever had. I learned this from my aunt, who made it every single Sunday dinner when I was growing up. I can still smell those sweet cooked cherries hitting the warm crust when she pulled it out of the oven. Trust me, it’s so easy, you’ll be wondering why you waited so long to try it!
Gathering Ingredients for Your Perfect Cherry Cobbler
Okay, the best part about this recipe is that the ingredient list is super short! You need quality stuff, though, because there’s nowhere for mediocre ingredients to hide in a simple cobbler like this. First up, you’re going to need four cups of cherries. If you can get fresh ones, fantastic, but frozen ones work brilliantly—just don’t thaw them first! That’s my biggest tip.
For the filling, grab one cup of sugar, two tablespoons of cornstarch to make it nice and thick, and just a teaspoon of bright lemon juice. For the topping, things get even simpler. You need half a cup of flour, another half cup of sugar, a teaspoon of baking powder, and just a pinch of salt.
The real secret to that flaky topping texture? Half a cup of cold, cubed unsalted butter. Seriously, keep that butter cold! Finally, you need half a cup of milk. If you happen to be out of milk, I’ve got this great guide on making buttermilk substitutes, though regular milk is what the recipe calls for here!
Essential Equipment for Making a Classic Cherry Cobbler
Before you even think about turning on the stove, let’s talk tools. Because this Cherry Cobbler is so straightforward, you don’t need a mountain of fancy gadgets. But having the right anchors makes the process smooth, trust me.
You absolutely need an 8×8 inch baking dish. That’s the perfect size for these proportions. If you use something much bigger, your topping will be too thin and dry out before the fruit is bubbly, and nobody wants that sad scenario!
For the filling, you’ll want a sturdy saucepan. Don’t use your best non-stick pan for the filling because it gets hot and you’ll be stirring constantly while the cornstarch activates. A whisk is essential for making sure that cornstarch dissolves evenly so you don’t end up with a weird gummy patch in your fruit.
For the topping, having a medium bowl for mixing the dry ingredients is helpful. Then, for cutting in the butter, you can use a pastry blender—I love the sound it makes! If you don’t have one, your fingers work just fine, but make sure your hands are cold so you don’t melt that crucial cubed butter before it gets mixed into the flour mixture.
Step-by-Step Instructions for the Best Cherry Cobbler
Now that you have your tools ready and your ingredients lined up, this is where the magic happens! This whole process flies by, and honestly, it’s so quick you could make this on a weeknight if you tried. Remember, baking is a science, but comforting desserts like this Cherry Cobbler don’t require a lab coat. I’m so glad you’re learning these basic but essential baking tips; you can check out more tips whenever you want here!
Preparing the Cherry Filling for Your Cherry Cobbler
First thing’s first: get that oven preheated to 375 degrees Fahrenheit, and give your 8×8 dish a quick grease job. Now, head to the stove with your cherries—remember, if they are frozen, no thawing required! Toss them into the saucepan with the full cup of sugar, the cornstarch, and that splash of lemon juice. You cook this over medium heat, stirring, until it just starts to thicken up. This takes about five to seven minutes, and once it’s thick enough to coat the back of a spoon, pour that gorgeous filling right into your prepared dish. Wow, the house already smells amazing!
Mixing the Topping Batter for Your Cherry Cobbler
In a separate bowl, whisk together the dry ingredients for your Cherry Cobbler topping: the flour, the second half-cup of sugar, baking powder, and salt. Now, here comes the buttery part! Drop in your cold, cubed butter. You need to ‘cut it in’ using your fingers or a pastry blender until it really looks like coarse crumbs—think small peas. Be quick here; you don’t want that butter getting warm!
Next, gently stir in the cold milk until everything is *just* combined. And I mean *just*! Seriously, do not overmix this topping batter. If you work it too much, it gets tough and dense. We want it tender and spoonable, ready to sit perfectly on top of the fruit.
Baking and Finishing the Cherry Cobbler
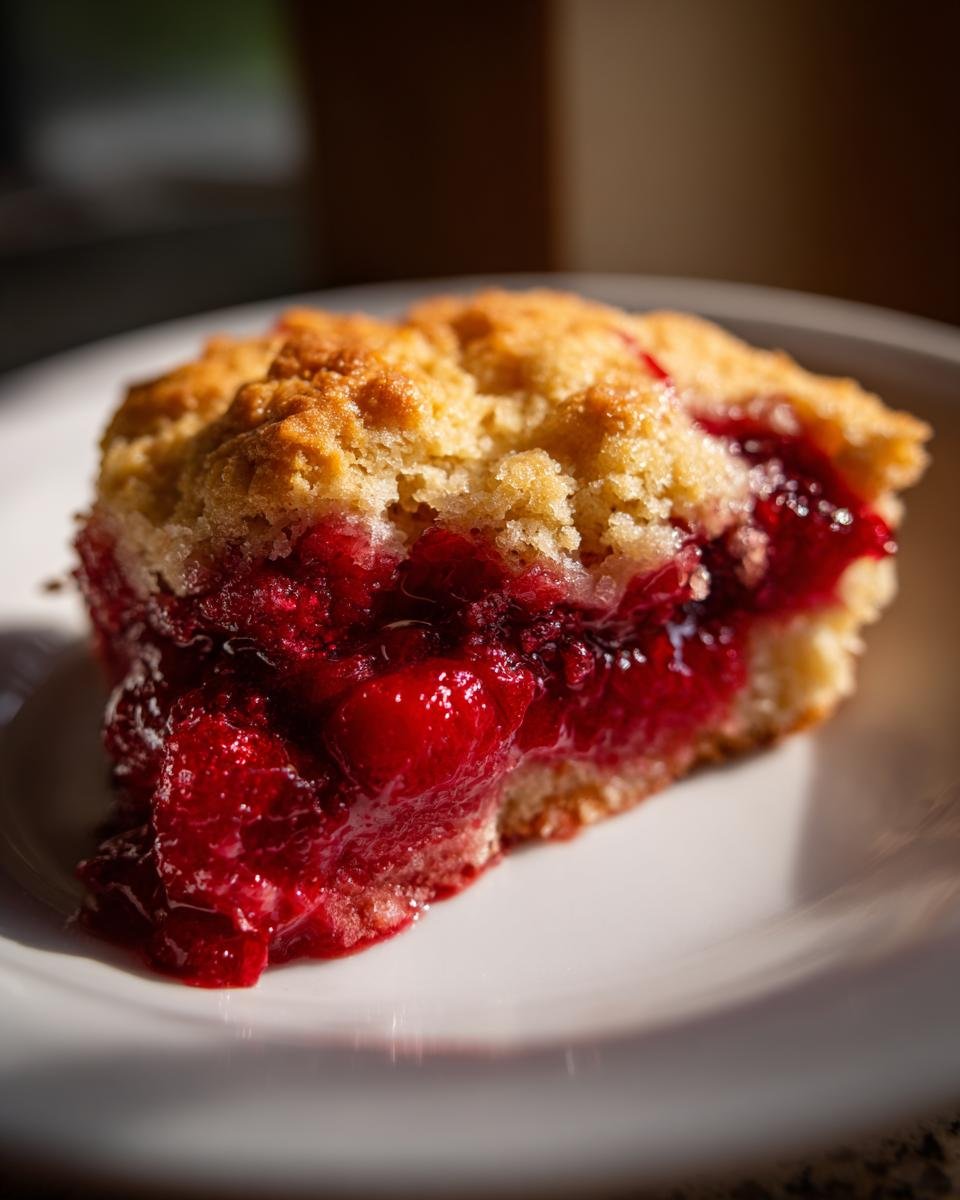
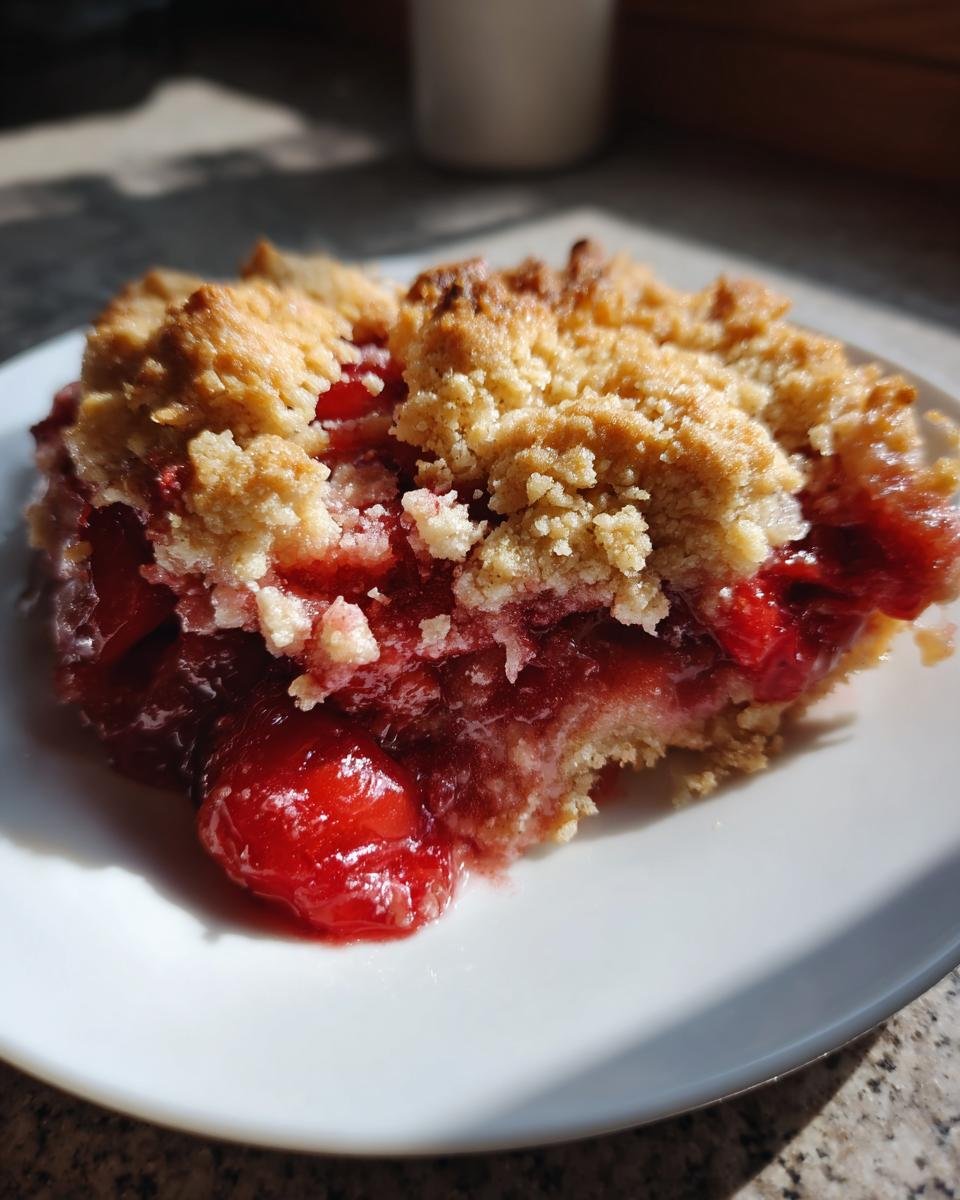
Take big spoonfuls of that crumbly batter and drop them gently and evenly over the top of the cherry mixture. Don’t worry about covering every single bit; the gaps are great because they let all that beautiful, bubbly juice peek through! Pop it into the oven, and let it bake for 30 to 35 minutes. You’re looking for the topping to be beautifully golden brown, and you’ll see the rich cherry filling bubbling up around the edges. Once it looks done, pull your Cherry Cobbler out and let it cool down just a touch before diving in. It needs about 10 minutes to settle!

Tips for Achieving a Perfect Cherry Cobbler Topping
Listen, the secret sauce to a great Cherry Cobbler isn’t in the fruit; it’s all about that topping! The single most important thing you have to remember is the butter temperature. That butter has to be fridge-cold, cut into uniform little cubes before you even start. If it’s soft when you cut it in, the topping will bake up greasy instead of wonderfully crumbly. You want those little chunks of cold butter to create steam pockets in the heat, giving you that light texture!
When you drop the spoonfuls over the filling, try to space them out as evenly as you can. And please, don’t try to smooth them out with a spoon or push them together! You want lots of little islands of soft dough sitting on top of the juicy fruit. This leaves space for the filling to bubble up hot and thick without completely drowning your biscuit-like topping.
Did your filling seem really watery when you put it in the pan? Don’t panic! If it looks like soup instead of thick jam, just let it cook on the stovetop for another minute or two until that cornstarch really gets going. A thick base sets the stage for the best Cherry Cobbler possible.
Variations on the Classic Cherry Cobbler Recipe
This recipe for Cherry Cobbler is amazing as is, but I love mixing things up depending on what I have in the fridge or pantry. It’s such a flexible fruit dessert! You can entirely switch out the fruit base if you feel like it. A mixed berry cobbler using frozen blueberries and raspberries works just as beautifully. You might need a tiny bit more cornstarch if the berries are extra juicy, but it’s a great swap.
If you stick with the cherries, though, you can totally ramp up the flavor complexity in that topping. I’m obsessed with adding just a quarter teaspoon of almond extract right when I mix in the milk—it tastes so sophisticated! Or, sometimes I just toss a half teaspoon of ground cinnamon right in with the flour and sugar. It adds such a warm layer of spice that complements the tartness of the cherry. For another flavor journey, check out how to make a truly flavorful fruit pie right here!
Serving Suggestions for Your Homemade Cherry Cobbler
This dessert truly sings when it’s warm—almost straight from the oven, but let it cool down for just a minute so you don’t burn your mouth!
The absolute best way to serve any cobbler, period, is with a huge, gloriously melting scoop of good quality vanilla ice cream nestled right on top. The contrast between the hot, tart fruit and the cold, sweet cream is non-negotiable in my book.
If ice cream feels like too much effort, a generous dollop of freshly whipped cream works miracles, too. Sometimes, when I’m feeling slightly less grand, I just use a sprinkle of powdered sugar, but that’s just me being lazy!
Storage and Reheating Instructions for Leftover Cherry Cobbler
If you actually manage to have any Cherry Cobbler left over—which I really doubt—storage is super simple. You want to let it cool down completely first. Once cool, cover the baking dish tightly with plastic wrap or foil and keep it on the counter for up to two days if your house isn’t too warm. If it’s hot, pop that sweet dessert into the fridge.
When you’re ready for round two, please ditch the microwave! Microwaving makes the topping gummy, which ruins that perfect texture we worked so hard for. Reheat individual portions in a toaster oven or a small baking dish in your oven at about 325 degrees Fahrenheit until it’s warmed through and the fruit is gently bubbling again. A truly worthy Cherry Cobbler deserves a proper reheat!
Frequently Asked Questions About Making Cherry Cobbler
I always get the same questions once people try this recipe for the first time! It’s such a reliable base recipe that people naturally start wondering how far they can stretch it. Whether you’re substituting ingredients or troubleshooting a small issue, I’ve got the answers for you. If you want to check out another surprisingly easy fruit dessert, this magic lemon cobbler is fantastic too—check it out here!
Can I use different fruit besides cherries in this Cherry Cobbler?
Oh, yes, absolutely! That’s what I meant about making this a flexible fruit dessert. While it’s truly designed for cherry goodness, peaches are a home run in this recipe, especially when they are in season. If you use berries, like blackberries or even a mix, just keep an eye on the consistency of your filling. Sometimes super juicy berries release more liquid than cherries, so you might need to bump that cornstarch up by just half a tablespoon to ensure your delicious Cherry Cobbler topping doesn’t end up swimming in juice!
What is the best way to serve this Cherry Cobbler?
My answer remains the same: warm! You want that beautiful, baked topping to have a little bit of give, and you want the cherry filling to be molten-hot. Serve it immediately after that gentle 10-minute cooling period. A generous scoop of high-quality vanilla ice cream that immediately starts melting into all those nooks and crannies on top? That’s the perfect bite. If you skip the ice cream, at least try whipped cream. It needs that cool, creamy counterpoint to the piping hot fruit.

Why did my topping sink into the fruit filling?
This is the most common issue, and it almost always comes down to the temperature of the filling when you top it. If you pour your topping batter over that piping hot, freshly thickened cherry base, the batter immediately starts cooking and liquefying before it has a chance to set. You have to let that fruit filling cool down for at least 15 minutes after you pour it into the pan! If the filling is warm, not scorching hot, the cold butter and flour mixture in the topping base will hold its structure and bake up nicely right on top. Don’t panic about the structure of your Cherry Cobbler; just give it a few minutes to rest first!
Nutritional Estimate for One Serving of Cherry Cobbler
Now, I always tell people not to look at the nutrition facts when you’re making comfort food, but hey, since we baked it up so neatly, I have the estimate right here for you. Keep in mind that these numbers are just a guiding point because every batch is slightly different based on the sweetness of the cherries you use!
For one serving, you’re looking at roughly 350 calories. The macros are about 45 grams of sugar—it is a dessert, after all!—15 grams of fat, 55 grams of carbohydrates, and about 4 grams of protein. Remember, these values are estimates; measuring your sugar precisely is what really locks in these numbers. So don’t stress too much, just enjoy that beautifully baked fruit dessert!
Print
Simple Cherry Cobbler
- Total Time: 50 min
- Yield: 6 servings 1x
- Diet: Vegetarian
Description
A straightforward recipe for a classic cherry cobbler dessert.
Ingredients
- 4 cups fresh or frozen cherries (pitted)
- 1 cup granulated sugar
- 2 tablespoons cornstarch
- 1 teaspoon lemon juice
- 1/2 cup all-purpose flour
- 1/2 cup granulated sugar
- 1 teaspoon baking powder
- 1/4 teaspoon salt
- 1/2 cup cold unsalted butter (cubed)
- 1/2 cup milk
Instructions
- Preheat your oven to 375 degrees Fahrenheit. Lightly grease an 8×8 inch baking dish.
- In a saucepan, combine cherries, 1 cup sugar, cornstarch, and lemon juice. Cook over medium heat, stirring until the mixture thickens, about 5 to 7 minutes. Pour the cherry filling into the prepared baking dish.
- In a medium bowl, whisk together flour, 1/2 cup sugar, baking powder, and salt.
- Cut in the cold butter using a pastry blender or your fingers until the mixture resembles coarse crumbs.
- Stir in the milk until just combined; do not overmix.
- Drop spoonfuls of the batter evenly over the cherry filling.
- Bake for 30 to 35 minutes, or until the topping is golden brown and the filling is bubbly.
- Let cool slightly before serving.
Notes
- If using frozen cherries, do not thaw them before cooking the filling.
- Serve warm with vanilla ice cream or whipped cream.
- Prep Time: 15 min
- Cook Time: 35 min
- Category: Dessert
- Method: Baking
- Cuisine: American
Nutrition
- Serving Size: 1 serving
- Calories: 350
- Sugar: 45g
- Sodium: 150mg
- Fat: 15g
- Saturated Fat: 9g
- Unsaturated Fat: 6g
- Trans Fat: 0g
- Carbohydrates: 55g
- Fiber: 3g
- Protein: 4g
- Cholesterol: 35mg
Keywords: cherry cobbler, fruit dessert, baked fruit, easy cobbler, sweet dessert