
Sometimes you just need a dessert that screams pure, unadulterated joy, right? Forget fancy techniques or obscure ingredients. We’re talking about the classics that stick with you long after the whipped cream is gone. For me, that’s **My Fave Childhood Banana Split**. I remember being maybe seven years old, sitting at the sticky booth at the roller rink, desperately trying to eat the melting scoops before they made a huge mess.
This isn’t some complicated, fussy recipe you see in magazines; this is the definitive, easy-to-assemble version of **My Fave Childhood Banana Split** that brings that feeling right back. It takes five minutes, and trust me, it hits every single nostalgic note perfectly. It’s practically magic in a boat-shaped dish!

Why You Will Make My Fave Childhood Banana Split Again and Again
Honestly, why wouldn’t you keep making this? It’s the fastest trip down memory lane you can take in the kitchen. You don’t even have to turn the oven on—which is a HUGE win on a hot day when you need a sugar fix, stat.
- Zero Cooking Required: Seriously, just assembly! It’s the perfect no-bake weeknight treat.
- Pure Nostalgia: Every spoonful takes you right back to being a kid enjoying a special occasion.
- Customizable Core: While this is the classic trio, you can swap flavors easily if you’re feeling bold.
- Instant Gratification: From fridge to face in under five minutes. You can’t beat that speed!
Essential Equipment for Your My Fave Childhood Banana Split
The best part about this dessert? You definitely don’t need a stand mixer or fancy pastry bags. We are keeping this easy, which is why I love it so much. Grab these super basic items, and you are good to go. Confidence builder alert: Since we aren’t baking, you really can’t mess this up!
- The most important thing is a long, shallow dish—you know, the classic banana boat shape!
- A simple butter knife for gently slicing the banana.
- Your favorite ice cream scoop—make sure it’s ready to go!
- Measuring spoons for getting those syrups just right.
Gathering Ingredients for My Fave Childhood Banana Split
Okay, let’s get everything out on the counter. This is strictly an assembly job, so get your prep done first! Remember, we are going for that classic look here, which means you need the specific trio of ice cream flavors. Don’t stress about exact amounts—it’s ice cream, after all—but these measurements are the magic number for one perfect serving.
- One large banana, peeled and sliced perfectly in half lengthwise.
- Three glorious scoops of ice cream: one vanilla, one creamy chocolate, and one bright strawberry.
- Two tablespoons of rich chocolate syrup—the thicker the better!
- Two tablespoons of sweet strawberry topping, the kind with actual fruit pieces in it.
- One tablespoon of crushed pineapple, drained really well.
- A generous cloud of whipped cream—I usually just use the pressurized can kind, no shame here.
- One single, perfectly preserved maraschino cherry for the crown jewel.
If you’re planning on making a whole batch for a party, maybe double the syrup amounts because everyone always needs extra sauce!
Ingredient Notes and Substitutions for My Fave Childhood Banana Split
Grandma always kept the topping line-up strict, but honestly, this dessert is so forgiving. The original recipe calls for the canned toppings, and they really bring that certain retro flavor that I love. If you’re looking for a little lighter take, go ahead and swap the canned strawberry topping for a nice fresh strawberry sauce you whip up yourself. You can even check out how I make a simple strawberry pie filling mixture for a little extra fruit flavor, just use less of it here!
Also, feel free to switch up those ice cream flavors! If you hate strawberry, use coffee! It’s your split, so make it work for you.
Step-by-Step Assembly Instructions for My Fave Childhood Banana Split
Okay, here’s the crucial bit! Since this is an assembly-only dessert, you have to work fast before the ice cream starts sliding everywhere. Grab that long dish—the classic banana boat shape—and line up your ingredients nearby. Timing is everything here, so seriously, keep your ice cream in the freezer until the very second you need it. I sometimes even chill my dish in the freezer for five minutes beforehand; it buys you an extra 30 seconds of melt-free time!
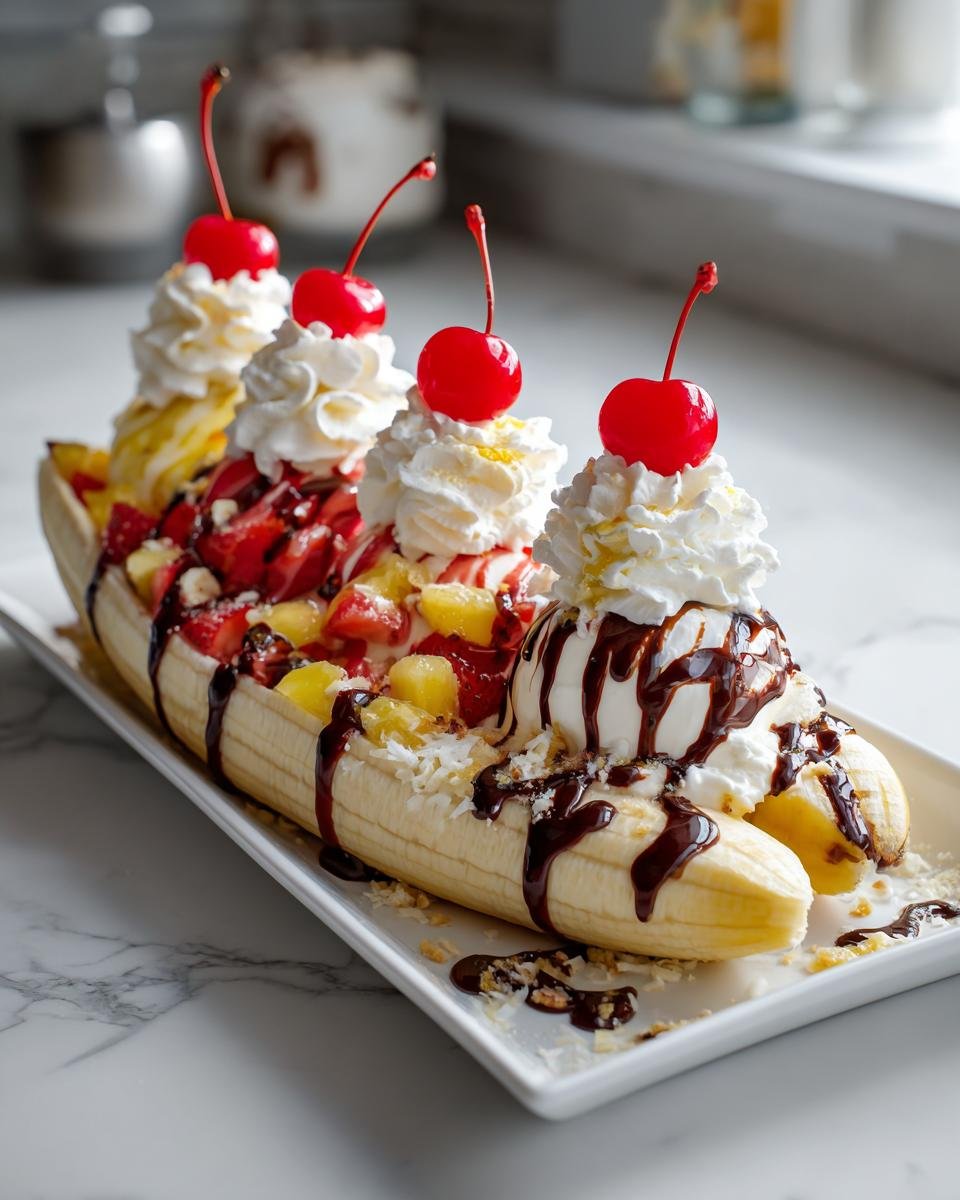
- First things first: Take that beautifully peeled banana and slice it right down the middle lengthwise. Don’t try to cut it into pucks; we need the long sides!
- Lay those two banana halves gently into the long dish, positioning them so they line the outside edges. They are the lovely edible walls of our dessert!
- Time for the main event! Between those banana halves, place your three scoops of ice cream. Make sure to space them out: vanilla on one end, chocolate on the other, and the strawberry scoop right in the very middle.
- Take that glossy chocolate syrup and drizzle it generously over both the vanilla AND the chocolate scoops—make sure most of it lands there.
- Next, spoon that sweet strawberry topping directly over just the strawberry ice cream scoop. Keep the flavors slightly separate for now!
- Now, take your drained crushed pineapple and spoon it right over that center strawberry scoop. This adds a fun little textural surprise.
- This is where we build up! Top each of those three scoops with a lovely swirling mountain of whipped cream. Don’t be shy!
- Finally, crown your creation. Place one shiny, bright red maraschino cherry right on top of the center dollop of whipped cream.
If you want to see quick tips on how to bake things when you’re in a rush (like maybe when you want a side of warm banana muffins with your split!), check out some of my other baking hacks!

Tips for the Ultimate My Fave Childhood Banana Split Experience
Getting this banana split right isn’t just about dumping ingredients; it’s about presentation and timing. Since this is an assembly dream, we can focus purely on technique! My biggest pro tip, which I learned the hard way after chasing melting chocolate across the counter, is to slightly soften your ice cream first.
I mean, just let it sit out for about five minutes. It gets soft enough to scoop perfectly but isn’t totally soup yet. This lets you create those beautiful, uniform scoops without fighting the ice cream, making the syrup drizzle look way cleaner.
Also, before you start, wet your scoop in hot water between flavors. Seriously, it makes the scoop glide right through! It’s a little thing, but it keeps your vanilla scoop from getting chocolate streaks and your strawberry scoop looking pristine. For more tips on general kitchen precision, I’ve put together some of my favorite baking tips to make you a better baker that also apply here!

Finally, always assemble this right where you plan to eat it. Don’t wander to the living room once the whipped cream goes on; you want that cherry at its peak height!
Serving Suggestions for My Fave Childhood Banana Split
Because this dessert is already so rich and fun, the best pairings are simple things that cut through the sweetness or echo those classic flavors. If you have a crowd, you can make a big batch of these or even whip up some easy strawberry milkshakes alongside them for the kids!
For presentation, skip the plate and go straight for the fancy napkin. If you want something extra, serve it with crisp vanilla wafers nestled near the banana halves. They give you a nice crunch to contrast the soft ice cream. Truly, though, this split stands perfectly on its own—it’s a whole meal of dessert glory!
Storage and Make-Ahead Advice for My Fave Childhood Banana Split
Alright, this is the tough love part of the recipe, but you need to hear it! Because this dessert relies on ice cream being perfectly frozen, there is zero effective way to store a fully assembled banana split. I’m telling you—don’t try to save leftovers! That beautiful structure will become a sweet, soupy puddle in about thirty minutes.
However, you can absolutely prep ahead! I suggest whipping up or portioning out all your toppings—the chocolate syrup, the strawberry topping, and draining that pineapple—into small serving bowls the day before. Keep those covered tightly in the fridge. Then, when dessert time rolls around, all you do is slice the banana, scoop the ice cream, and go, go, go! It keeps the assembly under that critical five-minute mark.
Frequently Asked Questions About My Fave Childhood Banana Split
Can I use different ice cream flavors for this classic banana split?
Of course, you can! My favorite childhood banana split used vanilla, chocolate, and strawberry because that’s what we always got at the rink. But if you aren’t a strawberry fan, go for it! Swap it out for butter pecan or mint chip. The core structure—the banana and the syrup placement—stays the same, so feel free to customize the ice cream to your liking. It’s still going to be a delicious ice cream dessert experience!
What is the name of the dish this is traditionally served in?
The traditional vessel for this kind of amazing dessert is usually called a banana boat or a banana split dish. They are long, narrow dishes, often with little divots or indentations where the banana halves sit perfectly on the sides. If you don’t have one, don’t panic! A deep, oval casserole dish works in a pinch, but the boat shape really elevates the presentation, doesn’t it?
How can I make this recipe vegan or dairy-free?
Adapting this sweet treat is quite easy! You can swap out the dairy ice cream for your favorite non-dairy frozen dessert. There are fantastic coconut or almond milk-based vanilla and chocolate options now. Just make sure your whipped topping is a coconut cream or soy-based option, and double-check that your chocolate syrup doesn’t contain any dairy. It keeps that classic, gooey texture without any dairy in sight!
Can I prepare the toppings ahead of time?
Yes, that’s the only smart way to prep for this! You should absolutely get all your syrups, crushed pineapple, and chopped nuts (if you add some!) ready and in little bowls ahead of time. I even prep my banana slices but cover them tightly with plastic wrap and a tiny splash of lemon juice to stop browning. But don’t assemble until the second you are ready to eat, or the ice cream will just melt away into a beautiful puddle of what used to be amazing cookies—speaking of which, these are great with my classic chocolate chip cookies on the side!
Nutritional Snapshot of My Fave Childhood Banana Split
I’m going to be completely honest with you: this is not a ‘health food’ recipe. This is pure, joyful, celebratory indulgence, and that is perfectly okay sometimes! If you absolutely must know what you’re digging into while you enjoy this blast from the past, here are the approximate numbers for one single serving based on the classic ingredients.
Remember, these figures are based on using standard commercial products—your specific brand of chocolate syrup or ice cream will change things just a bit! Think of this as a fun ballpark estimate for your epic ice cream adventure.
- Serving Size: 1 split
- Calories: Approximately 550
- Sugar: Roughing out around 70 grams (Yes, that’s high, but it’s nostalgia!)
- Fat: Around 25 grams total
- Saturated Fat: Roughly 15 grams
- Carbohydrates: Around 80 grams
- Protein: About 10 grams
Seriously, don’t look at the sugar content too closely, just focus on that cherry on top. You deserve this glorious treat!
Print
Childhood Banana Split
- Total Time: 5 min
- Yield: 1 serving 1x
- Diet: Vegetarian
Description
A simple, classic banana split recipe based on a childhood favorite.
Ingredients
- 1 large banana
- 3 scoops ice cream (vanilla, chocolate, strawberry)
- 2 tablespoons chocolate syrup
- 2 tablespoons strawberry topping
- 1 tablespoon crushed pineapple
- Whipped cream
- 1 maraschino cherry
Instructions
- Peel the banana and slice it in half lengthwise.
- Place the banana halves in a long dish, one on each side of the center.
- Place one scoop of vanilla, one scoop of chocolate, and one scoop of strawberry ice cream between the banana halves.
- Pour chocolate syrup over the vanilla and chocolate scoops.
- Spoon strawberry topping over the strawberry scoop.
- Spoon crushed pineapple over the center scoop.
- Top each scoop with whipped cream.
- Place one maraschino cherry on top of the whipped cream.
Notes
- You can substitute any ice cream flavors you prefer.
- Use fresh fruit instead of canned toppings for a different texture.
- Prep Time: 5 min
- Cook Time: 0 min
- Category: Dessert
- Method: Assembly
- Cuisine: American
Nutrition
- Serving Size: 1 split
- Calories: 550
- Sugar: 70
- Sodium: 150
- Fat: 25
- Saturated Fat: 15
- Unsaturated Fat: 10
- Trans Fat: 0
- Carbohydrates: 80
- Fiber: 3
- Protein: 10
- Cholesterol: 75
Keywords: banana split, ice cream, dessert, classic, childhood