
Let’s get one thing straight: if your brownie isn’t fudgy enough to practically stand up and salute you, you’re doing it wrong! I live for that dense, almost underbaked center that clings to the fork. But when you take that perfect fudge base and add the cool surprise of peppermint? Oh, wow. That’s when you hit the jackpot. These are my go-to **Irresistible Mint Chocolate Brownies A Flavor Explosion**, and they are completely addictive.
I remember the first time I tried to layer mint into a proper brownie. The frosting slid right off! I almost gave up, feeling like the universe didn’t want me to have this perfect trinity of chocolate, fudge, and cool mint. Trust me, I figured out the trick—it all comes down to patience while chilling. Once you master that, you’ll be making these all year long, not just at Christmas!
Why These Irresistible Mint Chocolate Brownies A Flavor Explosion Stand Out
Let me tell you why these brownies are the absolute best, hands down. You aren’t getting some crumbly, cakey disappointment here; we are talking about pure, unadulterated fudge heaven. My whole goal was to get fudgy perfection, and boy, did we nail it.
- The Fudgiest Brownie Base You’ll Ever Make: We skip the cakey fluff here! These are dense, rich, and perfect for holding up that awesome mint layer.
- The Cooling Mint Center: It’s not just frosting; it’s a real, cool mint layer that perfectly cuts through the deep chocolate flavor. It’s just divine!
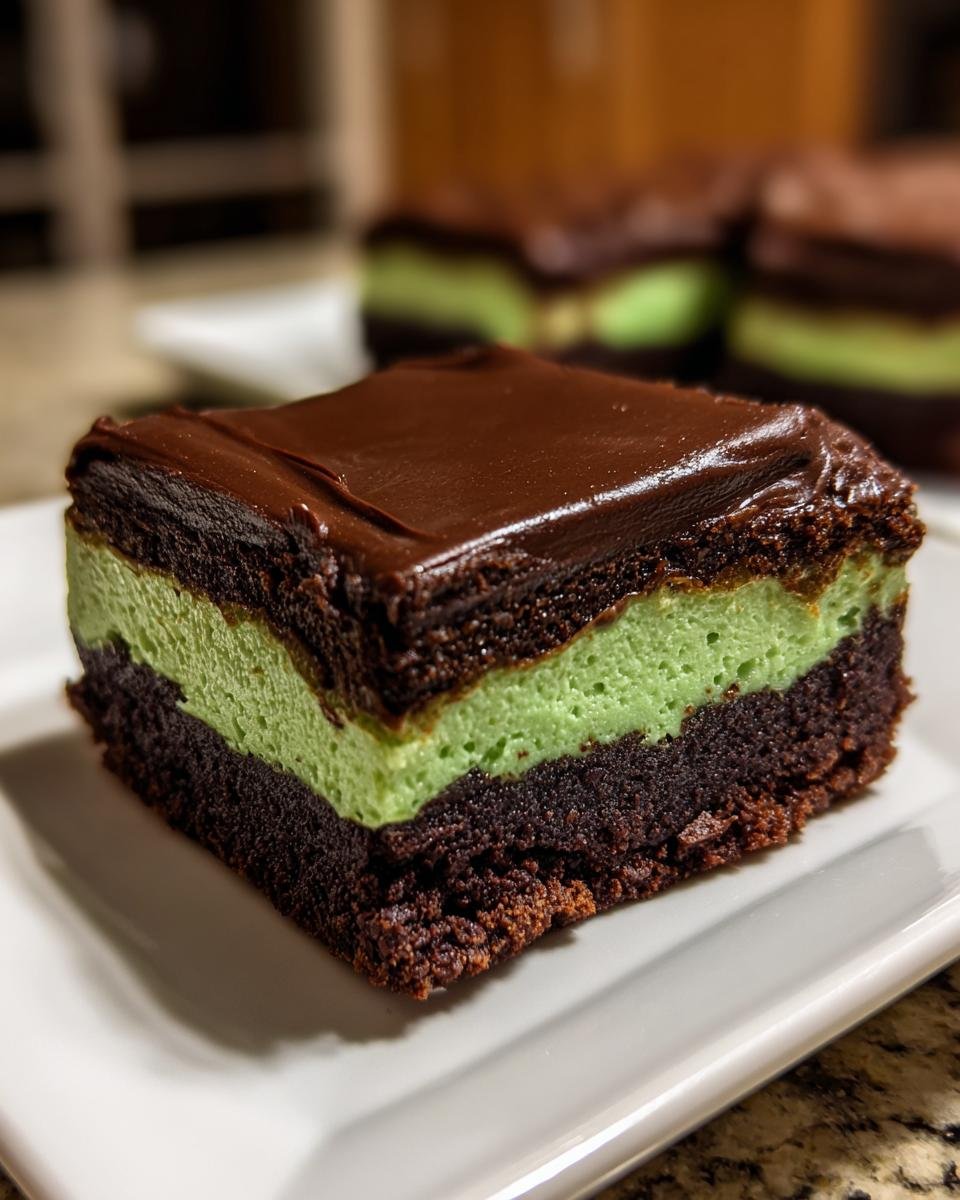
- Triple-Layer Perfection: You get three distinct textures working together—the dense brownie, the smooth, creamy mint, and the crisp chocolate cap. It’s a party in your mouth.
- Surprisingly Easy Assembly: Honestly, assembly is a breeze once the base is cool. You don’t need any fancy piping bags or complicated techniques. It’s very beginner-friendly, which is why I love it so much.
- They are amazing warm or cold! If you want something closer to a cheesecake texture, pop them in the fridge. If you want that classic gooey fudge experience, room temperature wins. You can check out my approach to chocolate peppermint cheesecake if you ever want to try something similar, but fudgier!
Seriously, ditch any other brownie recipe you have sitting around. These three layers—fudge, mint, and ganache—are exactly what you need when you want a showstopper that’s still simple to throw together.

Gathering Ingredients for Irresistible Mint Chocolate Brownies A Flavor Explosion
When you’re making something this special, the ingredients really have to sing, right? Since these brownies aren’t relying on leavening agents or flour structure for their magic, every single component has to pull its weight, especially when it comes to that deep chocolate flavor. Don’t skimp here!
Brownie Base Essentials
- One cup of good quality unsalted butter. You need to melt this, so make sure it’s ready to go.
- A full cup of unsweetened cocoa powder. This is where the deep, dark chocolate note comes from, so use the best one you’ve got!
- Two cups of granulated sugar. Yes, two cups—that’s how we get that amazing fudgy texture instead of a dry cake!
- Four large eggs, beaten well until everything is incorporated.
- One teaspoon of pure vanilla extract. It just boosts the chocolate flavor, trust me.
- One cup of all-purpose flour. We mix this separately!
- Half a teaspoon of salt to keep things balanced.
- One cup of semi-sweet chocolate chips. You can toss these right into the batter for extra melt-y pockets. If you’re running low on milk or buttermilk, I have a great little trick for making a substitute right at home!
The Creamy Mint Layer
This layer is where the cool hits the rich!
- One cup of powdered sugar, and make sure you sift it or it will be lumpy!
- A quarter cup of milk—just regular milk works fine here.
- Half a teaspoon of pure peppermint extract. Don’t be tempted to use too much; peppermint is strong!
- A few drops of green food coloring, only if you want that classic mint look. I usually skip it, but it looks fun for parties.
The Chocolate Topping
We finish this masterpiece with a simple, glossy top layer.
- Four ounces of semi-sweet chocolate, roughly chopped for easy melting.
Essential Equipment for Perfect Irresistible Mint Chocolate Brownies A Flavor Explosion
You don’t need a commercial kitchen for these, thank goodness! But a few trusty tools make the process so much smoother, especially when dealing with three different layers. If you’ve got these bits and pieces hanging around, you’re ready to bake. Seriously, having the right size pan makes all the difference!
- The Right Pan: You absolutely need a 9×13 inch baking pan. This size is crucial because it keeps the brownie base thin enough to bake quickly and ensures that your mint layer doesn’t turn into a half-inch-thick mountain. Measure your pan before you start!
- Saucepan: A small or medium saucepan is needed for melting that initial butter without scorching it. Keep the heat low—we aren’t boiling anything here, just gently melting.
- Mixing Bowls Galore: You’ll want at least three good mixing bowls. One for whisking the dry stuff for the base, one for the wet ingredients (eggs and sugar), and a medium one for whipping up that smooth mint frosting.
- Whisk and Spatula Combination: A whisk is great for getting the sugar and eggs nicely combined in the beginning. But once we introduce the flour? Switch to a sturdy rubber spatula. You need to fold gently, not beat the batter into submission. If you need a complete refresher course on basic kitchen tools and how to use them, go check out my favorite general baking tips!
- Cooling Rack: This is non-negotiable! The brownies *must* cool completely before that mint layer goes on, or it’ll melt into a sad, green puddle. Let them cool on a wire rack so air circulates underneath.
That’s really it! No stand mixer required, although you can use one if you want to save your arm muscle. Hand mixing works perfectly fine for these fudgy beauties.
Step-by-Step Instructions for Irresistible Mint Chocolate Brownies A Flavor Explosion
Okay, this is the main event! We have three separate things to accomplish here: the rich brownie, the cool mint, and the shiny top. The key to keeping these as Irresistible Mint Chocolate Brownies A Flavor Explosion is making sure each layer sets up properly before the next one goes on. My biggest piece of advice? You absolutely MUST let those brownies cool—and I mean cool, cool, cool—before you even think about touching that mint frosting. If you rush that, you’ll end up with melted soup, trust me!
This process is easy once you break it down. Since you already know the must-have ingredients, let’s dive right into the hands-on portion. You can read up on some general fantastic chocolate brownie recipes if you need a refresher on folding, but these steps are pretty straightforward.
Baking the Fudgy Brownie Base
First things first: grab that 9×13 pan and get it greased and floured. We are aiming high heat for this base, so preheat your oven right now to 350 degrees F (175 degrees C).
We start on the stovetop gently. Heat that cup of butter until it’s just melted, then pull it off the heat completely before stirring in the cocoa powder until it looks like thick, dark chocolate paint. Now, we whisk! In goes the two cups of sugar, then beat in those four eggs one at a time until everything looks glossy. Don’t forget the vanilla!
In a separate bowl, quickly whisk together the flour and salt. This separation is important; we don’t want gluten monsters forming. Now, gradually add this dry mix into your wet ingredients. Fold it until you see no more white streaks—that’s it! Fold in those chocolate chips gently. Spread this gorgeous batter evenly into your prepared pan and bake it for 25 to 30 minutes. Once it’s done, pull it out and walk away! Let those things cool completely on a rack; this might take an hour or more. Seriously, be patient!
Creating and Applying the Mint Layer
While the brownies are chilling out, we whip up the magic layer. In a small bowl, combine that cup of powdered sugar with the milk, the peppermint extract, and if you’re feeling fancy, a few drops of green food coloring. You want this mixture smooth, not grainy.
If it feels too thick to spread, add milk drop by drop. If it’s too thin, add a tiny bit more powdered sugar. Once your brownies are stone cold—and I mean completely room temperature—spread this mint mixture evenly across the top. Use an offset spatula if you have one; it makes everything beautiful and flat. Since this layer is mainly sugar, the green color is just for looks; you’ll get the same amazing flavor even if you skip it!
Finishing and Chilling Irresistible Mint Chocolate Brownies A Flavor Explosion
Time for the grand finale! Take your four ounces of semi-sweet chocolate and break it into small pieces. We’re melting this down either over a double boiler or in the microwave in short 30-second bursts, stirring well each time until it’s perfectly smooth and pourable.
Quickly spread this melted chocolate right over that pale green layer. Now for the most critical step: chilling! Pop the entire pan into the refrigerator for at least one full hour, or until the top chocolate has hardened completely. This chilling time is what guarantees those beautiful, clean cuts. When you try to slice a warm or even room-temperature layered bar, everything smears. Once it’s firm and cool, slice it into 16 squares, step back, and admire your perfect triple-layer treat!
Tips for Making Your Irresistible Mint Chocolate Brownies A Flavor Explosion The Best
Even though the main recipe is rock solid, there are always those little secrets that take something good and make it truly unforgettable, right? I’ve learned a few things over the years testing countless batches of these minty wonders that I just have to share with you. These aren’t in the instructions, but they make a huge difference in the final outcome!
Get the Best Chocolate Flavor Possible
I mentioned using good cocoa powder earlier, but let’s double down on that. If you can find high-quality Dutch-processed cocoa powder, use it! It has a lower acidity, which contributes to a darker color and a smoother, deeper chocolate taste in the brownie base. It just tastes richer, which is perfect when you’re competing against that bright mint flavor.
Also, for the top layer, think about your chocolate chips. If you use standard semi-sweet chips in the batter, they melt beautifully. But for the final drizzle, try using some high-quality bittersweet chocolate (around 60-70% cacao) instead of just semi-sweet. It adds a nice little sophisticated bitterness that makes the whole thing feel grown-up.
The Secret to Shiny, Crackly Tops
Everyone loves that thin, shiny, slightly crackly crust on a great brownie! It’s achieved by vigorously whisking the sugar and eggs together right after you mix in the melted cocoa butter. You are incorporating air, which creates those tiny bubbles that collapse slightly during baking, leaving that signature sheen on top of the brownie base.
Don’t over-mix once the flour goes in, but give that initial wet-sugar-egg mix some serious elbow grease! If you’re really interested in upping your general baking game, I highly recommend reading through my basic guide on baking tips to make you a better baker—it helps with everything!
Mastering the Clean Cut
We talked about chilling, but let’s talk technique for getting those perfect squares. Once the brownies are fully chilled (they should be firm to the touch!), grab your sharpest, biggest chef’s knife. Heat the knife up first!
Run the knife under very hot water for about 20 seconds, dry it completely with a clean towel, and then make your first long slice. Wipe the blade clean, run it under hot water, dry it, and slice again. Repeating this hot-wipe-dry cycle before every single cut prevents the sticky mint and top chocolate layer from dragging or smearing. It takes longer, but your presentation will be flawless!
Ingredient Notes and Substitutions for Irresistible Mint Chocolate Brownies A Flavor Explosion
Look, I know nobody’s pantry is perfectly stocked all the time. Sometimes you’re halfway through a recipe and realize you’re out of something crucial, or maybe you just don’t like a specific flavor. Don’t panic! These brownies are adaptable, but we have to be smart about the swaps, especially since we have three different components here.
Extract Swaps: Peppermint vs. Vanilla or Almond
The peppermint extract is the star of the show for that cool, fresh feeling, so if you leave it out, you’re basically making an incredible, fudgy, triple-layer chocolate bar instead of a mint chocolate bar. If you are totally out of peppermint, you can swap it for pure vanilla extract for a double-chocolate flavor boost. Another fun option is almond extract!
Almond extract gives you a totally different, almost marzipan-like flavor that pairs surprisingly well with rich dark chocolate. Just remember, almond extract is STRONG, much stronger than peppermint. Use only a quarter teaspoon if you swap for almond to start, then taste your frosting mixture before you commit! If you normally struggle with having the right liquids on hand, you might find my guide on making buttermilk substitutions useful for general baking emergencies.
The Case for Skipping the Green Dye
Honestly, the green food coloring is purely aesthetic luxury. It looks fantastic, especially around the holidays, but it does absolutely nothing for the taste or texture of the mint layer. If you skip it, you’ll end up with a beautiful, pale, cream-colored layer that tastes exactly the same.
If you really want a natural color, sometimes adding a tiny bit of natural spirulina powder can give a very muted green, but I find it can occasionally affect the texture of the icing, so I usually just stick to the dye or go totally color-free. Don’t stress about the color!
Chocolate Chip Choices
We call for semi-sweet chocolate chips in the brownie base and chopped semi-sweet chocolate for the final topping. If you prefer things darker—and I often do—feel free to substitute those with dark chocolate chips (around 60% cacao) in the batter!
For the topping, if you only have milk chocolate chips on hand, go ahead and use them, but understand that milk chocolate melts much softer than semi-sweet. This means your final top layer might never get that satisfying, firm snap when you bite into it, and it will definitely be messier to cut. For the best results, stick to semi-sweet or bittersweet for that top layer!
Storage and Make-Ahead Options for Your Brownies
One of the best things about these layered treats is that they actually get better after a little rest! Unlike a delicate cake that dries out fast, these fudgy, chocolatey babies are built to last. I actually prefer them on day two because the flavors really marry together beautifully.
Storing Leftovers for Maximum Freshness
You have two good options here, depending on how you like your chocolate served. If you’re planning on eating them within two or three days, keeping them on the counter is totally fine. Just make sure they are in a truly airtight container. Humidity is the enemy of chocolate tops, so seal it up tight!
Now, if you want that super firm, almost truffle-like texture where the mint layer is distinct and cool, pop them in the fridge. The chocolate glaze on top will get harder, and the whole thing will slice cleaner. I pull them out about 20 minutes before serving if they’ve been chilled, just to take the harsh chill off the fudge layer.
Can I Make These Ahead of Time?
Yes, absolutely! That’s why I love them for parties. You can definitely make the whole thing in one go the day before you plan to serve them. You just need to time it right. Bake the base, let it cool completely (you can even speed up cooling by popping it in the fridge for 30 minutes), then apply the mint layer.
Once the mint is set, add the chocolate top, and back into the fridge it goes overnight. Don’t cut them until you are ready to serve them, though! Cutting them makes them more susceptible to drying out or absorbing fridge odors.
Freezing These Layered Wonders
I’ve had great luck freezing these, but you need a slightly different approach because of the layers. You can’t just toss the whole pan in the freezer! First, cut the brownies into their individual squares *before* freezing. This is crucial for easy access later.
Wrap each square tightly, first in plastic wrap to seal out freezer burn, and then slip those wrapped squares into a heavy-duty freezer bag. They keep beautifully for up to two months this way. When you want one, just pull it out of the freezer and let it thaw slowly on the counter for a couple of hours. It thaws perfectly, ready to eat!
Frequently Asked Questions About Irresistible Mint Chocolate Brownies A Flavor Explosion
I know when you look at three layers of chocolate and mint heaven, a few questions are bound to pop up in that baker’s brain of yours! It’s totally normal. These aren’t your basic one-bowl wonders, so having a Q&A section just makes sense. Here are the things I get asked most often about making the absolute best fudgy mint brownies.
How do I get that shiny, crackly top on the brownie base?
Ah, the coveted shine! If you’re wondering about that beautiful, thin layer that sits right on top of the brownie base (underneath the mint, of course), that comes from technique, not extra ingredients! As I mentioned earlier, the secret is whisking your sugar and eggs together *really well* after adding the melted cocoa butter mixture and *before* adding any flour. You need to beat that mixture until it looks thick, pale, and glossy—like whipped honey. That incorporation of air creates the shine when it bakes. Don’t overmix after the flour goes in, or you’ll deflate all that beautiful potential shine!
Can I make these gluten-free?
Yes, but you need to be careful because the brownie structure relies on that flour holding everything together. If you want to try making these gluten-free, you should swap out the one cup of all-purpose flour for a high-quality, all-purpose 1:1 gluten-free flour blend that already contains xanthan gum.
Because GF flour sometimes absorbs moisture differently, keep an extra eye on the baking time. You might need to pull them out a minute or two early, as they can dry out faster than the traditional version. You can read some general baking advice for switching flours in my guide on simple chocolate brownie recipes!
How thick should the mint layer be when I spread it?
This is where many people go wrong when trying to achieve the perfect balance in these *Irresistible Mint Chocolate Brownies A Flavor Explosion*. You want the mint layer thin enough so that you still get plenty of fudge in every bite, but thick enough that you can really taste the peppermint.
Given that we are using a 9×13 pan, I aim for about 1/4 inch thickness for that mint layer. Spread it quickly and evenly once the base is totally cool. If you go much thicker, the brownie bottom starts to feel weak, and you end up with too much sugary icing compared to the rich fudge underneath. It’s all about balance!
Can I use mint extract if I don’t like green food coloring?
Absolutely! Peppermint extract is completely colorless on its own, so if you decide to skip the green dye, your middle layer will just be a creamy off-white color. Taste-wise, it is 100% identical. The green is really just for fun, especially if you are making them for Christmas or St. Patrick’s Day. If you skip the coloring, you can still enjoy the best mint brownie recipe without any artificial additives!
Sharing Your Flavor Explosion
Seriously, you’ve done it! You braved the fudgy base, you patiently waited for the bake, and you conquered the layering process. Now you have the most stunning, flavor-packed, triple-layer **Irresistible Mint Chocolate Brownies A Flavor Explosion** sitting on your counter.
I absolutely need to know what you think! If you made a batch, please jump down into the comments below and give this recipe a star rating. Don’t be shy—tell me the truth!
But here’s the real question that always sparks debate in my house: Are you team Brownie Base or are you completely obsessed with that cool, creamy Mint Layer? Let me hear your allegiance!
And if you snap a picture of those gorgeous, clean-cut squares—especially those clear layers—please tag me on social media! There is nothing better than seeing my recipes come to life in your kitchens. Happy snapping, and enjoy every single fudgy, minty bite!
Print
Mint Chocolate Brownies
- Total Time: 1 hour 50 min
- Yield: 16 servings 1x
- Diet: Vegetarian
Description
Rich, fudgy brownies with a cool mint layer and chocolate topping.
Ingredients
- 1 cup unsalted butter
- 1 cup unsweetened cocoa powder
- 2 cups granulated sugar
- 4 large eggs
- 1 teaspoon vanilla extract
- 1 cup all-purpose flour
- 1/2 teaspoon salt
- 1 cup semi-sweet chocolate chips
- 1 cup powdered sugar
- 1/4 cup milk
- 1/2 teaspoon peppermint extract
- Green food coloring (optional)
- 4 ounces semi-sweet chocolate, chopped (for topping)
Instructions
- Preheat your oven to 350 degrees F (175 degrees C). Grease and flour a 9×13 inch baking pan.
- Melt the butter in a saucepan over low heat. Remove from heat and stir in the cocoa powder until smooth.
- Whisk in the granulated sugar, then beat in the eggs one at a time. Stir in the vanilla extract.
- In a separate bowl, whisk together the flour and salt. Gradually add the dry ingredients to the wet ingredients, mixing until just combined. Fold in the chocolate chips.
- Spread the batter evenly into the prepared pan. Bake for 25 to 30 minutes. Let cool completely.
- For the mint layer, mix the powdered sugar, milk, peppermint extract, and a few drops of green food coloring (if using) until smooth. Spread this mixture evenly over the cooled brownies.
- Melt the 4 ounces of chopped chocolate in a microwave-safe bowl in 30-second intervals, stirring until smooth. Spread the melted chocolate over the mint layer.
- Chill the brownies for at least 1 hour before cutting into squares.
Notes
- For extra fudginess, slightly underbake the brownies.
- You can use mint chocolate chips instead of plain chips in the batter.
- Store leftovers in an airtight container at room temperature or refrigerated.
- Prep Time: 20 min
- Cook Time: 30 min
- Category: Dessert
- Method: Baking
- Cuisine: American
Nutrition
- Serving Size: 1 square
- Calories: 300
- Sugar: 35
- Sodium: 80
- Fat: 16
- Saturated Fat: 10
- Unsaturated Fat: 6
- Trans Fat: 0
- Carbohydrates: 38
- Fiber: 2
- Protein: 4
- Cholesterol: 60
Keywords: brownies, mint chocolate, fudge, dessert, chocolate chips, peppermint