
If you’re staring down a massive chocolate craving but you’re worried about that dreaded gluten-free crumble, stop everything! I have cracked the code. Seriously, I spent too many afternoons messing with ratios—too dry, too gummy, too crumbly—but I finally landed on this recipe for the absolute best, softest Gluten Free Whoopie Pies you will ever eat. They taste exactly like the real deal, maybe even better because you don’t have to worry about anything falling apart. The secret is getting that cake batter just right so it holds all that creamy filling without turning into sand!

Why You Will Love These Gluten Free Whoopie Pies
I know what you’re thinking when you see “gluten free”: dry, dense, and disappointing. Nope! Not here. These turn out so perfectly that I’ve tricked every non-GF friend I know. It’s quick magic, I promise. You really need to try these!
-
Perfectly Soft Cake Texture
These aren’t cookies that try to be cakes; they just work! They have that pillowy, tender crumb you crave in a real whoopie pie—moist from the buttermilk and cocoa, and never crumbly. They hold together beautifully when you squish them.
-
Creamy, Dreamy Filling
The filling is non-negotiable perfection. It’s rich, slightly sweet, and so impossibly fluffy from beating the butter and sugar just right. It perfectly balances the deep, dark chocolate of the cake parts. I could eat the filling with a spoon, honestly!
-
Naturally Gluten Free Whoopie Pies
Honestly, the fact that these are Gluten Free Whoopie Pies is just a bonus! No weird aftertastes or strange textures here. They are just pure, classic American comfort food that happens to fit perfectly into a gluten-free diet. You won’t even remember what you skipped!
Plus, the whole thing comes together in under an hour! We all need recipes that fast sometimes. If you want to level up your general baking game, check out some of my general baking wisdom here—it helped me get this recipe dialed in!
Essential Ingredients for Gluten Free Whoopie Pies
Okay, pay attention here, because when you’re baking gluten-free, the ingredients are non-negotiable! This recipe is built on quality components to make sure those chocolate cakes stay tender and don’t turn into dust when you try to pick them up. I’ve listed everything exactly as I use it. If you end up needing a buttermilk substitute, I have a little trick you can read about right here.
For the Chocolate Cakes
- 1 3/4 cups gluten-free all-purpose flour blend (Make sure yours has xanthan gum! Trust me on this one—it’s vital for structure.)
- 1 3/4 cups granulated sugar
- 3/4 cup unsweetened cocoa powder (Use good quality stuff; it’s the main flavor!)
- 1 teaspoon baking soda
- 1/2 teaspoon salt
- 1/2 cup unsalted butter, softened (Not melted, softened! This is key for mixing.)
- 2 large eggs
- 1 teaspoon vanilla extract
- 1 cup buttermilk (Our secret weapon for tenderness!)
For the Creamy Filling
This is where we get fluffy. Make sure both the butter and your powdered sugar are ready to go for the best results.
- 1 cup powdered sugar
- 1/2 cup unsalted butter, softened (Again, gotta be elbow-soft for creaming!)
- 1 teaspoon vanilla extract
See? Simple ingredients, right? But the precision in those measurements is what keeps these from collapsing!
Step-by-Step Instructions for Perfect Gluten Free Whoopie Pies
Don’t let the steps scare you; these are super fast once your ingredients are measured out. We’re basically whipping up a thick chocolate batter, dropping it onto sheets, and then making that amazing fluffy frosting. It all moves along quickly, especially since the baking time is so short. If you need a refresher on general baking precision, I put some tips right here!
Preparing the Chocolate Cake Batter
- First thing first: crank that oven to 350°F (175°C) and get your baking sheets lined with parchment paper. Don’t skip the parchment, trust me!
- Grab a big bowl and whisk together all your dry stuff: the gluten-free flour blend, sugar, cocoa powder, baking soda, and salt. Whisk it really well so there are no clumps of cocoa hiding anywhere.
- Now add the wet ingredients into that dry mix: the softened butter, the eggs, vanilla, and the buttermilk. Mix it on low speed with your electric mixer until it just comes together. Seriously, stop mixing the second you don’t see streaks of flour anymore. Overmixing these cakes leads to a less-than-perfect chew!
Baking and Cooling the Cakes
Scoop out round tablespoons of batter and drop them onto your prepared sheets. Make sure to leave about 2 inches between each one because they do spread a little. Pop them in the oven and bake for just 10 to 12 minutes. You’ll know they’re done because they firm up nicely. Let them rest right there on the sheet for five minutes—this prevents them from cracking—then move them gently onto a wire rack to cool down completely before we fill them.

Making the Sweet Filling
While those gorgeous chocolate cakes are cooling, we make the star of the show! Use a clean bowl and beat the powdered sugar, the other half-cup of softened butter, and the vanilla extract. You need to whip this until it’s really light and fluffy. It should almost double in volume; that’s how you know it’s perfect for sandwiching.
Assembling Your Gluten Free Whoopie Pies
Once everything is totally cool—and I mean totally cool, or the filling melts—it’s sandwich time! Take one chocolate cake piece and spread a generous dollop of that fluffy filling right onto its flat bottom side. Then, take a second cake and gently place the flat side down on top of the filling. That’s it! Now you have a perfect Gluten Free Whoopie Pie ready for eating.

Tips for Success with Gluten Free Whoopie Pies
When you’re baking gluten-free, every little step makes a huge impact, right? It’s not just about swapping out flour; it’s about managing structure entirely differently. I’ve learned a few things the hard way over the years—like ending up with chocolate hockey pucks—but these tips will make sure your Gluten Free Whoopie Pies come out soft and perfect every time. You can find even more general baking fixes here, but these are my must-know rules for this recipe.
Flour Blend Selection for Gluten Free Whoopie Pies
This is the most important thing if you’re new to GF baking. You absolutely must use a good quality gluten-free all-purpose flour blend that already includes xanthan gum. Xanthan gum acts like the gluten that we’re missing—it gives the batter body and elasticity. If you use a blend without it, your cakes will definitely be too delicate and prone to breaking apart when you try to fill them. No gum, no lift!
Buttermilk Substitute Guide
If you don’t keep buttermilk on hand, don’t stress! It’s a lifesaver for these chocolate cakes because the acidity keeps them tender, but you can easily make your own substitute. Just take one cup of regular milk—whole milk works best, but whatever you have is fine—and stir in one tablespoon of white vinegar or fresh lemon juice. Let it sit on the counter for about five minutes until it looks slightly curdled. That’s your fresh buttermilk, ready for action! If you ever need more guidance on this, I wrote a little cheat sheet just for you.
Preventing Overmixing
This is where most people go wrong with GF batters, especially when we add wet ingredients to the dry mix. When you overmix gluten-free flour, especially after the wet ingredients go in, you develop a really unappetizingly gummy or sometimes gritty texture. We want cake, not putty! Mix only until the streaks of flour disappear. Seriously, put the mixer down immediately once that dry stuff vanishes. A few lumps of butter are totally fine; they’ll melt away in the heat.
Variations for Your Chocolate Gluten Free Whoopie Pies
Once you master the base recipe for these Gluten Free Whoopie Pies, and trust me, you will master it because it’s so straightforward, you might want to mix things up a little! I love experimenting with the filling flavors—that creamy center is just begging for a little extra personality sometimes. Changing the cake base is less dramatic, but a tiny adjustment can make a big difference in the overall experience. It’s still fast, it’s still gluten-free, and it’s still delicious!
Filling Flavor Twists
The filling is so easy to customize; it really only takes a teaspoon or two of an extra flavor to transform the whole sandwich cookie. If you are a coffee lover like me, adding one teaspoon of finely sifted instant espresso powder into the filling while you beat the butter and sugar is incredible. It really deepens that chocolate flavor without making it taste like coffee!
Another fun one, especially around the holidays, is peppermint! Just swap out the vanilla extract in the filling for about 1/2 teaspoon of pure peppermint extract instead. Be careful not to use too much, though; peppermint is potent! If you like that chocolate peanut butter combo, you could even try mixing in a spoonful of peanut butter—it’s heaven, check out my sandwich cookie inspiration here!
Cake Flavor Adjustments
For the chocolate cake halves, the key is to keep the moisture and structure the same, so we are only talking about subtle additions to the dry mix before the wet ingredients go in. A tiny pinch (seriously, just a pinch!) of cinnamon blended with the cocoa powder adds a lovely warmth that you wouldn’t be able to place but would definitely miss if it wasn’t there.
If you want something powerful, try adding about one teaspoon of instant coffee granules right into the dry ingredients with the flour and sugar. It won’t make the cakes taste like coffee, but it will exponentially deepen the richness of the cocoa powder. It’s my favorite little trick for turning good chocolate into *great* chocolate in any dessert.
Storage and Reheating Instructions for Gluten Free Whoopie Pies
One of the best things about these Gluten Free Whoopie Pies is that they actually freeze really well, but there’s a catch—you have to freeze them *before* you fill them. The creamy frosting in the middle doesn’t handle the freezer or sudden temperature changes very gracefully, and we definitely don’t want that lovely buttercream getting weepy!
If you assemble them right away, you’ll want to keep them in the fridge. Because of that delicious, dairy-based filling, just pop them into an airtight container. They stay perfectly soft and tender in the refrigerator for about three to four days. I find they taste best, texture-wise, if you pull them out about 20 minutes before serving so the filling softens up a tiny bit from the fridge chill.

Now, about reheating: please don’t even try it! Whoopie pies, especially the ones with creamy frosting like these, are best served cool or at room temperature. Any attempt to microwave them, even for a second, is going to make a sticky mess out of that beautiful filling and probably make the cake parts gummy. Just enjoy them fresh or chilled!
If you *must* bake ahead, store your cooled chocolate cake halves in a well-sealed container on the counter for a day, or freeze them in a freezer bag for up to a month. Once thawed, then you can whip up a fresh batch of filling and assemble them. It keeps everything tasting their absolute best!
Serving Suggestions for Gluten Free Whoopie Pies
Honestly, once you take a bite of these rich, chocolatey Gluten Free Whoopie Pies, you might just want to sit right down and eat the whole thing naked, no garnish needed! But if you’re planning a little dessert spread, or if you just want to turn this treat into a real experience, you need the right drink by its side. Deep chocolate needs something creamy or something strong to cut through it, right?
These sandwich cookies are so decadent, they really play well with simple pairings. They don’t need anything complicated standing next to them, just something reliable that complements that dark cocoa flavor we worked so hard on!
Perfect Beverage Pairings
When you have intense chocolate, you have a few classic routes you can take, and they all work wonderfully with how soft these cakes are. The best part is, you can keep it super simple!
- A Big Glass of Cold Milk: You can’t mess with tradition! The cold milk cuts right through the richness of the chocolate and the sweetness of the filling. Childhood classic for a reason.
- Strong, Black Coffee: If you’re an adult enjoying this after dinner, a strong cup of hot coffee is amazing. The slight bitterness of the coffee really enhances the depth of the cocoa powder—it makes the chocolate taste even *more* chocolatey, if that makes sense!
- A Complementary Shake: If you want to go all-out decadent, skip the plain milk and grab a shake! Something fruity can be amazing with dark chocolate, or you could double down on the comfort. I actually have a super creamy strawberry milkshake recipe that offers a fantastic tart contrast to the heavy chocolate of the whoopie pie. Trust me, you won’t regret it!
Whatever you pick, just make sure you have a napkin handy. That creamy filling *will* try to escape when you take a big bite!
Frequently Asked Questions About Gluten Free Whoopie Pies
I know when you tackle a recipe like this, especially a delicate one like Gluten Free Whoopie Pies, you probably have a few questions bubbling up. Don’t worry, I get asked these all the time! Dealing with gluten-free baking always requires a little extra insight, so here are the things people ask me most often about keeping these chocolate sandwich cookies perfect.
Can I use almond flour instead of a GF blend for these Gluten Free Whoopie Pies?
Oh, I wish it were that easy! Almond flour behaves totally differently than your standard gluten-free all-purpose blend. It has a lot more fat and doesn’t absorb liquid the same way, so if you swap it out straight across, you’ll end up with flat, greasy puddles instead of cute little cake tops. For this recipe, you absolutely need that balanced gluten-free blend that includes xanthan gum. Stick to the recipe for the best structure!
How long do these sandwich cookies stay fresh?
Because the filling is butter and powdered sugar based, they are best eaten sooner rather than later, but they hold up surprisingly well. Once fully assembled, I store them in an airtight container in the back of the fridge. They are definitely good for up to three to four days. My secret is to pull them out about 20 minutes before I serve them because the filling stiffens up a bit when it’s cold, and you want that creamy texture.
Can I freeze the chocolate cake parts before filling?
Yes, absolutely! This is a great make-ahead move for busy weeks. The chocolate cake components freeze beautifully. Just make sure they are completely cool, put them in a tightly sealed freezer bag—maybe wrap the stack in a little plastic wrap first to keep air out—and they keep perfectly for about a month. When you want to make your Gluten Free Whoopie Pies, just let them thaw on the counter for an hour, whip up a quick batch of the creamy filling, and assemble!
Share Your Gluten Free Whoopie Pies Creations
I truly hope you had as much fun making these as I did perfecting them! These Gluten Free Whoopie Pies are definitely my go-to when I need a guaranteed chocolate hit, and I really hope they bring a little happy comfort to your table, too.
Now, the best part: I want to see your masterpieces! Did you stick to the classic cocoa flavor, or did you try that sneaky espresso powder twist in the filling? Don’t be shy! Snap a picture of your perfect chocolate sandwich cookies and tag me on social media. I get so excited seeing them come to life in your kitchens.
If you loved how tender the cakes turned out and you want to offer feedback, please leave a star rating right below this post! Your thoughts help me keep baking for you. And if you have any tricky questions or want to share a story about your baking adventure, you can always reach out to me directly through my contact page. Happy baking, everyone!
Print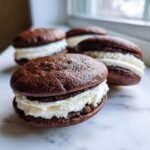
Gluten Free Chocolate Whoopie Pies
- Total Time: 32 min
- Yield: 12 whoopie pies 1x
- Diet: Gluten Free
Description
A recipe for soft, chocolate cake-like cookies filled with a sweet, creamy frosting.
Ingredients
- 1 3/4 cups gluten-free all-purpose flour blend
- 1 3/4 cups granulated sugar
- 3/4 cup unsweetened cocoa powder
- 1 teaspoon baking soda
- 1/2 teaspoon salt
- 1/2 cup unsalted butter, softened
- 2 large eggs
- 1 teaspoon vanilla extract
- 1 cup buttermilk
- 1 cup powdered sugar
- 1/2 cup unsalted butter, softened
- 1 teaspoon vanilla extract
Instructions
- Preheat your oven to 350 degrees F (175 degrees C). Line baking sheets with parchment paper.
- In a large bowl, whisk together the gluten-free flour blend, sugar, cocoa powder, baking soda, and salt.
- Add the 1/2 cup softened butter, eggs, and buttermilk to the dry ingredients. Mix with an electric mixer until just combined. Do not overmix.
- Drop rounded tablespoons of batter onto the prepared baking sheets, spacing them about 2 inches apart.
- Bake for 10 to 12 minutes. Let the cookies cool on the baking sheet for 5 minutes before transferring them to a wire rack to cool completely.
- To make the filling, beat the 1 cup powdered sugar, 1/2 cup softened butter, and 1 teaspoon vanilla extract until light and fluffy.
- Once the cookies are cool, spread a generous amount of filling on the flat side of one cookie. Top with another cookie, flat side down, to form a sandwich.
Notes
- Use a gluten-free flour blend that contains xanthan gum for best results.
- If you do not have buttermilk, mix 1 cup of regular milk with 1 tablespoon of white vinegar or lemon juice and let it sit for 5 minutes before using.
- Prep Time: 20 min
- Cook Time: 12 min
- Category: Dessert
- Method: Baking
- Cuisine: American
Nutrition
- Serving Size: 1 whoopie pie
- Calories: 350
- Sugar: 35
- Sodium: 150
- Fat: 20
- Saturated Fat: 12
- Unsaturated Fat: 8
- Trans Fat: 0
- Carbohydrates: 45
- Fiber: 2
- Protein: 4
- Cholesterol: 60
Keywords: Gluten Free Whoopie Pies, chocolate whoopie pies, gluten free dessert, sandwich cookies