
Okay, let’s be honest. Finding truly *good* bread when you’re eating gluten-free can feel like chasing a unicorn. Most bakery naan bread is off-limits, and the packaged stuff is usually dry or stiff, right? I spent what felt like years wrestling with crumbly, tasteless flatbreads before I finally cracked the code.
But I’m telling you, this recipe is the real deal. We’re making soft, chewy **Gluten Free Naan Bread**—the kind that actually puffs up and has those perfect little charred spots, ready to scoop up tons of curry! Mastering yeast in gluten-free baking takes a little patience, but when you see that dough rise for the first time, you just know you’ve nailed it. This is my favorite discovery from my gluten-free kitchen experiments!

Why This Gluten Free Naan Bread Recipe Works (Expert Tips)
When you’re baking without gluten, texture is everything, and that’s where a lot of people get frustrated. Traditional naan stretches because of the strong gluten network, but we don’t have that luxury! My secret weapon here is moisture and richness. The combination of plain yogurt—it keeps the crumb tender—and the olive oil adds necessary fat. Fat helps coat the gluten-free flour particles, which stops them from grabbing onto each other too tightly and turning rock hard.
If you want soft, pliable **Gluten Free Naan Bread**, you have to treat the dough gently and focus on hydration. I learned this trick reading up on general baking science, and it’s absolutely essential for yeast baking without wheat. You can see more great advice on general baking techniques here: baking tips to make you a better baker.
The Role of Yeast Activation in Gluten Free Naan Bread
This first little step is non-negotiable for getting that desirable puff. Yeast needs warmth to wake up and start doing its job, which is creating those beautiful gas pockets. If the water is too cold, they sleep in! If it’s steaming hot, they die immediately. You absolutely must hit that sweet spot of 105 to 115 degrees Fahrenheit. That foamy top is your visual guarantee that your rise is going to happen, even without gluten structure holding everything together.
Achieving Chewiness in Gluten Free Naan Bread Dough
Listen, the dough for **Gluten Free Naan Bread** is going to feel fundamentally wrong compared to regular bread dough. It’s going to be softer, stickier, and just a bit slacker. Please don’t panic and keep adding flour! The yogurt and the oil are working hard to create a pliable texture. When you gently knead it for those two minutes, you are just trying to incorporate everything evenly. Remember, we aren’t building long gluten strands; we are just setting the stage for a beautiful, chewy cook on the hot skillet.
Ingredients Needed for Perfect Gluten Free Naan Bread
Getting the right ingredients ready beforehand is half the battle, especially in gluten-free yeast baking. Having everything measured out and prepared means you won’t be fumbling when that yeast mixture starts bubbling! If you ever need ideas on swapping dairy, I have a great post on buttermilk substitutions you might find helpful: make buttermilk substitutions.
For this recipe, you need to make sure all your wet components are ready to go—we need that bowl of warm water hovering right around 110°F, the plain yogurt ready, and the olive oil measured. The core of this **Gluten Free Naan Bread** is simple, but those preparations are what count.
Flour Blend Specification for Gluten Free Naan Bread
The flour is where we need to talk business. Do not just reach for any bag of gluten-free flour you have sitting around! We absolutely, positively need a good blend designed for yeast breads. What’s critical is the binder—the xanthan gum. If the blend you buy already has it included, great! If it doesn’t, you *must* add that teaspoon yourself, otherwise, your **Gluten Free Naan Bread** will spread out into a sad, thin cracker instead of puffing up gorgeously.
You’ll need about two and a half cups of that special GF flour blend, plus the salt mixed in. Also, remember to keep extra flour handy! You will need it lightly floured on the surface when you go to roll out your ovals. It helps stop that sticky dough from clinging to your countertop.
Step-by-Step Instructions for Homemade Gluten Free Naan Bread
Okay, now for the fun part where the magic really happens! Since we’re dealing with yeast and no gluten structure, following the sequence matters a lot, but don’t stress about perfection. We aren’t looking for a super tight structure here; we want soft and yielding. If you want to see other ways I coax amazing texture out of my gluten-free doughs, check out this recipe: so soft and fluffy 1 amazing gluten-free. Trust me, the order matters!
Proofing the Yeast and Mixing the Gluten Free Naan Bread Dough
First things first: wake up the yeast! That warm water—it has to be warm, like a cozy bath, not hot—gets mixed gently with the sugar and the yeast. Set that aside for five to ten minutes. You are looking for foam, bubbles, and a lovely yeasty smell popping up. If you don’t see foam, dump it out and start over because your yeast is sleeping! While that’s happening, whisk your GF flour and salt in a big bowl. Once the yeast is lively, add it right into the dry stuff along with your yogurt and olive oil. Mix it until it just comes together into what I call ‘sticky soft.’ Seriously, this **Gluten Free Naan Bread** dough is never going to be firm like pizza dough.
Rising and Shaping the Gluten Free Naan Bread Portions
Pop that sticky dough into an oiled bowl, cover it tight with plastic wrap, and find a warm spot. This is where patience pays off! You need that dough to go for at least an hour, maybe an hour and a half, until it’s doubled in size. It might not be as dramatic as wheat dough, but it will definitely look fuller. Once it’s risen, gently push the air out—no smashing! Divide it carefully into six equal pieces. Roll them out gently one at a time—I like an oval or a teardrop shape—aiming for about a quarter-inch thick. Don’t roll them paper-thin! That thickness helps them puff up nicely when they hit the heat. You can find another fantastic fluffy flatbread adventure here: unleash amazing homemade pillowy naan in 2 hrs.
Cooking the Gluten Free Naan Bread on a Hot Skillet
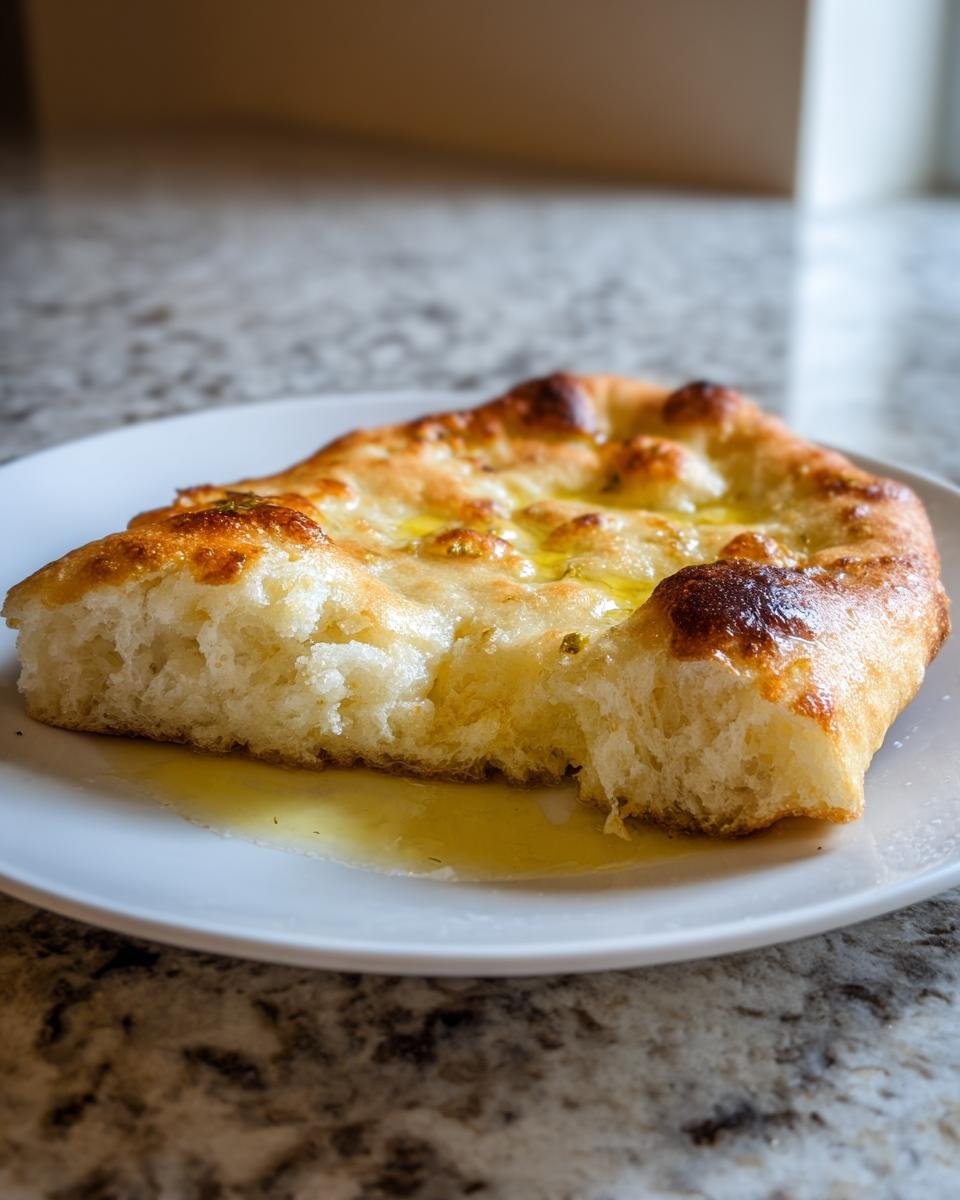
This is the exciting part! Get your cast-iron skillet ripping hot over medium-high heat. I mean seriously hot—no oil in the pan at all! When you drop a piece of **Gluten Free Naan Bread** dough on there, it needs to sizzle immediately. Cook it for about two to three minutes. You want to see big, beautiful bubbles forming all over the surface. If you want them to really puff up like they do in restaurants, grab your sturdy spatula and press *gently* down right in the middle of those bubbles. This encourages the steam built up inside to expand! Flip it and cook the other side until it’s marked up nicely. Immediately brush that warm bread with melted butter or ghee—that’s the final touch that seals in the flavor and keeps these beauties soft!
Tips for Success When Making Gluten Free Naan Bread
Even after you get the main steps down, there are a few little things that elevate good homemade **Gluten Free Naan Bread** to truly great. I’ve made my share of flat, slightly grey mistakes, so I’m happy to share my hard-won shortcuts with you. These tips focus on getting that perfect cook every single time.
First off, temperature control on your skillet is key. If the pan isn’t ripping hot, the dough sits there steaming itself into a gummy mess instead of puffing up and browning quickly. You need that immediate reaction on the surface! Make sure your cast iron is hot enough to sizzle instantly when the dough touches it.
Secondly, don’t skimp on the butter or ghee *after* cooking. Seriously, this is crucial for that mouthfeel. As soon as the naan comes off the hot skillet, brush it generously with melted butter or ghee while it’s still steaming. This traps the moisture inside and gives you that melt-in-your-mouth softness that defines amazing **Gluten Free Naan Bread**.
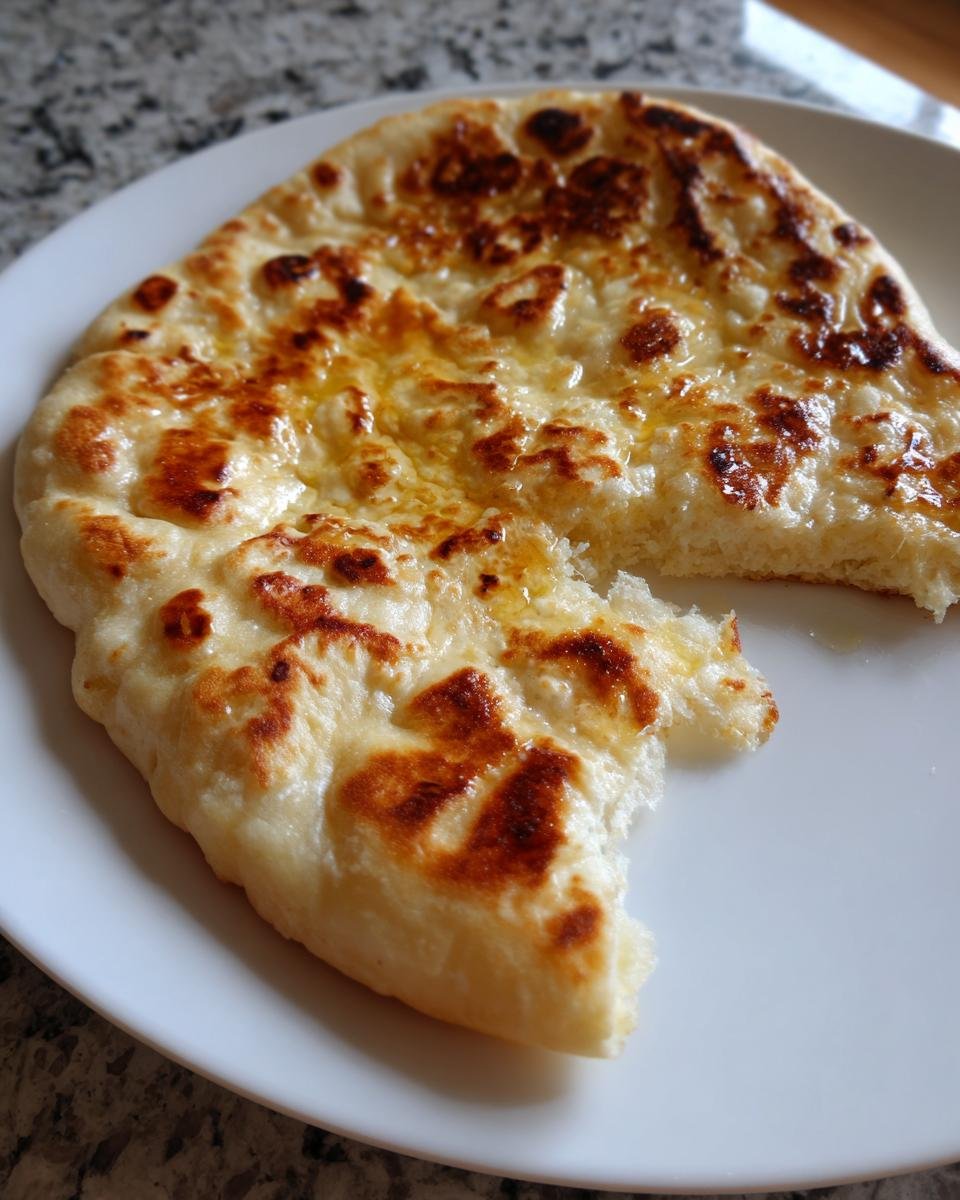
My third little tip addresses the charring. If you want that authentic, slightly blackened look you get at a restaurant, you can quickly utilize your stovetop flame—but be careful! After you pan-cook the naan for most of its time, you can use tongs to briefly (just a few seconds!) hold the naan directly over a low gas flame. This gives you fantastic blistered spots instantly. Never leave it unattended, or you’ll end up with charcoal instead of **Gluten Free Naan Bread**!
Finally, work quickly once you divide the dough for shaping. Gluten-free flours absorb moisture much faster than wheat flour does, so if your shaped pieces sit around too long waiting their turn, they start drying out on the edges. Get them into the pan while they are still slightly pliable.
Serving Suggestions for Your Homemade Gluten Free Naan Bread
Honestly, once you pull these warm, buttery flatbreads off the skillet, the hardest part is figuring out what to serve them with! These aren’t just plain sides; they are essential dipping tools for the best meal experience. Forget your usual dinner roll; this naan begs for something flavorful!
My number one obvious suggestion is a rich, saucy curry, of course! Whether it’s a creamy lentil dal or a vibrant chicken tikka masala, you need something hearty for scooping. The slight chewiness of the bread absorbs all that extra sauce perfectly right up to the last drop. Don’t waste any sauce on the bottom of the bowl!
But naan is so versatile, you don’t have to stick to Indian food. I absolutely love these served alongside hearty Mediterranean or Middle Eastern stews. Think really thick lamb tagine or even just simple braised chickpeas. The slightly sweet, yeasty flavor complements those savory herbs beautifully.

And for a quick snack? You cannot beat using them as the base for a quick dipping platter. I sometimes serve them warm with whipped feta dip or maybe a really garlicky homemade hummus. Speaking of hummus, if you are looking for a fantastic dip recipe, you have to check out this creamy hummus pasta recipe to see what else you can blend up: creamy hummus pasta a deliciously easy recipe. It’s such a perfect vehicle for hearty dips!
Seriously, tear a piece, slather it with yogurt mixed with garlic and herbs, and you’ve got an easy appetizer that disappears way too fast!
Storage and Reheating Instructions for Gluten Free Naan Bread
Okay, this is an important part where people often mess up their **Gluten Free Naan Bread**! Because we aren’t working with the structural integrity of wheat, these beauties tend to firm up faster once they cool down completely. You absolutely must resist stacking them on a plate to cool uncovered; they’ll turn stiff and sad within the hour!
The second each naan comes off that hot skillet and gets brushed with butter or ghee, you need to wrap it tightly. I mean, really wrap it up in a clean kitchen towel, and then maybe nestle that towel inside a ziplock bag or an airtight container. This traps all the residual steam, keeping them wonderfully pliable and soft for a day, or even two! Seriously, they are best eaten the day you make them, but this wrapping trick works wonders.
Now, if you have leftovers and decide to reheat them the next day, you need to bring that heat back quickly to reactivate the moisture. Microwaving is fast, I admit, but it often leads to a slightly chewy or rubbery texture once it cools again. For me, the absolute best way to reheat **Gluten Free Naan Bread** is to do it fast and dry.
- Pop the naan directly onto a dry, hot griddle or skillet (medium heat this time, not screaming hot).
- Heat for about 30 seconds per side. You don’t need oil, but if they look dry, a tiny spritz of water—like one quick spray—can help revive the pliability just before heating.
- Watch them carefully! You only want to reheat them until they are warm through and maybe start bubbling a tiny bit again. They shouldn’t brown deeply again.
If you’re planning way ahead, you can definitely freeze your **Gluten Free Naan Bread**. Individual wrap each piece tightly in plastic wrap first, and then put those wrapped pieces into a freezer bag. They keep great this way for about a month. When you’re ready to eat them, just let them thaw on the counter for an hour, and then follow the quick skillet reheat method above. They come out almost perfect—I promise!
Frequently Asked Questions About Gluten Free Naan Bread
I know you might have a few lingering doubts, especially if you’ve had disastrous experiences with gluten-free dough before! Yeast baking feels intimidating, but for this **Gluten Free Naan Bread**, we’ve simplified everything. Here are a few questions I get all the time when people try this recipe for the first time.
Can I make Gluten Free Naan Bread without yeast?
You *could* try to make a quick bread version, maybe using baking powder instead of yeast, but honestly, I wouldn’t recommend it if you want that iconic naan experience. Yeast gives us that light, airy, slightly tangy flavor and—most importantly—the big, distinctive bubbles that characterize great flatbread. Without the yeast, you’d end up with something closer to a dense, greasy cracker. If you’re aiming for true **Gluten Free Naan Bread**, stick with the yeast activation step! It’s worth the 10 minutes of waiting time, trust me.
What is the best gluten-free flour blend for this Gluten Free Naan Bread?
The flour blend is the bedrock of this whole recipe, so choose wisely! You want a high-quality, multi-purpose gluten-free all-purpose flour blend that is specifically sold for baking things like cookies or breads. The real kicker here is the binder. My instructions mention that the blend needs to include xanthan gum. Xanthan gum acts like the protein structure found in wheat, giving your dough elasticity so it can stretch and hold air. If your favorite blend doesn’t have it listed in the ingredients, you have to add that teaspoon of pure xanthan gum yourself. It’s the MVP ingredient for successful **Gluten Free Naan Bread** batch after batch!
Estimated Nutritional Data for Gluten Free Naan Bread
I am happy to share the estimated nutrition information for this recipe! Now, remember, I mix this up by hand sometimes, and the exact brand of gluten-free flour or yogurt can make a tiny difference, so think of these numbers as a really helpful guide rather than something for serious dietary tracking.
Since this recipe makes 6 generous portions, here’s what you can generally expect per piece of naan:
- Serving Size: 1 piece
- Calories: 180
- Fat: 6g
- Saturated Fat: 2g
- Carbohydrates: 29g
- Fiber: 2g
- Sugar: 2g
- Protein: 4g
You’ll notice the cholesterol is zero, which is fantastic! That’s thanks to relying on olive oil and dairy or non-dairy yogurt rather than animal fats in the main dough base. Also, the sodium is kept slightly controlled, around 250mg, but always check your salt measurement when you mix everything in!
As I mentioned, please take this as an estimate. If you use ghee instead of butter for brushing, or if you opt for a store-bought flour blend that’s heavier on rice flour than tapioca, the numbers might shift slightly. Overall, though, it gives you a great picture of what you are enjoying!
Share Your Homemade Gluten Free Naan Bread Experience
I honestly cannot wait for you to try making this **Gluten Free Naan Bread**! Seriously, you’ll never look at store-bought flatbread the same way again once you pull these soft, buttery pieces off your hot skillet. It’s such a satisfying bake, and it truly fills the house with the smell of proper bread, which is rare in gluten-free cooking.
When you make them, please, please come back and tell me how they turned out! Did they puff up huge? Were they perfectly chewy? Did you serve them with your favorite curry? Your feedback helps other bakers feel confident about tackling yeasted gluten-free doughs, so don’t be shy!
Drop a rating down below—five stars if they blew your mind! And if you snapped any photos of your gorgeous, bubbly naan, I would absolutely love to see them. You can always reach out to me directly if you have super specific questions that the FAQ didn’t cover; just use my contact page here: contact. Happy baking, and enjoy every single bite of your incredible homemade **Gluten Free Naan Bread**!
Print
Gluten Free Naan Bread
- Total Time: 1 hour 35 min
- Yield: 6 pieces 1x
- Diet: Gluten Free
Description
A recipe for making soft, chewy gluten-free naan bread at home.
Ingredients
- 1 cup warm water (about 105-115°F)
- 1 teaspoon sugar
- 2 1/4 teaspoons active dry yeast
- 2 1/2 cups gluten-free all-purpose flour blend (with xanthan gum)
- 1 teaspoon salt
- 2 tablespoons plain yogurt (dairy or non-dairy)
- 2 tablespoons olive oil
- Extra flour for dusting
- Butter or ghee for brushing
Instructions
- Combine warm water, sugar, and yeast in a small bowl. Let it sit for 5 to 10 minutes until foamy.
- In a large bowl, whisk together the gluten-free flour blend and salt.
- Add the yeast mixture, yogurt, and olive oil to the dry ingredients. Mix until a soft, slightly sticky dough forms.
- Knead the dough gently on a lightly floured surface for about 2 minutes. The dough will be softer than traditional wheat dough.
- Place the dough in a lightly oiled bowl, cover it, and let it rise in a warm place for 1 to 1.5 hours, or until doubled in size.
- Gently punch down the risen dough and divide it into 6 equal portions. Roll each portion into an oval or teardrop shape, about 1/4 inch thick.
- Heat a cast-iron skillet or griddle over medium-high heat until very hot. Do not add oil to the pan.
- Place one piece of naan dough onto the hot skillet. Cook for 2 to 3 minutes per side, until bubbles form and the bread is lightly browned in spots. You can press down gently with a spatula to encourage puffing.
- Remove the cooked naan and immediately brush the top with melted butter or ghee.
- Repeat with the remaining dough portions. Serve warm.
Notes
- If your gluten-free flour blend does not contain xanthan gum, add 1 teaspoon to the dry ingredients.
- For best results, use a good quality gluten-free flour blend designed for yeast breads.
- You can cook the naan directly over an open gas flame for a few seconds after pan-cooking to achieve more charring, if desired.
- Prep Time: 20 min
- Cook Time: 15 min
- Category: Side Dish
- Method: Skillet Cooking
- Cuisine: Indian
Nutrition
- Serving Size: 1 piece
- Calories: 180
- Sugar: 2
- Sodium: 250
- Fat: 6
- Saturated Fat: 2
- Unsaturated Fat: 4
- Trans Fat: 0
- Carbohydrates: 29
- Fiber: 2
- Protein: 4
- Cholesterol: 0
Keywords: Gluten Free Naan Bread, Indian flatbread, yeast bread, dairy optional, homemade naan