
Oh, friend, you know those days when you absolutely *crave* that cozy, spiced apple pie flavor, but you just can’t deal with the fuss of a double crust or the guilt afterwards? I get it! That’s why I spent ages messing around with the crust in my kitchen until I finally nailed these Healthy Apple Pie Bars. Trust me, this recipe is the answer.
We’ve swapped out the white flour for whole grains and cut down on the sugar by using real maple syrup. The best part? That crust! It’s sturdy enough to hold up to the gooey filling, but still crumbly in the best way. It took about three attempts to get the butter cold enough to make it perfect, but we are there now. These bars deliver all the classic cinnamon-apple goodness you adore in a perfectly portionable, mess-free square!

Why These Healthy Apple Pie Bars Are Your New Favorite Treat
You might be wondering what makes these different from the ten thousand other apple bars out there. Well, let me tell you, it’s all about making you feel good about eating dessert! I really focused on making these easy for you.
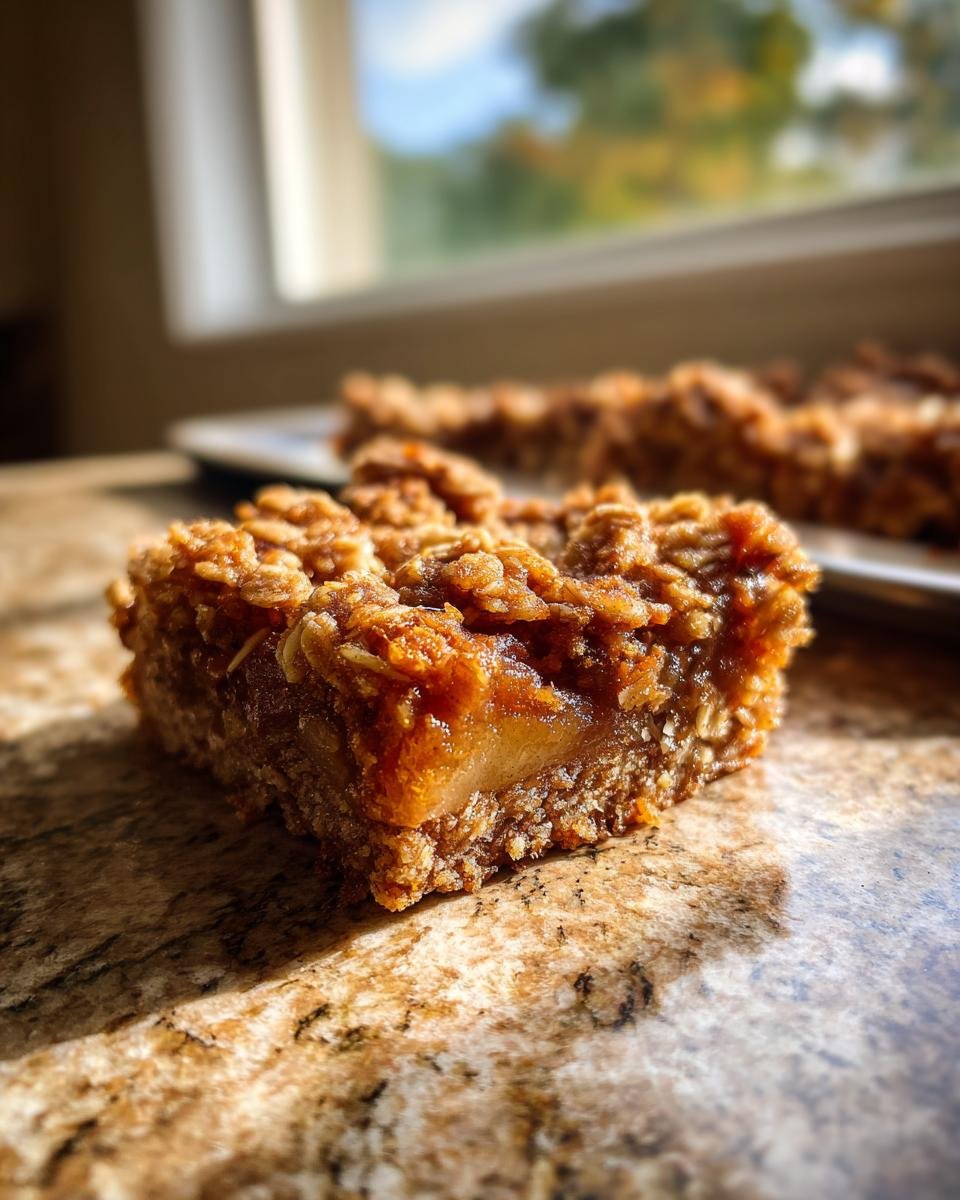
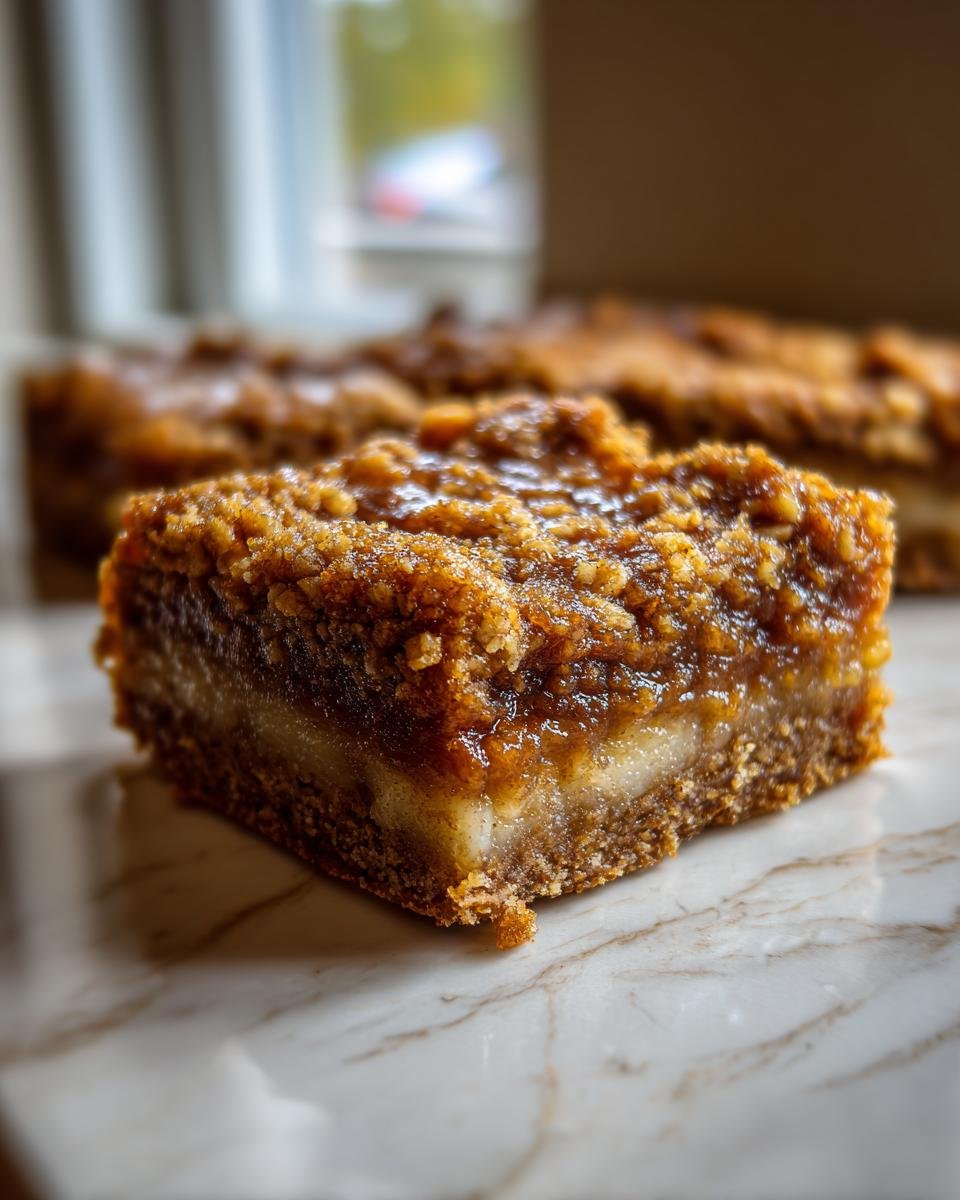
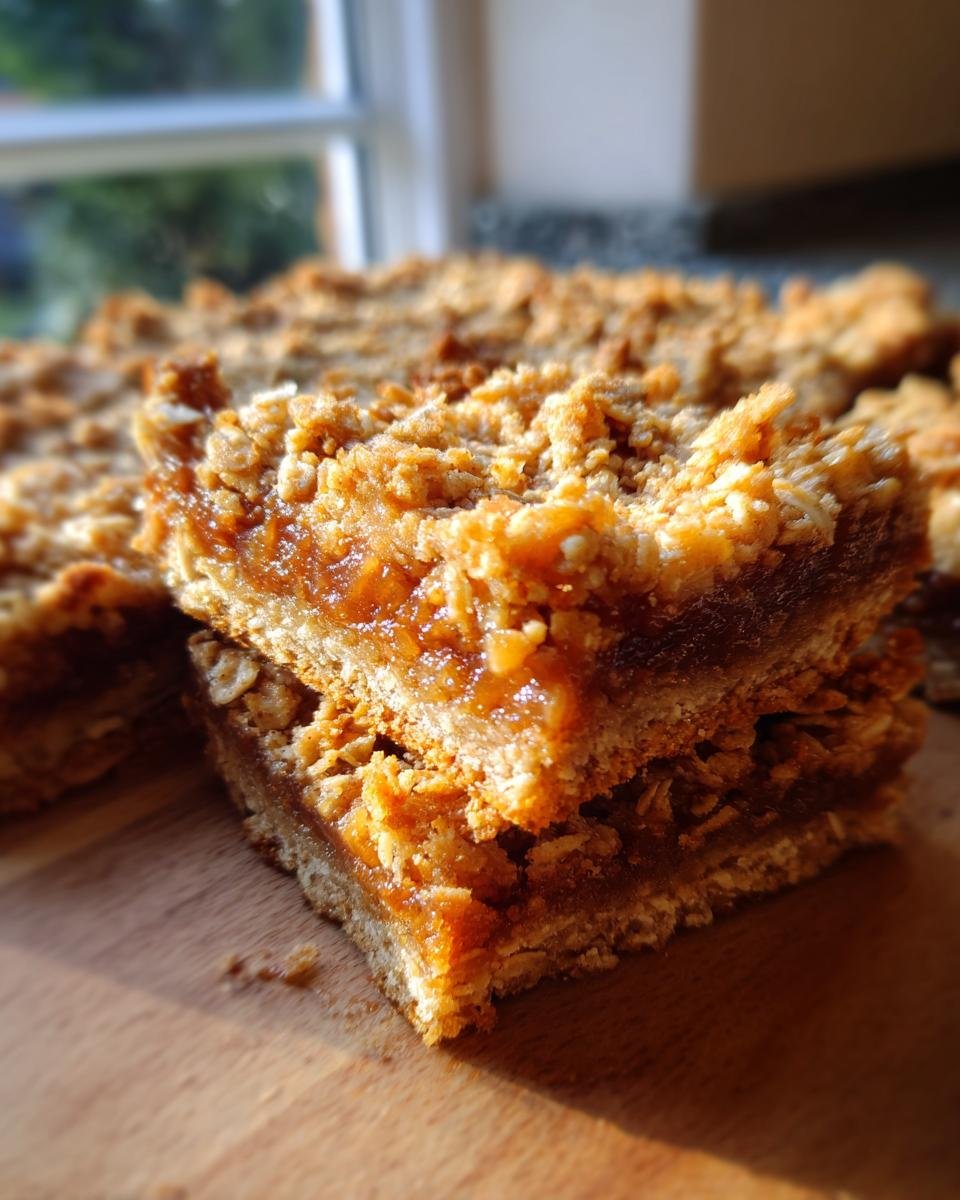
- Whole-grain crust: That satisfying, hearty crunch comes from whole wheat flour and oats. No flimsy crusts here!
- Naturally sweetened filling: We rely on maple syrup. It gives such a deeper, almost caramel-like sweetness that feels way more satisfying than plain sugar.
- Perfect portion control: Since they are bars, you don’t have to worry about guessing what one slice is. Grab one, you’re good!
- Easy to transport: Seriously, these are my go-to for potlucks or picnics. No worries about them melting or falling apart on the way! If you want to perfect your grab-and-go baking game, check out some general baking tips here.
Gathering Ingredients for Your Healthy Apple Pie Bars
Okay, friend, don’t let the word ‘healthy’ scare you off! We are using fantastic ingredients here that give us that famous dessert taste without the usual fuss. When we talk about these Healthy Apple Pie Bars, the secret is really in sticking to whole grains and natural sweeteners. If your ingredients are high quality, the outcome is guaranteed to be amazing. Remember, this recipe makes a beautiful 8×8 pan, which we cut into 16 perfect little squares!
You’ll notice we are keeping things pure—no complicated extracts or weird powders here, just real food doing the heavy lifting. Grab your mixing bowls, we are starting on the necessities!
For the Whole Grain Crust and Crumble
This is where we build the foundation, and the temperature of your butter is absolutely non-negotiable. If the butter is warm or soft, you’ll get mush, not crumbs. I always put my butter in the freezer for about ten minutes right before I start mixing everything else.
- 1 1/2 cups whole wheat flour (It gives such a nice nutty flavor that white flour just misses!)
- 1/2 cup rolled oats (Make sure these are old-fashioned, quick oats change the texture too much.)
- 1/4 cup brown sugar (Good dark brown gives the best molasses depth.)
- 1/2 teaspoon baking soda
- 1/4 teaspoon salt
- 1/2 cup cold unsalted butter, cut into small cubes (Seriously, make them small! Like little dice.)
- 1 large egg
For the Spiced Apple Filling
This is the cozy part! We are loading those apples up with warmth. Forget refined sugar; we are using pure maple syrup here. It melts right into the apples and gives a fantastic, deep sweetness that just sings next to the cinnamon.
- 3 medium apples, peeled, cored, and diced (Don’t chop them huge; we want them to soften nicely.)
- 1/4 cup maple syrup (The real stuff, please!)
- 1 teaspoon ground cinnamon (Don’t skimp, this is the star!)
- 1/4 teaspoon ground nutmeg
- 1 tablespoon lemon juice (This keeps the apples bright and stops them from browning while you work!)
Step-by-Step Instructions for Perfect Healthy Apple Pie Bars
Alright, the moment we put all those lovely ingredients to work! Making these Healthy Apple Pie Bars is really just a two-part process: make the dough, make the filling, then crisscross the layers. You definitely need to get your oven fired up first thing, and you’ll want a standard 8×8 inch baking pan ready to go. I always spray mine lightly with cooking spray, just as an extra layer of defense!
Here’s my big pro tip to make sure that whole-grain crust doesn’t get soggy sitting underneath those juicy apples: before you press in the bottom layer, sprinkle just a *tiny* whisper of flour over the greased pan bottom. It sounds silly, but it creates just enough barrier between the wet apples and the dough. If you’re brushing up on your crust techniques in general, this article on pie crust success might give you a little extra confidence!
Preparing the Crust
We start by building our sturdy base. In a good-sized bowl, just whisk those dry stuff together: the whole wheat flour, oats, brown sugar, baking soda, and salt need a quick mix so everything is evenly distributed. Next, toss in your little cubes of ice-cold butter. You have to work quickly here—either use a pastry blender or just your fingertips—and blend that butter into the dry mix until it looks like coarse, slightly sandy crumbs. If you squeeze a handful, it should hold together loosely.
Now for binding! Whisk that single egg really well, then pour it in and gently mix it until a shaggy dough starts to form. Don’t overwork it, or it gets tough! Once it comes together, take about two-thirds of that dough and press it down firmly and evenly across the bottom of your prepared pan. Get those corners nice and tight!
Assembling and Baking the Healthy Apple Pie Bars
While the crust is resting in the pan, quickly mix up that filling in a separate bowl. You just need to gently toss those diced apples with the maple syrup, cinnamon, nutmeg, and that splash of lemon juice until everything is coated beautifully. Spread that spiced apple mixture evenly right over the dough base you just packed down. Make sure it’s a relatively even layer!
For the grand finale, take that remaining one-third of your dough—it’s going to feel crumbly, and that’s perfect—and just crumble (or sprinkle!) it right over the apples. It forms a gorgeous, rustic topping which will brown up nicely. Pop that pan into your 350-degree oven for about 30 to 35 minutes. You are looking for two things: the topping should be nice and golden brown, and if you peek at the edges, the apple filling should be bubbling gently. The waiting game is the hardest part; you MUST let these bars cool down completely in the pan before you even *think* about cutting them. If you cut them warm, they just turn into a gooey mess!
Tips for Making the Best Healthy Apple Pie Bars
Now that you’ve got the recipe down, I want to share a couple of little tricks that really elevate these Healthy Apple Pie Bars from “good” to “I can’t stop eating them.” Since we aren’t loading these up with tons of refined sugar, the quality of our main players matters even more!
First up: the apples! The recipe notes mention Granny Smith, and I have to wholeheartedly agree. If you use soft, sweet apples, they melt down too much and you lose that nice textured bite in the filling. Granny Smiths hold their shape beautifully and give you the perfect tartness to balance out that maple syrup sweetness. It’s honestly the key to that homemade pie flavor.
Next, let’s talk about keeping things flexible! If your kitchen happens to be running hot—maybe you are baking in the middle of summer—the crust dough can get really soft while you’re pressing it. If you find that happening, just pop that pan into the fridge for about ten minutes before you add your apple layer and sprinkle on the topping. A cold base helps everything set up nicely before it hits the heat.
Lastly, for my friends avoiding dairy, substitutions are easy here! You can absolutely swap that cold unsalted butter for cold coconut oil. You need to make sure the coconut oil is solid, not melted, when you cut it in. It gives a fantastic texture, though the flavor is slightly different. If you’re ever curious about other substitutions for things like milk or sour cream in baking, I always point people toward this guide on great baking substitutions!
Storage and Reheating for Your Apple Pie Bars
Don’t you hate it when you bake something amazing, and then you don’t know how to keep it tasting amazing the next day? If you manage to have any of these Healthy Apple Pie Bars left over—which, let’s be honest, can be a challenge around here—storage is super easy.
Because we used wholesome ingredients and not a ton of super-high sugar icing, how we store them depends on how long we need to keep them. If you think you’re going to demolish the batch within two days, leaving them right on the counter in an airtight container is perfectly fine. The whole-grain crust holds up really well at room temperature.
If you need them to last longer, definitely pop them into the fridge! Slice them up first (it makes grabbing one later so much easier) and stack them layered with a little wax paper between the layers inside a sealed container. They keep beautifully like this for almost a full week. I find they actually taste even better on day two after the flavors have really settled into that crust.
When you’re ready for a treat, reheating is a breeze, especially if you are like me and prefer a slightly warm, gooey center.
For a quick fix, just pop one bar in the microwave for about 10 to 15 seconds. Watch it carefully so it doesn’t get too hot, though! If you have a bit more time and want to bring back that fresh-out-of-the-oven feel, I recommend wrapping the square or two you want to eat in a little foil and heating them in a toaster oven or regular oven at about 300 degrees Fahrenheit for about five minutes. It crisps the topping up just perfectly without drying out the filling. Enjoy!
Frequently Asked Questions About Healthy Apple Pie Bars
So many great questions pop up when people first try this recipe! I totally get it; sometimes we need specific tweaks to make sure these Healthy Apple Pie Bars fit perfectly into our own routines. Here are some of the things I hear most often from folks.
Can I use different types of apples in these bars?
Yes, you absolutely can play around with the apples! The main thing to remember is that you want a firm apple that won’t turn completely to applesauce during baking. While the recipe calls for a mix or leaves it open, I always steer people toward Granny Smith, like in my little note. They stay nice and firm and give you that essential tartness. Honeycrisp or Fuji are also great choices too, but if you use a very sweet apple, you might want to drop the maple syrup down by just a teaspoon or so!
How do I make these Healthy Apple Pie Bars dairy-free?
This one is super easy, thank goodness! If you need these bars to be completely dairy-free, we just tackle the butter. As I mentioned when talking about substitutions, use cold coconut oil instead of the unsalted butter. You need it to be solid, not melted, before you cut it into the flour mixture. Coconut oil behaves almost identically to butter during the crumb-making phase, and it really holds the structure of that whole wheat crust beautifully. Zero fuss!
Can I freeze the baked bars?
Oh, definitely! If you make a double batch—and trust me, you might want to—freezing is the way to go. Once the bars have cooled completely (this is crucial, they cannot be warm at all!), slice them up into your 16 squares. You want to wrap each bar individually in plastic wrap first. Then, stack those wrapped bars inside a heavy-duty freezer bag or an airtight container. They freeze perfectly for up to about three months. When you want one, just pull it out and let it thaw on the counter for an hour, or zap it for ten seconds in the microwave!
Estimated Nutrition for Healthy Apple Pie Bars
Now, I want to be super clear about this part. Because we’re using whole wheat flour and maple syrup instead of highly refined white stuff, the nutrition profile looks a heck of a lot better than your average store-bought slab of pie. But listen, this list is based on dividing the recipe ingredients into 16 equal bars using my standard ingredient amounts. Your exact measurements might be slightly different, so take these numbers as a really good estimate, okay?
I’m thrilled with these numbers, especially having only 180 calories per bar! It’s a genuinely satisfying treat you can feel good about enjoying.
Here is the breakdown for one bar:
- Calories: About 180 – That’s a steal for an apple pie fix!
- Carbohydrates: Around 25 grams. Most of this is coming from the apples and the whole grains, which is what we want because it includes a really nice dose of fiber.
- Total Fat: Roughly 8 grams. Since we are using butter (or coconut oil), we do have some fat, but it keeps the texture amazing.
- Protein: About 3 grams. That little boost comes mostly from the oats and the egg in the crust.
- Sugar: Around 12 grams. Remember, this is primarily natural sugar from the maple syrup and the fruit, not empty processed sugar.
You can see that these Healthy Apple Pie Bars really hit that sweet spot between being delicious and being reasonably balanced for a dessert. Feel free to adjust your slice size, but these calculations are based on 16 squares!
Share Your Healthy Apple Pie Bars Experience
Whew! We did it! We took all that cozy apple goodness and managed to bake it into these perfectly portioned Healthy Apple Pie Bars without all the usual fuss or guilt. Now that you’ve pulled these golden squares out of the oven and let them cool (I know, that part is torture!), I desperately want to hear what you think!
When you bake these up, please take a picture! I absolutely live for seeing your results on social media—it seriously makes my day when I see my recipes popping up in your kitchens. Tag me so I can see how you styled your bars!
More importantly, I need to know how you liked them. Did the whole-grain crust turn out perfectly crumbly? Did you love the maple syrup sweetness? Please hit up the comments section below and leave a rating for this recipe. Your feedback helps me know what recipes to focus on next!
If you have any little adjustments you made for your family—maybe you added pecans to the crumble or used just a touch more nutmeg—share those genius ideas with the rest of us bakers, too! If you need to reach out directly for any specific questions about substitutions or techniques, you can always drop me a note over on the contact page. Happy baking, sweet friend!
Print
Healthy Apple Pie Bars
- Total Time: 55 min
- Yield: 16 bars 1x
- Diet: Vegetarian
Description
Simple bars featuring a whole-grain crust and a spiced apple filling.
Ingredients
- 1 1/2 cups whole wheat flour
- 1/2 cup rolled oats
- 1/4 cup brown sugar
- 1/2 teaspoon baking soda
- 1/4 teaspoon salt
- 1/2 cup cold unsalted butter, cut into pieces
- 1 large egg
- 3 medium apples, peeled, cored, and diced
- 1/4 cup maple syrup
- 1 teaspoon ground cinnamon
- 1/4 teaspoon ground nutmeg
- 1 tablespoon lemon juice
Instructions
- Preheat your oven to 350 degrees Fahrenheit. Lightly grease an 8×8 inch baking pan.
- In a medium bowl, combine the whole wheat flour, rolled oats, brown sugar, baking soda, and salt.
- Cut in the cold butter using a pastry blender or your fingers until the mixture resembles coarse crumbs.
- Whisk the egg lightly and mix it into the flour mixture until a dough forms. Press two-thirds of the dough evenly into the bottom of the prepared pan.
- In a separate bowl, mix the diced apples, maple syrup, cinnamon, nutmeg, and lemon juice.
- Spread the apple mixture evenly over the crust in the pan.
- Crumble the remaining one-third of the dough over the apple layer.
- Bake for 30 to 35 minutes, or until the topping is golden brown and the filling is bubbly.
- Let the bars cool completely in the pan before cutting into squares.
Notes
- For a richer flavor, use Granny Smith apples.
- You can substitute coconut oil for butter if you prefer a dairy-free option.
- Prep Time: 20 min
- Cook Time: 35 min
- Category: Dessert
- Method: Baking
- Cuisine: American
Nutrition
- Serving Size: 1 bar
- Calories: 180
- Sugar: 12
- Sodium: 80
- Fat: 8
- Saturated Fat: 4
- Unsaturated Fat: 4
- Trans Fat: 0
- Carbohydrates: 25
- Fiber: 2
- Protein: 3
- Cholesterol: 25
Keywords: apple pie bars, healthy dessert, whole wheat, oat bars, cinnamon, baked apples