
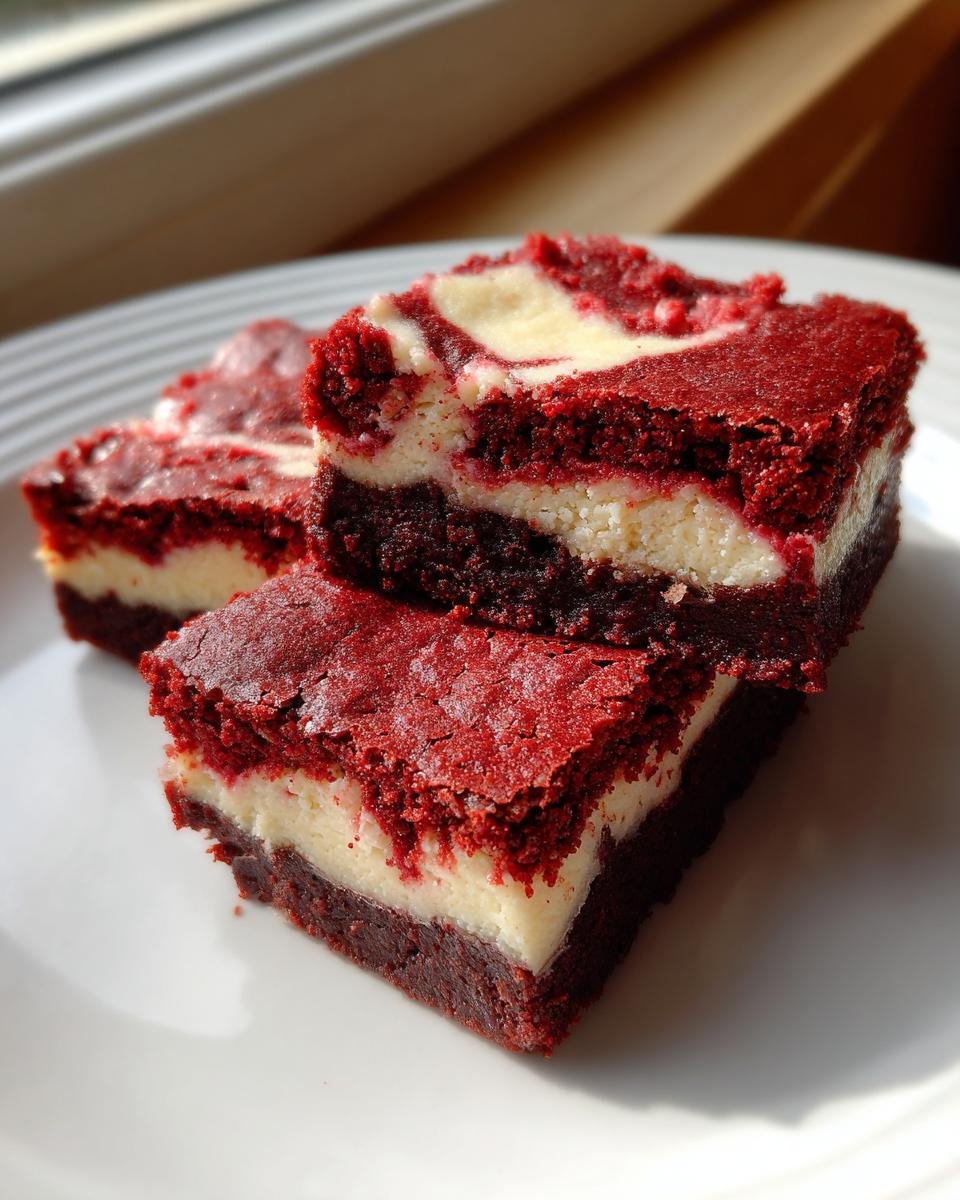
Oh my gosh, you have to try these! If you’re like me and think cake is okay, but brownies are life, then we’ve hit the jackpot here today. We are taking the beautiful, slightly tangy flavor profile of classic red velvet and smashing it into the ultimate rich, fudgy brownie base. Forget those cakey imposters; trust me, these **Red Velvet Brownies** are intensely dense and melt-in-your-mouth good. The real game-changer, though, is that cream cheese swirl. I must have made seven batches before I figured out how to dollop the cheese mixture just right so it marbled without sinking entirely. When you finally pull that pan out and see that gorgeous pattern? Wow, pure magic. This is my absolute favorite way to get that beloved red velvet taste in a satisfyingly chewy square.
Why You Will Love These Fudgy Red Velvet Brownies
I tell everyone who asks: these aren’t just brownies that happen to be red. They’re the best of both worlds in one pan, and honestly, they are my go-to when company drops by unexpectedly. You don’t need a stand mixer or hours of free time to make these sing.

- Purely Fudgy Texture: We are skipping the cakey texture entirely. If you follow my instructions, you get that rich, dense, slightly underbaked magic that good brownies demand. They hold their shape, but they cave satisfyingly when you bite into them.
- The Perfect Swirl: That cream cheese layer isn’t just decoration! It cuts through the deep chocolate flavor we get from the cocoa powder, giving you that classic, slightly tangy red velvet finish in every single bite. It’s beautiful to look at, too.
- Fast Prep Time: Seriously, the mixing only takes about 15 minutes. Once the wet and dry ingredients are married, you just swirl and bake. For tips on how to keep your mixing fast and accurate, check out my general baking guide right here!
- Intense Color Payoff: Because we aren’t using buttermilk or a huge amount of cocoa powder, the red color really pops. It makes them look incredibly special, even though they are simple to throw together.
- Minimal Ingredients, Maximum Flavor: You probably have most of what you need already! No fancy extracts or obscure ingredients here—just good old butter, sugar, eggs, and that touch of vinegar that helps wake up that red coloring.
Essential Ingredients for Perfect Red Velvet Brownies
Okay, here is where we lock in the success of these brownies. Getting the amounts right, especially for this recipe, is the difference between a fudgy dream and a gummy mess! We treat the base and the swirl almost like two separate little baking projects that are destined to meet in the middle. Remember, for the base, we are leaning into a little cocoa for that chocolate backbone, which is what makes these different from a straight-up red velvet cake mix. If you ever run into a situation where you are short milk, don’t panic—I have a great guide on how to make quick buttermilk substitutes if you need it.
For the Fudgy Red Velvet Brownies Base
- 1/2 cup unsalted butter, melted (Make sure it’s measured after melting!)
- 1 cup granulated sugar
- 2 large eggs
- 1 teaspoon vanilla extract
- 1 teaspoon white vinegar (Trust me, it helps the color!)
- 1/2 teaspoon red food coloring (liquid or gel—gel is stronger!)
- 1/4 cup unsweetened cocoa powder
- 1/2 cup all-purpose flour
- 1/4 teaspoon salt
For the Tangy Cream Cheese Swirl
This part needs to be mixed separately until it’s perfectly smooth so it drops onto the batter without lumps. That’s our secret to a clean swirl!
- 4 ounces cream cheese, softened (This has to be room temperature, otherwise it won’t mix!)
- 1/4 cup powdered sugar
- 1/4 teaspoon vanilla extract
Step-by-Step Instructions for Making Red Velvet Brownies
Don’t let the two-tone look intimidate you! Following these steps in order is critical, especially when we add the richness of the cream cheese layer. We want beautiful marbling, not a muddy mess, and that means respecting the mixing times. I’ve broken it down so you can follow along easily. If you need a refresher on basic mixing volume or how much to mix until it’s *just* combined, my general guide on baking tips should help you before you start!
Preparing the Pan and Oven
First things first, get that oven humming at 350°F (175°C). Grab your 8×8 inch pan. Line it completely with parchment paper, making sure to leave an overhang—that’s your little handle for lifting them out later. Don’t skip that overhang; it’s a lifesaver when cutting!
Mixing the Red Velvet Brownie Batter
In one bowl, whisk your melted butter and sugar. Then, beat in those two eggs one by one until they look happy together. Now for the color! Stir in the vanilla and that crucial red food coloring until the whole thing looks like bright, glossy lava. In a separate bowl, quick-whisk your dry stuff—cocoa, flour, and salt. Now, gently fold the dry ingredients into the wet until you see *just* no more flour streaks. I mean it—stop mixing the moment they disappear. Overmixing is the enemy of fudgy brownies!
Creating the Cream Cheese Layer and Swirl
While your dry ingredients were chilling out, you should have whipped up that cream cheese mixture until it was silky smooth. Next, spoon exactly half of your gorgeous red batter into your prepared pan. Drop little dollops of the cream cheese mixture all over that first layer. Then, pour the rest of the red batter right on top. Take a knife or wooden skewer and gently drag it—don’t whip it!—through the layers just two or three times. You want ribbons, not a uniform pink color.
Baking and Cooling Your Red Velvet Brownies
Slide the pan into the hot oven for about 25 to 30 minutes. You are testing for “moist crumbs,” not wet batter, on your toothpick—if it comes out looking totally dry, you’ve gone too far! Once they look set, pull them out. Now here’s my biggest tip: Resist cutting them immediately. Seriously. Let them cool completely, and for the cleanest squares possible, chill those brownies in the fridge for at least an hour before slicing. It makes all the difference!
Tips for Achieving the Best Red Velvet Brownies Texture
Listen, I’ve burned enough batches of brownies in my life to know exactly what makes the difference between a tray of chocolate fudge and a slightly disappointing, chewy brick. For these **Red Velvet Brownies**, the texture is EVERYTHING. We aren’t aiming for cake here; we are aiming for that luxurious mouthfeel that makes you forget everything else.
The first thing you need to remember, and I mean *really* remember, is timing. Overbaking is the fastest way to ruin these beauties. When that toothpick test comes back, you should see moist crumbs clinging to it—that is your signal to pull them out immediately. If it’s dry, you’ve baked a standard chocolate square instead of a fudgy marvel. Don’t worry if the center feels just a tiny bit soft; carryover heat takes care of the rest while they cool down. I promise, resisting the urge to bake them an extra five minutes is half the battle!
Another thing that makes a huge difference is your coloring choice. If you use the liquid red food coloring, you might need a full teaspoon, sometimes a little more, just to make the color pop against the cocoa powder. However, if you have gel food coloring on hand, use that! Gel colors are far more concentrated, meaning you use less wet ingredient overall, which helps keep that fudgy ratio locked in place. Less liquid equals less risk of a cakey texture, so if you bake often, investing in gel is worth it just for this recipe.
Finally, when you mix the batter—and this echoes what I said earlier—stop mixing as soon as the flour disappears. Brownies are tough; they develop gluten faster than almost anything else. Once you see those dry streaks go, you stop stirring, put the spoon down, and fold in the cream cheese layer gently. Quick, decisive mixing is the key to keeping these brownies incredibly tender instead of tough!
Creative Variations for Your Red Velvet Brownies
I could honestly eat these **Red Velvet Brownies** exactly as they are written up above for the rest of my life and be perfectly happy. But sometimes you want to jazz things up a little bit, right? These brownies are super flexible, which I love because it means you don’t have to follow the rules perfectly all the time. They take well to additions, especially since the texture is already so robust and fudgy.
If you want to give these a little extra wow-factor without overcomplicating the whole process, I have a few easy ideas I’ve toyed around with over the years. My sister loves adding chunks of white chocolate—and honestly, so do I! If you’re already looking for more red velvet goodness, you might want to check out my recipe for red velvet Oreo cheesecake, but for brownies, stick to these simple tweaks.
Add White Chocolate Chips: Right before you pour the final layer of batter into the pan, toss about a half cup of white chocolate chips over the top of the batter that’s already swirled. They melt beautifully right into the cream cheese layer, giving you those creamy, soft pockets of sweetness that pair so well with the slight tang of the red velvet base. Don’t stir them in heavily; just let them sit on top!
Try Browned Butter: If you have an extra five minutes, swap out that melted butter for browned butter. Browning the butter adds such a nutty, deep flavor that complements the cocoa powder beautifully. Just melt your butter slowly in a light-colored saucepan until little brown bits start to form at the bottom and it smells nutty—then pour it straight into your sugar mixture as directed. It’s an easy trick that elevates the entire flavor complexity instantly.
A Dusting Before Baking: This is purely for presentation, but I love it. Before the pan goes into the oven, take a tiny fine-mesh sieve and dust just a whisper of extra unsweetened cocoa powder lightly over the top of the red batter. When they bake, this creates a subtle, slightly darker top crust that looks professional and adds just a hint more chocolate dryness to contrast that fudgy center.
Storing and Serving Your Red Velvet Brownies
Now that you’ve gone through all that trouble to make perfect, fudgy **Red Velvet Brownies**, the last thing you want is to store them incorrectly and ruin that texture! Luckily, these are really easy to keep fresh because they are so rich. The key here is keeping that moisture locked in so they stay chewy for days.
When it comes to storage, you need an airtight container. Don’t even think about leaving these uncovered on the counter; they’ll dry out faster than you can say “cream cheese swirl.” You can absolutely keep them right on the counter at room temperature for up to three days. I usually stack them with little squares of parchment paper in between each layer, just to make sure that beautiful marbling on top doesn’t stick to the brownie above it.
If you want them to last longer, say up to a week, pop that airtight container into the fridge. Chilling them is also fantastic because it firms up that cream cheese layer, which helps you get those truly beautiful, clean slices—remember how much I stressed chilling them before cutting? If you fridge them, just remember they firm up a bit more when cold, so let them sit out on the counter for about 20 minutes before you eat them for that perfect fudgy give.
As for serving, I love keeping it simple because the brownie itself is so flavorful. A light dusting of powdered sugar right before serving always looks fantastic against that deep red color. But if you really want to impress someone, serve a square slightly warm—not hot, just warm—with a scoop of really good vanilla bean ice cream. The cold creaminess plays so wonderfully against the slightly tangy chocolate richness of the brownie. Honestly, they go great with coffee, too, if you’re enjoying them in the afternoon!
Frequently Asked Questions About Red Velvet Brownies
When tinkering with a recipe this amazing, questions always pop up! I totally get it. You want these **Red Velvet Brownies** to come out perfectly fudgy every single time, and I’m here to help you troubleshoot those last little details. I’ve gathered the questions I get asked the most about these treats, especially from folks diving into their first batch. If you’re looking for more inspiration after mastering this recipe, you can always check out my other fantastic red velvet adventures over here!
Can I make these Red Velvet Brownies without cocoa powder?
Oh, I wouldn’t recommend skipping the cocoa powder, honestly. I know red velvet cake doesn’t have as much cocoa as a standard chocolate cake, but that little bit we use here is super important! It’s there to give the red color some grounding. Without it, the flavor would just taste aggressively sweet and slightly tangy, and the color wouldn’t look quite right against the cream cheese.
The cocoa is what gives us that beautiful, dark backdrop for the red to pop against, and it deepens the overall chocolate experience when paired with the slight tang from the vinegar. If you absolutely, positively have zero cocoa powder, you could try skipping it, but you’ll definitely lose that classic red velvet complex flavor profile. You’ll just end up with a very sweet, tangy vanilla-ish brownie.
What is the best way to cut clean squares from these fudgy Red Velvet Brownies?
This is the number one question after texture, and it all comes down to one thing: patience! Seriously, if you try to cut these while they are even slightly warm, the fudgy center will smear everywhere, and you’ll end up with messy mounds instead of neat squares. You must let them cool down completely, and then, for professional-looking squares, pop the whole pan (still lined with the parchment sling!) into the refrigerator for at least an hour.
Once they are thoroughly chilled, they firm up like a dream. Here’s my little trick: grab a long, sharp knife and run it under hot water for a minute. Wipe the blade dry—it needs to be hot! Make your cut. Wipe the blade hot again, dry it, and cut again. That hot, clean blade slices right through that firm, fudgy texture without dragging the cream cheese swirl. It makes such a difference!
Also, if you just can’t wait for the fridge time, at least let them sit on the counter until they are completely room temperature before attempting any slicing at all. Trust me on the chilling; it makes serving so much easier!
Estimated Nutritional Snapshot for Red Velvet Brownies
Now, let’s talk numbers for a second. Because these **Red Velvet Brownies** are rich with butter, sugar, and that lovely cream cheese swirl, they definitely fall into the “indulgent treat” category. I always advise my friends not to worry too much about the exact count when baking something this good, but it’s smart to know what you’re looking at for general tracking.
This information is based on dividing the recipe into 9 generous squares, which is how I usually serve them! Remember, this is just an approximation based on the ingredients I listed in the recipe above. If you swap sugar or use different brands of cream cheese, those numbers might shift a tiny bit, so take this as a helpful guideline rather than a strict laboratory analysis.
Here’s a quick breakdown:
- Serving Size: 1 square
- Calories: Around 250 (Yep, worth every bite!)
- Sugar: About 25 grams
- Fat: 15 grams total (That’s the butter and cream cheese doing their happy dance!)
- Protein: 3 grams
I always try to use unsalted butter and the specified amount of sugar so that the results are consistent, but if you’re watching your sodium, note that this recipe is pretty low at around 120mg per square. Enjoy this rich treat responsibly!
Share Your Fudgy Red Velvet Brownies Creations
And that’s it, my friends! You have officially conquered the rich, fudgy, beautifully marbled world of **Red Velvet Brownies**. I truly hope your kitchen smells incredible right now, and that you are already cutting into that first deliciously tangy square. Honestly, telling you how much I love hearing from you is an understatement—it’s the best part of sharing recipes.
Once you’ve let these cool down and you’ve managed to resist eating the entire pan yourself (I never can!), please come back here and let me know how they turned out for you. Did the swirl look amazing? Did you manage to wait for them to chill before cutting? Drop a comment below and tell me everything!
If you loved them as much as I do, leaving a star rating right here on the page really helps other bakers find the recipe and trust that they are making something fantastic. And if you snapped a photo of your beautiful marbled squares, I would absolutely adore seeing them! Please tag me on social media when you post your pictures. Sharing our amazing bakes is what home cooking is all about!
If you have any trouble at all while you’re baking, or just want to ask a question about substituting ingredients down the road, please don’t hesitate to reach out to me directly through my contact page. Happy baking, and enjoy every single fudgy, red, velvet bite!
Print
Red Velvet Brownies
- Total Time: 45 min
- Yield: 9 servings 1x
- Diet: Vegetarian
Description
A recipe for rich, fudgy brownies with the distinct flavor and color of red velvet cake.
Ingredients
- 1/2 cup unsalted butter, melted
- 1 cup granulated sugar
- 2 large eggs
- 1 teaspoon vanilla extract
- 1 teaspoon white vinegar
- 1/2 teaspoon red food coloring (liquid or gel)
- 1/4 cup unsweetened cocoa powder
- 1/2 cup all-purpose flour
- 1/4 teaspoon salt
- 4 ounces cream cheese, softened
- 1/4 cup powdered sugar
- 1/4 teaspoon vanilla extract
Instructions
- Preheat your oven to 350°F (175°C). Grease and line an 8×8 inch baking pan with parchment paper, leaving an overhang for easy removal.
- In a medium bowl, whisk together the melted butter and granulated sugar until combined.
- Beat in the eggs one at a time. Stir in 1 teaspoon vanilla extract and the red food coloring until the batter is uniformly red.
- In a separate small bowl, whisk together the cocoa powder, flour, and salt. Gradually add the dry ingredients to the wet ingredients, mixing until just combined. Do not overmix.
- Pour half of the batter into the prepared baking pan.
- In a small bowl, beat the softened cream cheese with powdered sugar and 1/4 teaspoon vanilla extract until smooth. Drop small spoonfuls of the cream cheese mixture over the batter in the pan.
- Pour the remaining red batter over the cream cheese layer. Use a knife or skewer to gently swirl the layers together for a marbled effect.
- Bake for 25 to 30 minutes, or until a toothpick inserted near the center comes out with moist crumbs attached.
- Let the brownies cool completely in the pan on a wire rack before lifting out and cutting into squares.
Notes
- For a deeper red color, use gel food coloring instead of liquid.
- Do not overbake; these brownies are best when fudgy.
- Chill the brownies for at least one hour before slicing for cleaner cuts.
- Prep Time: 15 min
- Cook Time: 30 min
- Category: Dessert
- Method: Baking
- Cuisine: American
Nutrition
- Serving Size: 1 square
- Calories: 250
- Sugar: 25
- Sodium: 120
- Fat: 15
- Saturated Fat: 9
- Unsaturated Fat: 6
- Trans Fat: 0.5
- Carbohydrates: 28
- Fiber: 1
- Protein: 3
- Cholesterol: 55
Keywords: red velvet brownies, chocolate, cream cheese swirl, fudgy brownies, dessert