
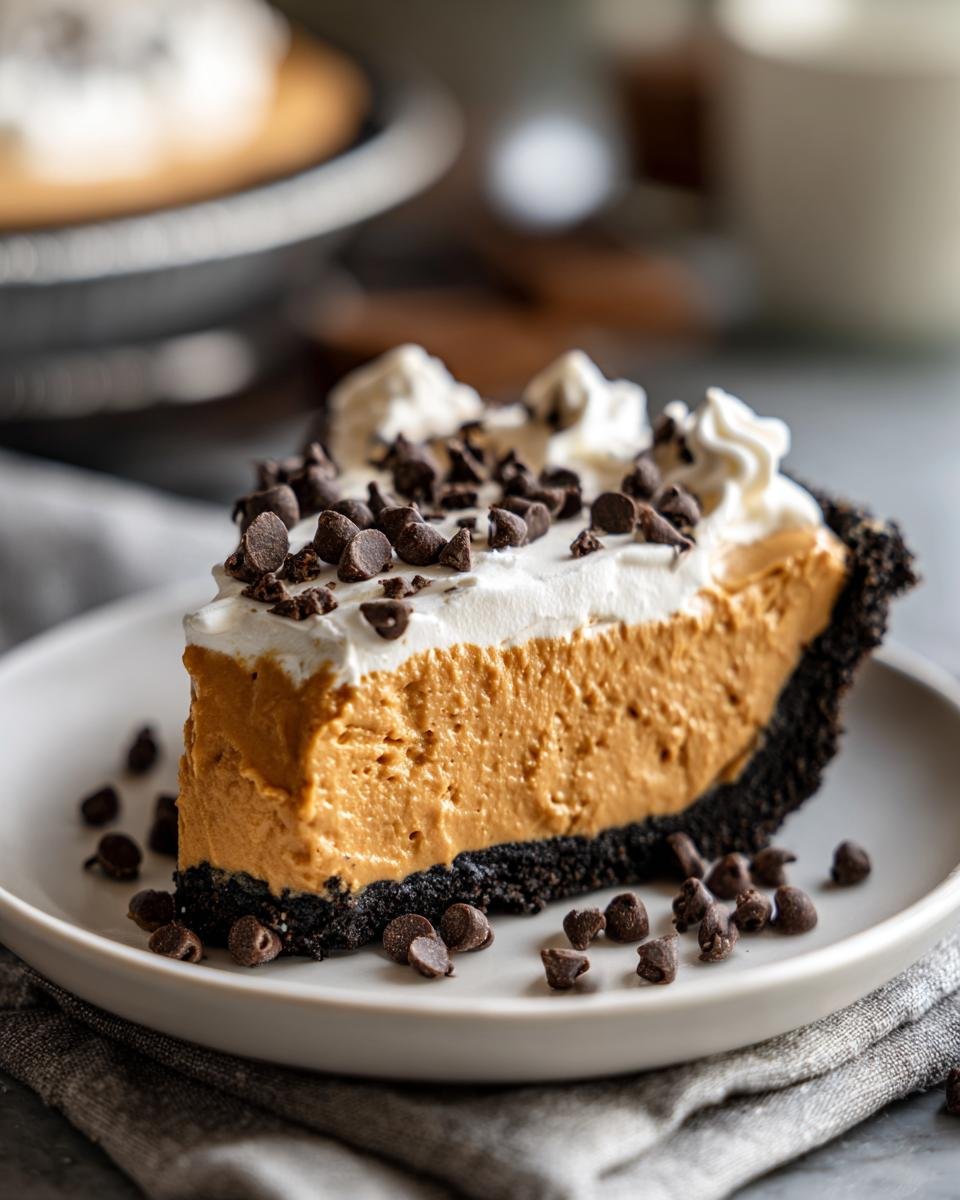
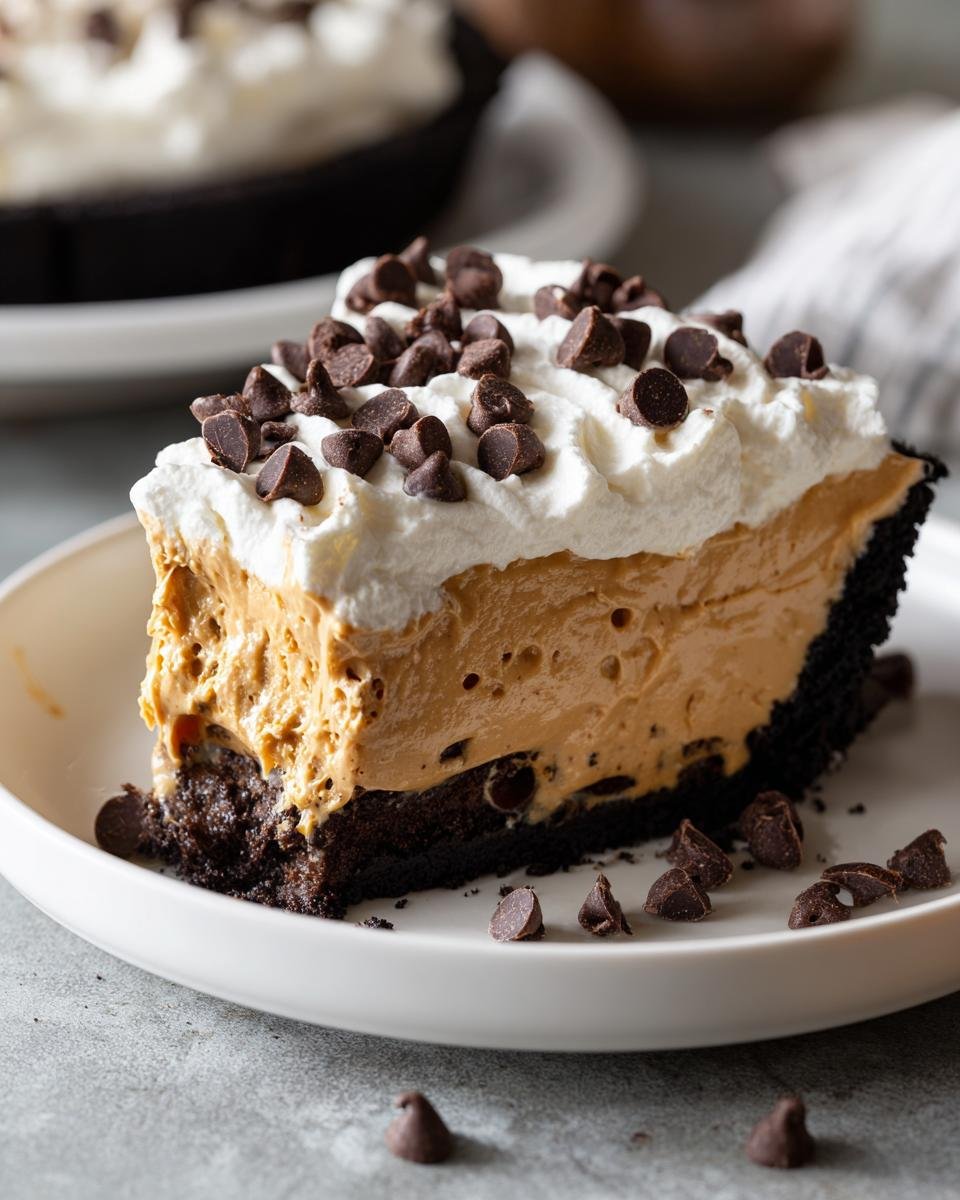
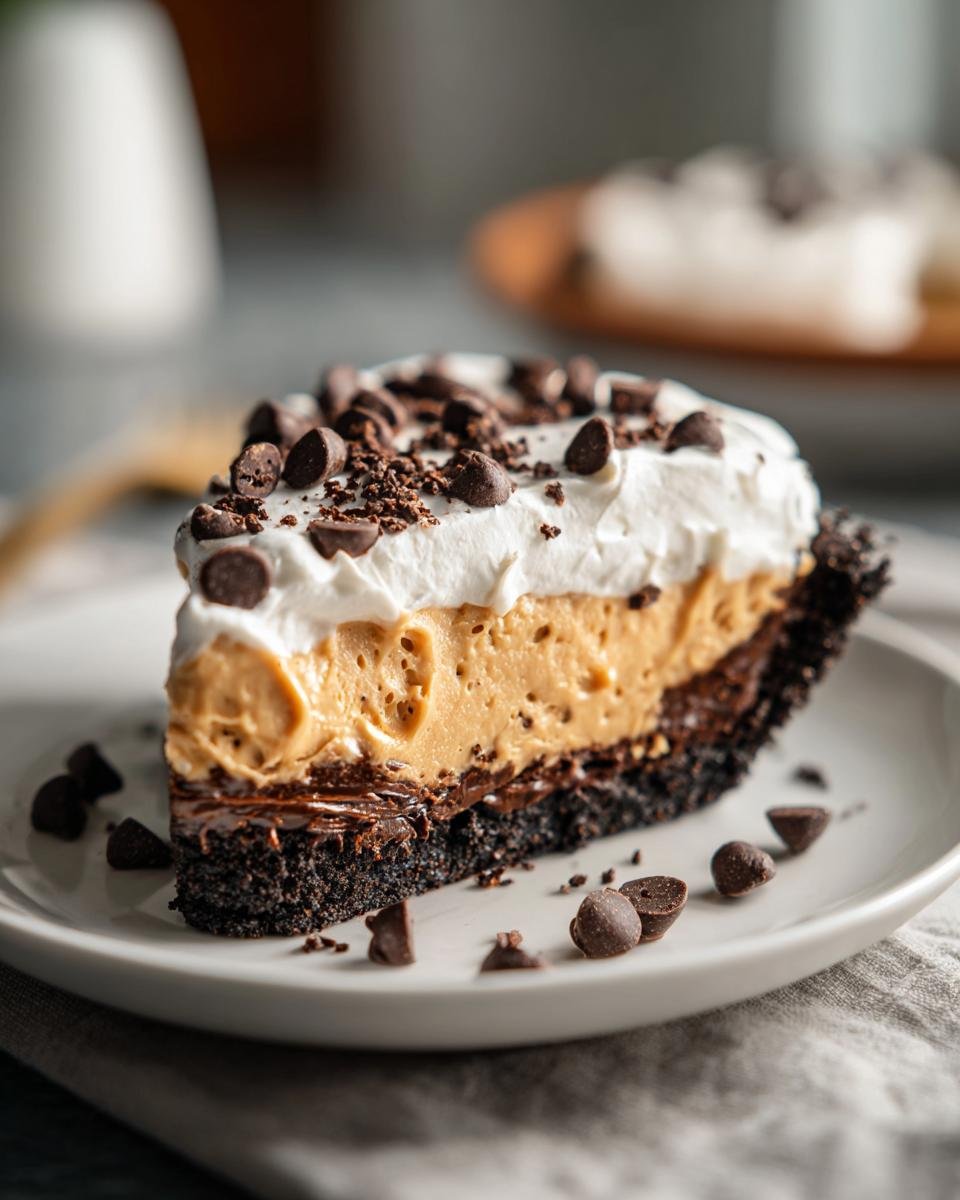
Oh, are you craving something rich, sweet, and absolutely decadent right now? Trust me, I know that feeling, especially when the weather is too hot to even think about turning on the oven! That’s why this recipe is my absolute lifesaver. This is, hands down, the simplest, creamiest, no-bake Peanut Butter Pie you will ever make, and it pairs that luscious filling with a deep, dark chocolate cookie crust. Wow! I started relying on this recipe years ago when I needed a big dessert but didn’t want the heat, and now, the kids demand it for every single celebration. It sets up perfectly in the fridge, proving you don’t need any baking magic to achieve pastry perfection!
Why This Creamy No Bake Peanut Butter Pie Recipe Works
When you need a showstopper dessert without the fuss, this recipe saves the day every time. Seriously, there’s nothing better than pulling this beauty out of the fridge when you thought you didn’t have time to bake. It comes together so fast!
- It’s creamy perfection every single time.
- It requires zero baking time—just chilling!
- The chocolate crust makes it taste extra special.
Zero Oven Time for the Perfect Peanut Butter Pie
The best part? It’s completely no-bake! Chilling is your oven here. That time in the refrigerator is what sets up that beautiful cream cheese and peanut butter filling so it slices cleanly. Honestly, it’s fool-proof for beginners, and you can see similar simple techniques work wonders in my no-bake chocolate peanut butter bars recipe too.
Rich Chocolate Cookie Crust Foundation
Forget plain graham crackers! That marriage of sweet peanut butter and dark chocolate in the crust is just divine. It uses simple pantry staples, and that salty-choc-PB flavor combo is what takes this simple pie over the top. Who knew such easy ingredients could taste this luxurious?

Gathering Ingredients for Your Peanut Butter Pie
Okay, listen up! Since this is a no-bake marvel, the texture relies completely on getting our measurements right, especially for this magnificent Peanut Butter Pie. Don’t worry, the list is short, but please make sure you have the right consistency for key items like the cream cheese. For more ideas on mixing heavy dairy, you might want to check out my thoughts on peanut butter cheesecake dip!
For the Chocolate Cookie Crust
We need that deeply flavored, slightly crunchy base. Make sure you’re using the chocolate wafer cookies—the kind that are almost black! The butter should be basic unsalted for structure.
- 1 1/2 cups chocolate cookie crumbs (I use pre-made store-bought crumbs, but crushing your own Oreos works too—just leave the cream filling in!)
- 1/4 cup melted **unsalted** butter
For the Creamy Peanut Butter Pie Filling
This is where the magic—and the smoothness—happens, so temperature is everything here, I promise you. Don’t skip softening that cream cheese!
- 8 ounces cream cheese, **softened completely to room temperature**
- 1 cup powdered sugar (sift this if you see any lumps—we want velvety!), plus extra as needed
- 1 cup **creamy** peanut butter (use the standard kind, not the natural oily stuff!)
- 1 teaspoon vanilla extract
For the Whipped Topping and Garnish
The topping needs to be light enough to float on top of that heavy filling, so those ingredients must be cold!
- 1 cup heavy whipping cream, **straight from the fridge**
- 1/4 cup powdered sugar (just for sweetening the whipped cream)
- 1/2 cup miniature chocolate chips (for sprinkling on top at the very end)
Step-by-Step Instructions for the Easiest Peanut Butter Pie
Putting this spectacular Peanut Butter Pie together is honestly more about assembling than cooking, which is why I love it! The key to success here is not rushing the chilling stages. If you’re looking for general tips on how to be a better kitchen whiz, sometimes my old baking tricks can help, like those I share in baking tips to make you a better baker.
Preparing and Chilling the Crust
First things first: the base. Just mix those chocolate cookie crumbs and the melted butter together until everything looks like damp, dark sand. Then, press that mixture firmly into the bottom and up the sides of your 9-inch pie plate. You really need to pack it down there to make sure it holds up later! Pop that beauty into the fridge for exactly 15 minutes while you whip up the filling. Don’t skip that chill time!
Making the Smooth Peanut Butter Filling
Grab your electric mixer for this part! Start by beating that room-temperature cream cheese until it’s totally smooth—no lumps allowed, please! Then, gradually mix in the first cup of powdered sugar until it’s just combined. Next up is the star: peanut butter and vanilla go in. You have to keep beating until that whole mixture looks completely smooth and creamy. That’s how you know you’ve incorporated everything just right.
Folding in the Whipped Cream for Lightness
Now, in a separate, clean bowl, whip your ice-cold heavy cream and the extra 1/4 cup of powdered sugar until you get stiff, glorious peaks. This is crucial! Gently take about half of that whipped cream and fold it carefully into your peanut butter base. You want to keep that air in there! Once folded, spread this lighter-than-air filling right into your chilled crust.
Final Assembly and Setting the Peanut Butter Pie
Take the rest of your beautiful whipped cream and gently dollop it on top of that first layer. Use a spatula to make some nice swirls if you’re feeling fancy. Then, sprinkle those miniature chocolate chips everywhere! This next step is non-negotiable for a proper slice: the entire Peanut Butter Pie needs to refrigerate for at least four hours. If you slice it too soon, it’ll just ooze everywhere!
Tips for the Best Ever Peanut Butter Pie Texture
Getting the texture right is honestly the secret handshake for any great no-bake dessert. If you skip temperature checks, you end up with a bumpy, sad filling, and we absolutely don’t want that for our spectacular Peanut Butter Pie! I always follow these quick checks to make sure every slice is perfectly smooth. Sometimes when I have issues with texture, I look at substitutes for other ingredients, like when I’m figuring out my make buttermilk substitutions.
Ensuring Cream Cheese is Perfectly Softened
If your cream cheese is cold, you’re going to end up with little chunks of cream cheese in your filling, and that just ruins the velvety mouthfeel we are aiming for. Trust me on this one! If you forget to take it out, just unwrap the block and microwave it on low power for about 10 seconds max. You need it soft enough to press your finger into easily, but not melting or greasy.
Achieving Stiff Peaks for the Topping
The topping needs to hold its shape when you spread it on top of the pie, so those stiff peaks are non-negotiable. For the best result with your heavy whipping cream, make sure your bowl and your whisk attachments are totally clean and, ideally, chilled too. Cold cream whips up faster and holds its structure better than cream that’s even slightly warm. It makes all the difference!
Peanut Butter Pie Ingredient Substitutions and Variations
I always get asked if you can switch things up in here, and the answer is usually yes, but you have to know what you’re sacrificing! Since this is such a simple recipe, changing one major component can totally alter the final texture of your Peanut Butter Pie. Before you swap anything, though, check out my peanut butter cookie cake if you’re feeling like baking!
Crust Swaps for Your Peanut Butter Pie
If you’re not big on the deep chocolate flavor, you can absolutely substitute the crumbs! The original notes suggested using graham cracker crumbs instead of the chocolate ones. If you go that route, you’ll get a lighter, slightly more savory base that pairs beautifully with the rich filling. You might need to add a tiny bit more melted butter, maybe a tablespoon more, just to make sure the crumbs hold together well enough after chilling.
Peanut Butter Type Variations
Another big question is creamy versus crunchy. I always use creamy because I want that perfectly smooth, melt-in-your-mouth filling texture. If you use crunchy peanut butter, you are going to end up with little bits of chopped nuts throughout the filling. It’s delicious if you love texture, but it won’t be as silky smooth as the original Peanut Butter Pie.
Storage and Serving Suggestions for Peanut Butter Pie
Once you’ve gone through all that folding and waiting, you want to make sure your incredible Peanut Butter Pie lasts! Storing it properly is easy, but you have to be gentle with that fluffy topping. I also love pairing this rich pie with something simple that won’t compete with all that peanut butter goodness. If you need a quick drink to go with it that has the same flavor profile, check out my recipe for a chocolate peanut butter banana smoothie!
Storing Leftover Peanut Butter Pie
This pie absolutely has to stay in the fridge because of all that cream cheese and heavy cream in the filling and topping structure. Cover the pie loosely with plastic wrap—don’t press it right onto the topping, or you’ll ruin your pretty swirl! It stays perfectly lovely and firm for about 3 to 4 days. Honestly, ours never lasts that long, though!
Serving Pairings
Because this pie is so rich, I like to serve small wedges. Sometimes, if I’m feeling extra fancy, I’ll use a fine-mesh sieve to just dust the tiniest bit of unsweetened cocoa powder right over the top before serving. A little drizzle of melted chocolate syrup, only if you’re feeling wild, is incredible too, but honestly, this pie can stand all on its own!
Frequently Asked Questions About This Peanut Butter Pie
I get asked the same few things all the time when people make this recipe, especially since so many people are new to making a completely no bake dessert! Don’t worry if you have questions—I’ve got the insider scoop to make sure your Peanut Butter Pie comes out perfectly. Before you go, you might want to check out my guide for making a totally different but equally delicious no-bake chocolate pie recipe for more tips on chilling!
Can I use natural peanut butter in this no bake Peanut Butter Pie?
Oh, please don’t try it with the natural kind! I know we try to be healthy sometimes, but the unstable oils in natural peanut butter will just separate out when you mix it with the cream cheese. You’ll end up with a greasy, runny mess instead of that firm, gorgeous filling. For this pie, you absolutely must stick to the conventional, jarred, creamy peanut butter. It has the stabilizers we need to hold everything together!
Can I freeze this Peanut Butter Pie?
You certainly *can* try it, but I have to give you a warning! The lightness of that whipped cream topping just doesn’t like the freezer. When you thaw it, the cream often gets watery and separates a little bit. If you *must* freeze it, try scraping off the topping, freezing the crust and filling layers only, and then topping it fresh when you plan to serve it. That way, you save your incredible Peanut Butter Pie structure.
How long does the chocolate crust need to chill?
This is one of those steps where rushing means failure later! You need to chill that chocolate crust for a minimum of 15 minutes, like I noted in the instructions. Pressing the melted butter and crumbs in firmly is only half the battle. That 15 minutes in the cold helps the butter firm up just enough so the crust acts like a solid shell. If you skip it, your heavy filling is going to make the bottom crumble when you try to slice that beautiful chocolate crust!
Estimated Nutritional Snapshot for the Peanut Butter Pie
Yowza, this is a rich dessert, so I always tell people to enjoy every single bite! These numbers are just my best guess based on standard ingredient amounts for one slice, assuming we get 8 perfect servings from the whole Peanut Butter Pie. Remember, if you use different peanut butter or extra chips, these estimates will shift around a bit!
- Calories: Around 450
- Total Fat: Roughly 30 grams
- Carbohydrates: About 40 grams
- Protein: Near 10 grams
Share Your Creamy Peanut Butter Pie Creations
I absolutely live to hear how your pie turned out! Please rate this Peanut Butter Pie in the comments below, and don’t forget to tag me on social media with your magnificent slices. If you need to get in touch with any questions, my contact page is right here: Let’s Chat!
Print
Simple Peanut Butter Pie
- Total Time: 4 hr 25 min
- Yield: 8 servings 1x
- Diet: Vegetarian
Description
A straightforward recipe for a creamy peanut butter pie with a chocolate cookie crust.
Ingredients
- 1 1/2 cups chocolate cookie crumbs
- 1/4 cup melted butter
- 8 ounces cream cheese, softened
- 1 cup powdered sugar
- 1 cup creamy peanut butter
- 1 teaspoon vanilla extract
- 1 cup heavy whipping cream
- 1/4 cup powdered sugar (for whipped cream)
- 1/2 cup miniature chocolate chips (for topping)
Instructions
- Combine cookie crumbs and melted butter. Press mixture into the bottom and up the sides of a 9-inch pie plate. Chill for 15 minutes.
- Beat cream cheese until smooth. Gradually add 1 cup powdered sugar, mixing until combined.
- Add peanut butter and vanilla extract. Beat until the mixture is smooth and creamy.
- In a separate bowl, whip heavy cream and 1/4 cup powdered sugar until stiff peaks form.
- Fold half of the whipped cream into the peanut butter mixture. Spread this filling into the chilled crust.
- Top the pie with the remaining whipped cream. Sprinkle with miniature chocolate chips.
- Refrigerate for at least 4 hours before serving.
Notes
- You can use graham cracker crumbs instead of chocolate cookie crumbs for a different crust flavor.
- Chill the pie plate briefly before pressing in the crust to help it set.
- Prep Time: 25 min
- Cook Time: 0 min
- Category: Dessert
- Method: No Bake
- Cuisine: American
Nutrition
- Serving Size: 1 slice
- Calories: 450
- Sugar: 35
- Sodium: 300
- Fat: 30
- Saturated Fat: 12
- Unsaturated Fat: 18
- Trans Fat: 0
- Carbohydrates: 40
- Fiber: 2
- Protein: 10
- Cholesterol: 55
Keywords: peanut butter pie, no bake, chocolate crust, cream cheese dessert, easy pie