
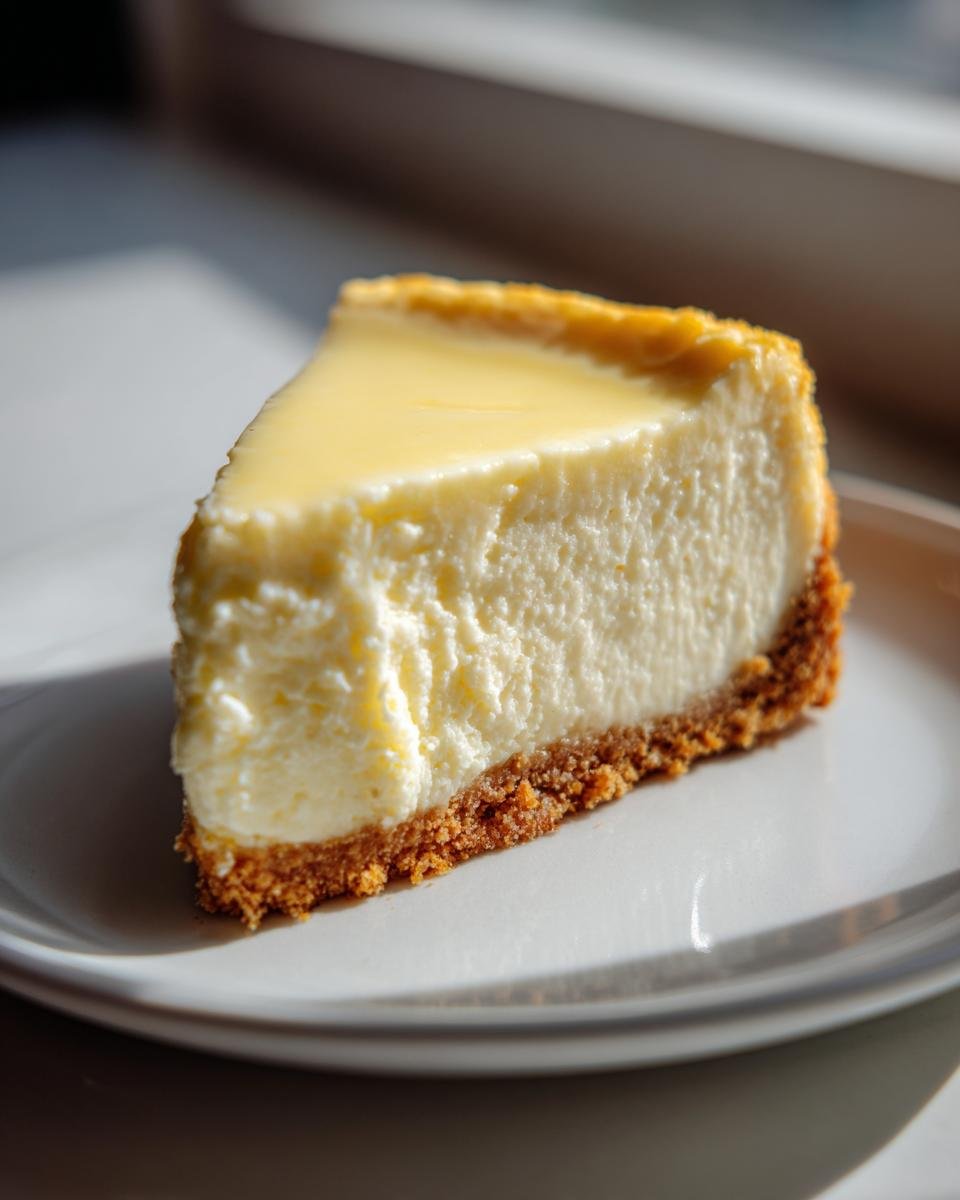
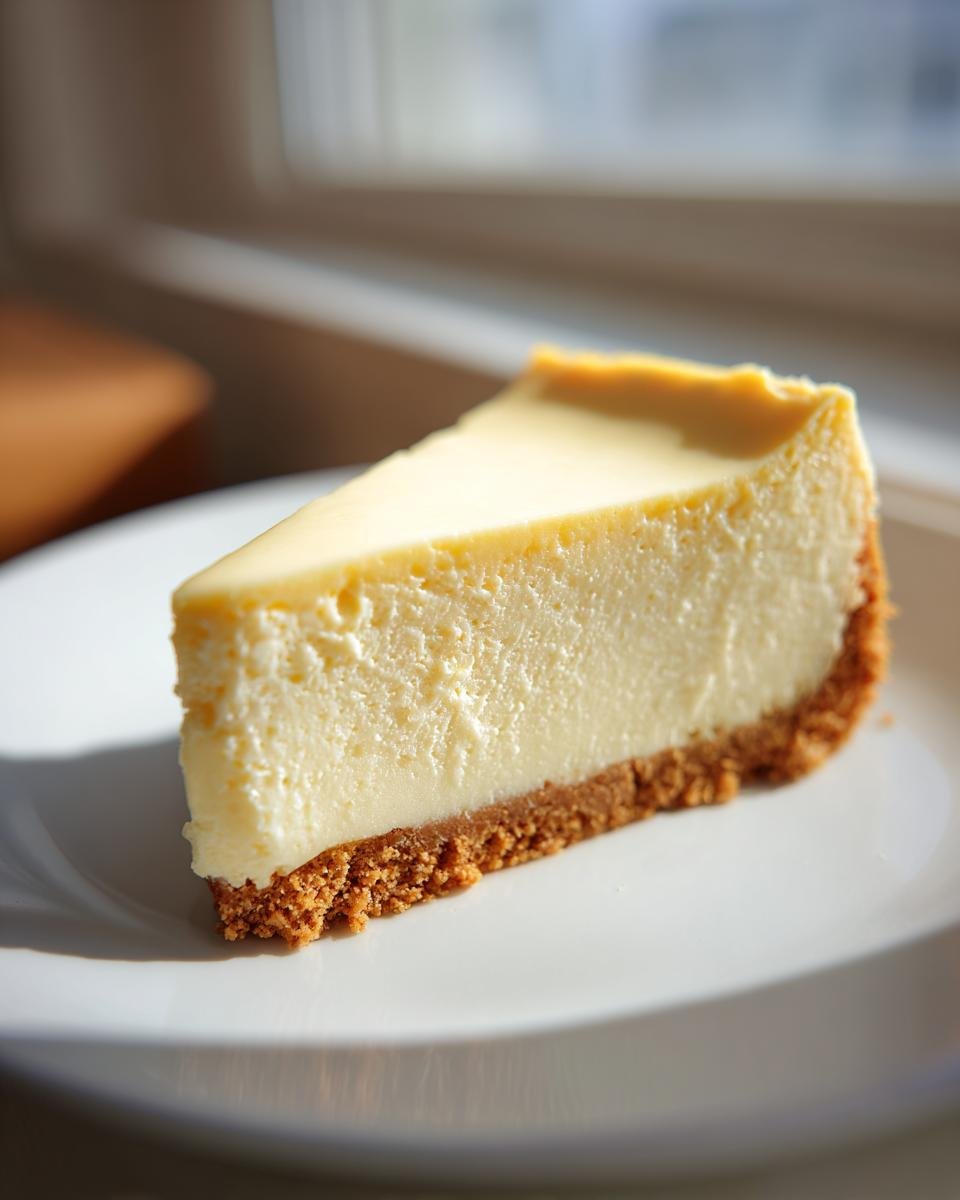
Oh, when the craving hits for something decadent, yet bright enough to cut through all that richness, nothing beats a classic cheesecake. Forget those fussy, intimidating recipes you see online! My ultimate goal was always to crack the code on a foolproof, creamy, and beautifully tangy Lemon Cheesecake that anyone could pull off on a weeknight.
This version, with its perfect graham cracker crunch and that unbelievable citrus zing, changed everything for me. Honestly, the secret weapon here isn’t some fancy ingredient; it’s mastering the technique—specifically that water bath. After a few sad, cracked tops in my early days, I finally figured out the cooling trick, and now my cheesecakes come out looking like polished cream jewels every single time. Trust me, you are going to adore how straightforward the process is!
Why This Lemon Cheesecake Recipe Works So Well
Baking a showstopper dessert shouldn’t feel like a gamble! This recipe has become my go-to because it delivers reliability every single time. I wasn’t going to share this until I stopped seeing those horrible surface cracks. Now, I can promise you a result that feels professional but comes together surprisingly easily.
I actually put together a huge guide on how to generally improve your baking process, but these specific points are what truly make this cheesecake special. You absolutely need to read through these key takeaways before you start mixing!
- The crust always holds together beautifully; no crumbling mess here!
- The texture is dense when chilled but incredibly creamy when you cut into it.
- It’s incredibly forgiving, which is rare for baked cheesecakes.
If you want general baking wisdom, check out my full baking tips guide, but let’s get specific about the lemon magic.
The Perfect Balance of Tangy and Sweet Lemon Cheesecake
There’s nothing worse than a cheesecake that tastes like sweet, dense butter. We want PUNCH! That bright, sharp flavor that lifts the whole dessert comes from using both fresh lemon juice AND lemon zest. The zest is where the real aromatic oil lives, so don’t skip grating it!
Achieving a Smooth, Crack-Free Lemon Cheesecake Finish
This is the big one that trips everyone up. You need your cream cheese completely soft—think almost glossy—and you need that water bath. The gentle steam from the bath keeps the environment inside the oven incredibly humid. It cooks evenly and stops the top from drying out and splitting. It sounds fussy, but it’s worth the extra two minutes of prep!

Essential Ingredients for Your Lemon Cheesecake
Okay, the secret to a great cheesecake isn’t just about the process, it’s about respecting the ingredients. When you are working with something as luxurious as cream cheese, you need to make sure everything else is top-notch too! I’ve broken down the list below so you can see exactly what goes into making that perfect crunch on the bottom and that silky filling on top. Remember, proper preparation here is what makes the difference between fine and truly *fantastic*.
If you ever get stuck on substitutions, sometimes knowing what else you can swap out is helpful. For instance, if you look at my guide on buttermilk swaps, you’ll see I’m always thinking ahead about backups, though for cheesecake, I really recommend sticking to the list!
For the Graham Cracker Crust
This crust needs to be the sturdy foundation for our creamy dream! We keep it simple here because the lemon filling is the star, but the pressing is non-negotiable. You absolutely must use 6 tablespoons of melted butter to bind the 1 1/2 cups of graham cracker crumbs and the 1/4 cup of sugar together. Get in there with the bottom of a glass and really pack that mix down into the 9-inch pan. If you’re loose with this step, the crust floats away when you cut the slice!
For the Creamy Lemon Cheesecake Filling
Here is where the magic happens. You need three full packages—that’s 24 ounces total—of cream cheese, and make absolutely sure they are at room temperature. Softness matters! We pair that with 1 1/2 cups of sugar and just a scant 1/4 cup of all-purpose flour to give it just a little structure. Then, for flavor, we bring in 1 teaspoon of vanilla extract, the bright juice from 1/4 cup of fresh lemons, and the zest you grated earlier.
The final heroes are the four large eggs. They have to go in last, one by one. I mean it: mix until just combined after *each* egg. Don’t use your stand mixer on high speed here! We are gently folding them in to maintain that smooth texture we worked so hard to achieve, not whipping air into a meringue.
Step-by-Step Instructions for the Best Lemon Cheesecake
Alright, let’s get down to business. This isn’t the kind of dessert you rush, but the actual hands-on work is minimal. Pay close attention to the order of operations and these temperature changes, and you’ll have an absolutely flawless surface. Don’t just skim this—read it all the way through once before you turn on the oven, okay? Mastering the timing separates the good bakers from the great ones, especially when dealing with that delicate Lemon Cheesecake!
Preparing and Baking the Crust
First things first: crank that oven up to 350 degrees F! While it’s heating, take your 9-inch springform pan and seriously wrap the outside bottom with heavy-duty aluminum foil. You aren’t fooling the water bath; this is insurance against leaks! Mix your graham crumbs with the small amount of sugar, then pour in the melted butter. Stir until it looks like wet sand. Press that mix down firm onto the bottom of the pan. Get it tight! Bake that crust for exactly 10 minutes. Once it’s done, pull it out, but don’t touch the oven temperature just yet—you’ll reduce it later.
Mixing the Lemon Cheesecake Filling
Time to tackle that beautiful, creamy filling. In a big bowl, you’re going to beat your softened cream cheese with the larger amount of sugar and that small bit of flour until it looks completely smooth—we want zero lumps here. Next, gently stir in your vanilla, the fresh lemon juice, and all that gorgeous zest. Now, handle the eggs with care! Beat them in one at a time. I mean it: mix just until you can’t see the yolk anymore, then stop and add the next one. If you overmix here, you introduce too much air, and that’s a cracked top guaranteed!
Baking the Lemon Cheesecake with a Water Bath
This is the water bath, your key to success! Lower your oven temp now to 325 degrees F. Pour your filling over that slightly cooled crust. Set the springform pan inside a large roasting pan. Carefully pour *hot* water into the roasting pan until it comes about halfway up the sides of your cake pan. Slide that whole setup into the oven. Bake for about 50 to 60 minutes. You know it’s close when the edges look set but the very, very center wobbles just slightly. Don’t peek too much during the main bake, either!
When 60 minutes hits, turn the oven OFF. Seriously, shut it down. Prop the oven door open just a crack—you can jam your wooden spoon in there—and let the cheesecake hang out inside for a full hour while it slowly cools. This gentle temperature transition is non-negotiable for a crack-free top.
Chilling and Serving Your Lemon Cheesecake
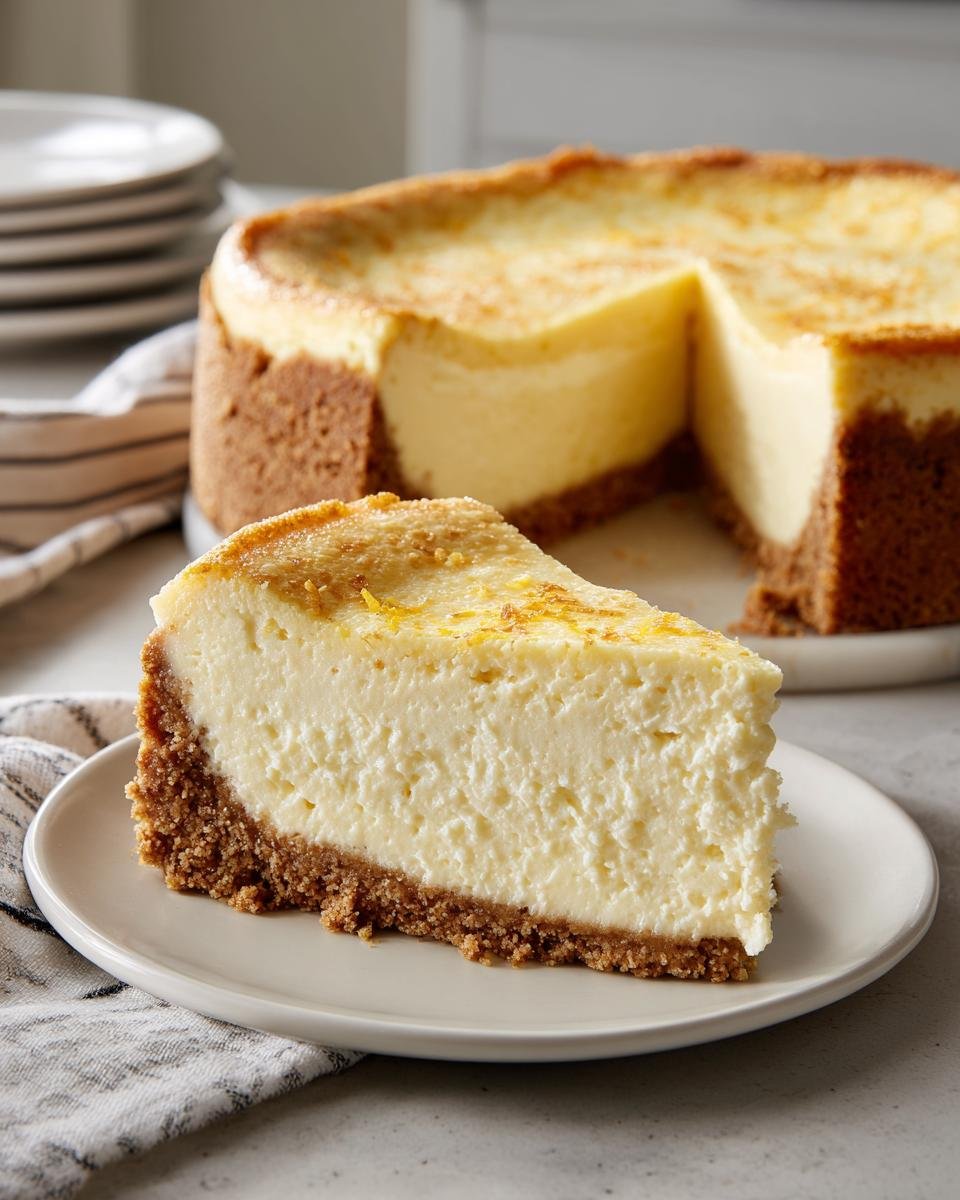
After the gradual cool-down inside the oven, take the pan out of the water bath and let it cool the rest of the way on a wire rack. Once it’s just warm, cover it gently and move it to the fridge. This isn’t an instant dessert; it needs time to firm up and let those lemon flavors deepen. I insist you chill it for a minimum of six hours, but overnight is always the winner. Before you try to release the sides of the springform pan, carefully run a thin, sharp knife around the edge first. That little bit of separation ensures a clean slice every time you serve it!
Tips for a Flawless Lemon Cheesecake Experience
Even with the step-by-step guide, there are always those little tricks that can take your dessert from great to absolutely legendary. Since you’ve gone to the trouble of making that water bath, let’s make sure you are rewarded with a perfect slice! These tips are things I learned through trial and—let’s be honest—a few expensive baking failures.
First off, let’s talk about the temperature difference between your cheesecake and your cooling rack. Once you take the cheesecake out of the oven and off the water bath, give it a minute or two on the counter before covering it. If you slap plastic wrap on a hot cake, you trap steam, and that steam turns into condensation, which can make the surface sticky or even cause slight surface damage as it cools. Patience is your best friend here—wait until it’s only slightly warm to the touch.
Secondly, when it comes to the water bath itself, I always use *very* hot tap water, not cool water. Using hot water gets the steam going quicker in the oven, meaning your oven temperature stabilizes faster inside that roasting pan. This cuts down on any awkward temperature fluctuations while that cheesecake is setting up.
Finally, let’s focus on service! When you think it’s done chilling—maybe after 6 hours—resist the urge to run that knife around the edge immediately. Wait until you are actually ready to unclip the sides. If the cake sits against the metal ring for hours after it has been fully set, you risk the edges slightly pulling away from the knife when you try to cut it free later. Give it that last little helping hand right before you serve it. If you follow these little nudges, you’ll have the smoothest, creamiest Lemon Cheesecake you’ve ever made!
Creative Variations for Your Next Lemon Cheesecake
Once you’ve mastered the basic, perfect Lemon Cheesecake, which, let’s be honest, is a masterpiece on its own, you might start getting ideas! I love tinkering, and this rich base is just begging for a little makeover. You don’t need a whole new recipe; just a few twists to keep things exciting!
My favorite way to switch things up is usually with the crust. That standard graham cracker crust is fantastic, but sometimes I want more crunch or a different flavor profile to play against the tart filling. You could easily substitute the graham crackers for crushed shortbread cookies—they add such a lovely buttery note.
Or, if you’re feeling really bold, try swapping in some gingersnap crumbs! The warm spice of ginger is surprisingly delicious next to bright lemon. Just treat the substitution exactly like the graham crumbs: mix with melted butter and that tiny bit of sugar, then press and pre-bake!
Now for the topping! Because this cheesecake is so tangy, it loves fruit. You don’t need to bake anything new on top. Just wait until the cheesecake is completely chilled, and then you can spoon on some fresh raspberry sauce or topping. If you’ve ever made my Lemon Raspberry Cupcakes, you know exactly how perfectly those two flavors marry together. A simple layer of sliced strawberries or even a beautiful blueberry compote after chilling works wonders for color and flavor!
Remember, the beauty of this recipe is that the filling itself is so stable. Just avoid adding chunky fruit *into* the batter before baking, or you risk messing up that smooth top we worked so hard to achieve with the water bath!
Serving Suggestions for Your Tangy Lemon Cheesecake
Now that you’ve got this incredible, perfectly set Lemon Cheesecake chilling happily in the fridge, we need to talk about the moment of truth: serving it! A dessert this good deserves a proper presentation. Since that bright, tart lemon flavor is so powerful, you want toppings that either complement that brightness or offer a creamy, cooling contrast.
Honestly, sometimes I just dust mine with powdered sugar because the top is so beautifully smooth from the water bath, but where’s the fun in that?
Here are my favorite ways to dress it up when company comes over:
- Fresh Berries: You cannot beat the combination of tart lemon and sweet, slightly acidic berries. Keep it simple with a pile of perfectly ripe raspberries or sliced strawberries. They just shout “summer elegance,” even if you’re eating cheesecake in December!
- Homemade Whipped Cream: A big, fluffy dollop of lightly sweetened, freshly whipped cream makes every slice feel luxurious. I always add just a tiny drop of vanilla extract to my cream. It’s soft contrast to the dense, cool cheesecake underneath.
- A Bright Sauce Drizzle: If you want something a little more dramatic for presentation, a fruit sauce is the way to go. A drizzle of my homemade strawberry sauce pools gorgeously against the white surface of the cheesecake. You can even use fresh lemon curd if you want to double down on the citrus punch!
Whatever you choose, make sure you let the cheesecake sit out of the fridge for maybe 15 or 20 minutes before slicing and topping. That little bit of warmth helps release the flavors and makes cutting those perfect wedges so much easier!
Storage and Reheating Instructions for Lemon Cheesecake
You’ve made this incredible, perfect, crack-free Lemon Cheesecake, and now you have leftovers. Hooray! The good news is that cheesecake is one of those rare desserts that actually tastes *better* the second day, once it’s had a long, cold nap in the fridge. But we have to treat it right so that fantastic creamy texture stays perfect.
First rule: you cannot just leave it sitting out on the counter. It’s packed with dairy, so keep it cold until you’re ready to serve a slice. You want to cover it securely, but you can’t press plastic wrap directly onto that beautiful, smooth top surface—it will stick and ruin your hard work!
The absolute best way to store it is to wait until it’s fully chilled, then carefully use toothpicks stuck vertically around the edge of the cheesecake. Then, loosely drape a layer of plastic wrap over those toothpicks. It creates a little tent, keeping the condensation off the surface but still sealing in the moisture. I usually keep mine stored this way in the fridge for about four to five days. It holds up wonderfully!
Can I prepare this Lemon Cheesecake ahead of time?
Oh, absolutely yes! In fact, I highly encourage it. If you try to make this the same day you plan to serve it, you’ll be stressed about the chilling time. Once the cheesecake is completely set and chilled, it actually holds its flavor better if it stays cold. I make mine on Friday evening and it is always perfect for Sunday dinner. It really lets those bright lemon notes settle in!
Freezing Your Baked Lemon Cheesecake
If you want to make an entire cheesecake just for future enjoyment (smart move!), freezing is your best friend. But here’s a crucial step: you MUST freeze it *before* you slice into it. Un-sliced cheesecakes freeze much more evenly. Wrap the entire chilled cake tightly, first in plastic wrap, and then follow that up with a layer of heavy-duty aluminum foil. This double layer protects it against freezer burn.
It keeps beautifully frozen for about a month. When you are ready to eat it, move the whole wrapped cake to the refrigerator overnight to thaw slowly. Never try to rush thawing a cheesecake at room temperature or in the microwave—it just encourages sogginess. Once thawed in the fridge, unwrap it, and you can serve it plain or add your favorite topping!
A Note on Reheating
Since this is a chilled dessert, we never reheat a slice of Lemon Cheesecake! If you are taking a slice out of the fridge and want to serve it slightly softer—perhaps to let the flavors pop more—just let it sit on the counter for 20 minutes before serving. That’s the best way to “warm” it up without melting that beautiful cream cheese structure!
Frequently Asked Questions About Making Lemon Cheesecake
I know that even with the best instructions, sometimes you just have nagging questions bubbling up when you’re standing in the kitchen with ingredients out. Don’t worry, you’re not alone! I’ve answered the top three things people ask me when they’re perfecting their baked Lemon Cheesecake. Hopefully, this helps you feel confident moving forward!
Can I use a different crust for this Lemon Cheesecake?
Yes, you absolutely can! The graham cracker crust is classic because it’s sturdy and lets that bright lemon flavor shine through without competing. However, if you want to switch things up, shortbread cookies make an *amazing* rich, buttery base. Alternatively, if you like a little kick, crushed gingersnap cookies provide a fantastic, spicy contrast to the tangy filling. Just treat them exactly like the graham crumbs: crush finely, mix with melted butter and sugar, and press firmly into the pan before that initial 10-minute bake!
What is the purpose of the water bath when baking?
This is the million-dollar question for any baked cheesecake, and it’s why our tops stay smooth! The water bath, or *bain-marie*, creates a steamy, humid environment inside the oven. Think of it like gentle cooking instead of harsh baking. This steam keeps the cheesecake batter from setting too quickly or heating unevenly, which is what causes those ugly cracks and that dry, curdled texture on the surface. It ensures the entire cake cooks slowly and gently, resulting in that unbelievably silky, creamy texture we are aiming for.
I used to dread this part, thinking it meant complicated setup, but as I showed in the instructions, it’s just wrapping the pan really well and setting it in a larger pan to pour hot water into! It’s the key step that guarantees that smooth finish, so please don’t skip it unless you love fixing cracks later!
How can I make this Lemon Cheesecake lighter in texture?
That’s a common request! Because this recipe is based on a classic American baked cheesecake—which is supposed to be dense and rich—making it significantly “lighter” usually means turning it into a no-bake recipe, which changes the flavor profile entirely. If you want to achieve the lightest possible *baked* texture without sacrificing the tangy lemon flavor, focus strictly on mixing technique. Make absolutely sure you are not over-beating the eggs. Mix those eggs in by hand on low speed, just until they disappear. Avoid whipping any unnecessary air into the batter, because air expands when hot, leading to domes and cracks!
Estimated Nutritional Overview for Lemon Cheesecake
Now, I always tell people that when you’re enjoying a truly indulgent dessert like this absolutely perfect Lemon Cheesecake, you shouldn’t be thinking about the numbers too much! You should just be enjoying that bright, tangy perfection. But, because I like to give you all the details you need to know, I researched the general breakdown for a standard slice.
This is based on a slice yielding 1 of 10 servings. Remember, this is just an estimate—if you use full-fat cream cheese versus Neufchatel, or if you swap out the sugar for a sweetener, those numbers shift around!
- Calories: 450
- Fat: 30g (This is where the richness comes from, naturally!)
- Total Carbohydrates: 40g
- Protein: 8g
- Sugar: 35g
- Cholesterol: 120mg
We’re looking at a reasonably rich treat here, which is what cheesecake is supposed to be! It’s definitely satisfying. If you’re counting macros, you can see it’s higher in fat and sugar, as expected from the cream cheese base. But hey, considering how amazing this tastes, I think it’s a completely worthwhile indulgence. Just maybe don’t eat half the cake in one sitting like I almost did last Tuesday!
Share Your Creamy Lemon Cheesecake Success
And just like that, you’ve done it! You’ve conquered the bake, respected the water bath, and now you have a spectacular, crack-free, tangy Lemon Cheesecake waiting in your fridge. Doesn’t that feel good? I hope just looking at that perfect, creamy slice makes all the patience totally worth it.
I truly put everything I know about baking these delicate gems into that guide, from prepping the foil on the pan to the final slow cool-down. But honestly, the best part of sharing a recipe like this is hearing how it turns out in *your* kitchen!
Did you try swapping out the graham crackers for gingersnaps? Did you add a sprinkle of zest on top right before serving? Don’t keep those secrets to yourself! Please come back down to the comments section and let me know how your Lemon Cheesecake turned out. A star rating shows me you found the advice helpful, and I absolutely love seeing photos of your finished, glorious dessert!
If you have any last-minute questions or need general advice (maybe about getting in touch with me for specific baking help), you can always find my contact information right here. Happy baking, and enjoy every single velvety bite!
Print
Simple Lemon Cheesecake
- Total Time: 7 hours 20 min
- Yield: 10 servings 1x
- Diet: Vegetarian
Description
A straightforward recipe for a creamy, tangy lemon cheesecake with a graham cracker crust.
Ingredients
- 1 1/2 cups graham cracker crumbs
- 1/4 cup granulated sugar (for crust)
- 6 tablespoons unsalted butter, melted
- 3 (8 ounce) packages cream cheese, softened
- 1 1/2 cups granulated sugar (for filling)
- 1/4 cup all-purpose flour
- 1 teaspoon vanilla extract
- 1/4 cup fresh lemon juice
- 1 tablespoon lemon zest
- 4 large eggs
Instructions
- Preheat your oven to 350 degrees F (175 degrees C). Wrap the outside bottom of a 9-inch springform pan with heavy-duty aluminum foil.
- Combine graham cracker crumbs and 1/4 cup sugar in a bowl. Pour in melted butter and mix until crumbs are moistened. Press the mixture firmly into the bottom of the prepared springform pan.
- Bake the crust for 10 minutes. Remove from the oven and set aside to cool slightly. Reduce oven temperature to 325 degrees F (160 degrees C).
- In a large bowl, beat the softened cream cheese, 1 1/2 cups sugar, and flour until smooth. Mix in vanilla extract, lemon juice, and lemon zest.
- Beat in the eggs one at a time, mixing just until combined after each addition. Do not overmix.
- Pour the filling over the cooled crust. Place the springform pan in a larger roasting pan. Carefully pour hot water into the roasting pan until it reaches halfway up the sides of the springform pan (this creates a water bath).
- Bake for 50 to 60 minutes, or until the edges are set and the center is almost firm.
- Turn off the oven, crack the oven door open slightly, and let the cheesecake cool in the oven for 1 hour.
- Remove the cheesecake from the water bath and let it cool completely on a wire rack. Refrigerate for at least 6 hours, or preferably overnight, before serving.
Notes
- For the water bath, use very hot tap water to speed up the process.
- To prevent cracking, do not open the oven door during the initial baking time.
- Run a thin knife around the edge of the cheesecake before releasing the springform side for easier removal.
- Prep Time: 20 min
- Cook Time: 60 min
- Category: Dessert
- Method: Baking
- Cuisine: American
Nutrition
- Serving Size: 1 slice
- Calories: 450
- Sugar: 35g
- Sodium: 300mg
- Fat: 30g
- Saturated Fat: 18g
- Unsaturated Fat: 12g
- Trans Fat: 0.5g
- Carbohydrates: 40g
- Fiber: 1g
- Protein: 8g
- Cholesterol: 120mg
Keywords: lemon cheesecake, graham cracker crust, baked cheesecake, cream cheese dessert, lemon zest