
Oh my gosh, if there is one dessert that instantly transports me straight to a bustling Italian bakery, it’s the cannoli! The crunch of that fried shell, followed by that sweet, cool, creamy filling—it’s pure magic, isn’t it? I wrestled with this recipe for years because I always bought them pre-made, but trust me when I say making your own Irresistible Homemade Cannoli Recipe For Sweet Bliss is the absolute only way to go.
I’m going to walk you through every single fussy detail, from getting those shells perfectly bubbly and crisp to making sure your ricotta filling isn’t watery. It feels intimidating, I know! But once you nail the dough rest time and properly drain that cheese, you’ll wonder why you waited so long. This guide covers everything needed for that authentic, melt-in-your-mouth Italian treat.

Why This Irresistible Homemade Cannoli Recipe For Sweet Bliss Stands Out
Look, you can buy cannoli anywhere, right? But they often disappoint. They’re either stale, or the filling is gritty, or worse—soggy! This recipe is different. I’ve tightened up all those little steps that make the difference between a good cannoli and one that tastes just like *Nonna* made it.
It might seem like a lot of work, but trust me, every single step adds up to glorious results. If you’re ready to elevate your home baking game, you should check out some general tips on making yourself a better baker, too!
Perfectly Crisp Cannoli Shells
I promise you, these shells will shatter when you bite them—in the best way possible! The combination of vinegar and white wine in the dough is what creates those beautiful, tiny air bubbles during frying. That airiness is key. But to get that perfect structure, you absolutely have to let the dough cool its heels. An hour rest makes the dough incredibly pliable and stops it from shrinking back when you roll it out. It’s non-negotiable!
Authentic Creamy Ricotta Filling
This is where most recipes fail. They skip the overnight drain. If you don’t drain that whole milk ricotta? You end up with soup in your shell! We want thickness, we want texture, and we want it to hold up beautifully. Draining it overnight in the fridge takes zero active time but guarantees that luxurious, thick filling consistency every single time. That’s the secret to flavor that sings.
Essential Components for Your Irresistible Homemade Cannoli Recipe For Sweet Bliss
Okay, let’s talk ingredients! Getting the right stuff is half the battle when you are aiming for that truly authentic cannoli taste. You can’t just toss whatever you have lying around into this. We need specific items working together flawlessly, especially for the dough, where chemistry is happening!
I’ve split this into the two main stars: the crispy shell and the creamy interior. Remember, the quality of your ricotta makes or breaks the filling, so be sure to shop for the good whole milk stuff!
For the Cannoli Shell Dough
This is where we build the crunch! You’ll notice the wine and the vinegar are in here. Don’t skip them! The acid from the vinegar reacts with the flour right when it hits the hot oil, giving you all those lovely little blisters and bubbles on the shell. It’s fantastic.
- 1 1/2 cups all-purpose flour (just plain flour is perfect)
- 1/4 cup granulated sugar
- 1/4 teaspoon salt
- 1 large egg
- 1/4 cup dry white wine (grab that cheap bottle for baking!)
- 1 tablespoon unsalted butter, melted
- 1 teaspoon white vinegar
- Vegetable oil, for frying (you’ll need maybe 2 inches deep)
For the Sweet Ricotta Filling
This filling has to be made the day before, or at least hours before you plan to eat them, because that draining step is crucial. Don’t confuse this with a creamy frosting; this is rich, thick, and meant to complement the shell, not drown it out.
- 15 ounces whole milk ricotta cheese, drained overnight (I mean it—overnight!)
- 1/2 cup powdered sugar, sifted (Sifting avoids lumps!)
- 1/4 teaspoon vanilla extract
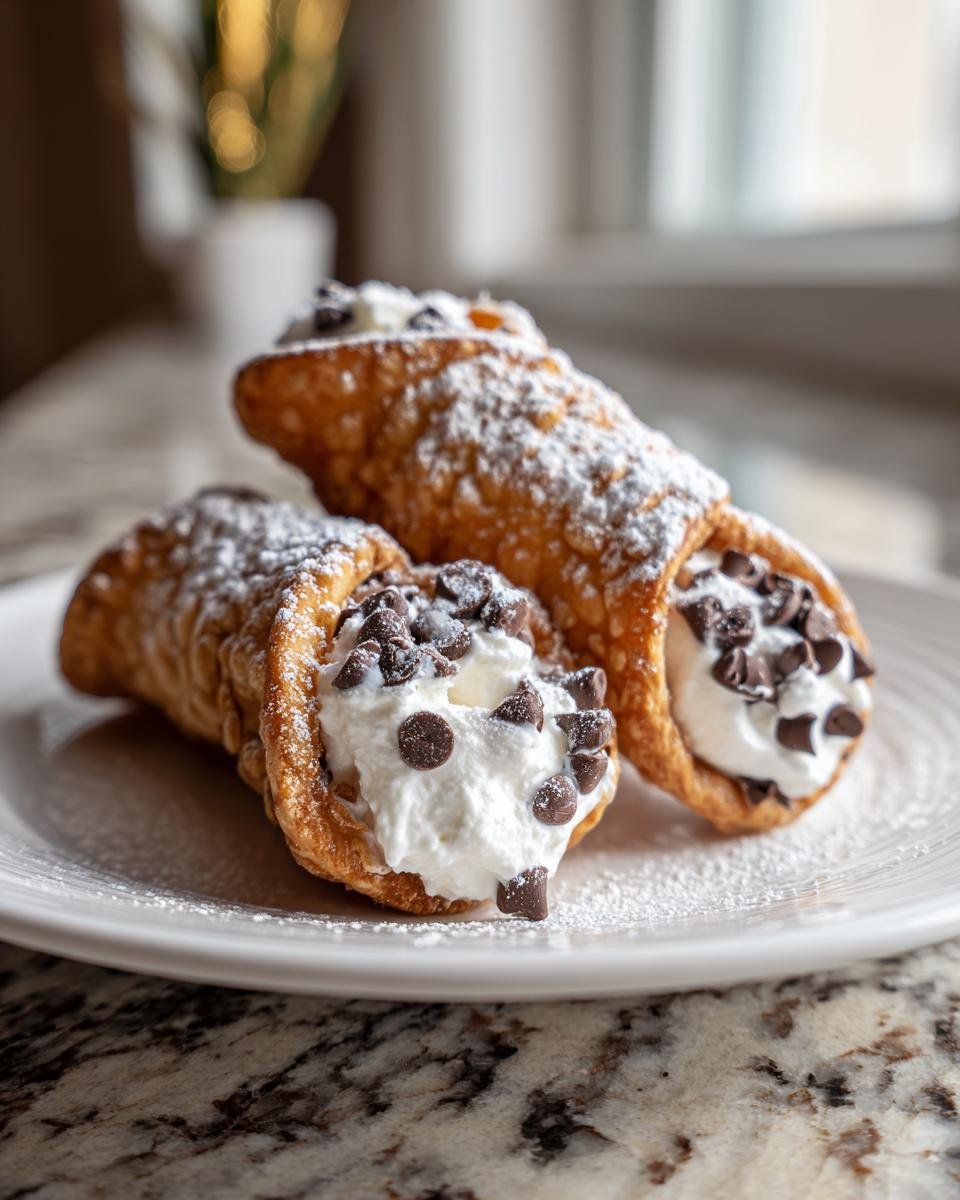
- 1/4 cup mini chocolate chips (they stay suspended better when they are small)
Step-by-Step Guide to the Irresistible Homemade Cannoli Recipe For Sweet Bliss
Alright, deep breath! This is the part where we put all those wonderful ingredients to work. Don’t let the steps intimidate you; just follow them in order, and you’ll hear that wonderful *crunch* later. We’re doing the dough first, then setting up the cold filling while the dough rests, then we move on to the fun part—frying!
Preparing the Cannoli Dough and Resting
First things first, grab a big bowl and whisk together your dry stuff—flour, sugar, and salt. Now, make a little well in the middle of that flour mountain. Time to add the wet ingredients: egg, the wine, that melted butter, and the vinegar. Mix it using a fork or your hands until it just comes together into something shaggy and messy looking. Don’t overmix it yet!
Turn that shaggy mess out onto a lightly floured countertop. Now, you knead! You need to work this dough for a solid 5 to 7 minutes until it feels smooth and elastic under your hands. This develops the structure for a great shell. Once it’s smooth, wrap it up tight in plastic wrap. Seriously tight! It needs to rest at room temperature for at least one full hour. This lets the gluten relax, making it super easy to roll thin later.
Making the Creamy Ricotta Filling
While that dough is chilling out, let’s focus on the star interior. Remember that ricotta you drained overnight? Scoop it into a bowl. We’re going to mix this until it is unbelievably smooth—we don’t want any graininess here!
Use a hand mixer or a sturdy whisk to beat the drained ricotta with the sifted powdered sugar and the vanilla extract. Beat it until it looks silky smooth. If you are adding those little chocolate chips, fold them in gently at the very end. Pop this filling into the fridge to chill for a minimum of two hours. Keeping it cold helps it stiffen up, which is exactly what we want before piping it into the crispy shells.
Shaping and Frying the Cannoli Shells
Once the dough has rested, it’s time to roll it out thin. Like, really thin. If you have a pasta machine, use the thinnest setting but keep in mind you might need to cut the dough into smaller pieces first. If you’re rolling by hand, use a rolling pin until you can almost see your hand through the dough!
Cut out 4-inch circles. Take a metal cannoli tube, and wrap a dough circle around it, making sure one edge overlaps the other slightly. You need to seal that overlap with a tiny dab of egg white—this acts as the glue that keeps the shell together while frying. Don’t skip the glue!
Heat about two inches of vegetable oil in a heavy pot until it hits exactly 375°F (190°C). If you don’t have a thermometer, test it with a tiny scrap of dough; it should immediately sizzle vigorously and turn bubbly. Fry just a couple of shells at a time so you don’t drop the oil temperature. They cook fast—about two minutes per side until beautiful golden brown. Use tongs to fish them out and immediately slide them off the metal tubes onto paper towels to drain. Let them cool completely before you even think about removing the tubes—it takes patience!
Assembling Your Irresistible Homemade Cannoli Recipe For Sweet Bliss
This is important: Do not fill your cannoli shells until the absolute last minute! Seriously, if you fill them too early, that moisture from the ricotta migrates into the shell, and you lose that amazing crisp shatter. If you are having a party, make the shells one day, make the filling the next day, and pipe them 30 minutes before serving.
Once the shells are totally cool and the tubes are out, use a pastry bag (or even just a spoon for a rustic look) to pipe that cold, creamy filling into both ends of the shell until they are plump and perfectly beautiful. Right before you hand them out, dust them generously with powdered sugar. That final dusting makes them look like they came straight from Sicily!

Expert Tips for the Best Irresistible Homemade Cannoli Recipe For Sweet Bliss
Okay, listen up, because this is where we move from ‘made cannoli’ to ‘made *the* cannoli.’ Even when following the steps perfectly, sometimes little things go wrong, usually related to temperature or thickness! I’ve gathered all the hard-earned lessons here so you don’t have to learn them the hard way.
It’s all about respecting the ingredients and the process. If you want that ultimate, show-stopping crunch, you need to pay attention to these details. For even more advanced advice on improving your skills, you can always look up some great baking tips to make you a better baker in general!
Troubleshooting Shell Bubbles and Crispness
The number one reason shells flop (aside from filling them too early) is unstable oil temperature! If the oil is too cool, the dough soaks it up like a sponge and gets greasy. If it’s too hot, it burns before it cooks through, and you won’t get those lovely little bubbles.
Keep a thermometer in the oil while frying, and work in small batches—only two or three shells at a time. This keeps the temperature steady around that 375°F mark. Also, make sure you are rolling that dough thin enough! If it’s too thick, it won’t blister properly; it’ll just look like a hard, dense cracker.
One quick tip if you’re short on metal cannoli tubes: you can absolutely make your own! Get some sturdy wooden dowels (make sure they are food-grade wood!) and wrap them tightly, layer after layer, with heavy-duty aluminum foil. Make sure the foil is smooth where the dough touches it! Works like a charm.
Achieving Smooth, Non-Gritty Filling
We talked about draining the ricotta overnight, and I have to stress it again: Do not skip that step! Even if you think your ricotta looks fine, set it in a mesh sieve over a bowl in the fridge. Seriously, gravity pulls out the water you don’t want.
The second non-negotiable is sifting the powdered sugar. Powdered sugar clumps up worse than anything else, and those tiny sugar clumps will resist mixing into the cheese, leaving you with gritty spots. Sift it right before you add it to the drained ricotta. Then, beat it smooth! If you have a nice stand mixer, use the paddle attachment and let it go for a good five minutes until it looks like silk.
Storage and Make-Ahead Guidance for Your Cannoli
This is where hosting becomes easy, people! I absolutely love making these ahead of time because they feel so fancy, but you have to handle the shells and the filling separately if you want that perfect crunch.
If you try to fill them the night before or even more than a few hours early, you’ll be sorely disappointed. That creamy ricotta filling just loves to leach moisture, and no one wants a soggy shell!
Here is my solid recommendation for staying sane while making this for a crowd:
- The Shells: You can absolutely fry the shells the day before you plan to serve them. Once they are completely cool—and I mean *stone cold*—store them in an airtight container. You can often keep them perfectly crisp for two full days this way. Just keep them away from anything humid!
- The Filling: Keep that gorgeous ricotta filling chilled in the refrigerator. Since it has sugar, it keeps well for about three days, but honestly, it tastes best the day you make it. Just make sure it’s covered well so it doesn’t pick up any weird fridge smells.
The assembly rule: Always, always, always fill the cannoli shells right before serving. I aim to fill mine no more than 30 minutes before people start eating. If you’re serving them slightly later, just pipe them and leave them on a platter, but dust them with the powdered sugar only in the last five minutes so it doesn’t dissolve into the filling.
If you follow this schedule, you look like a superstar baker with zero stress on the big day!
Variations on the Irresistible Homemade Cannoli Recipe For Sweet Bliss
Once you master the fundamental shell and filling, you realize there is so much room to play around! It’s still classic Italian pastry, but you can tweak that creamy ricotta filling to match your mood or the season. Don’t feel like you have to stick to just vanilla and chocolate chips every single time. I love changing it up!
These little customizations take about two extra minutes while you’re mixing the filling, so there’s really no reason not to try one of these flavor boosts next time you make them. It keeps things exciting!
Citrus Zest for Brightness
If you want a cleaner, brighter flavor that cuts through the sweetness—especially after a big meal—add some fresh citrus zest to the filling when you’re mixing in the powdered sugar. Orange zest is the classic choice here! It pairs so beautifully with ricotta. Lemon zest is amazing too, but use it a bit more sparingly, as lemon is much more intense. Just one small orange or lemon, finely zested, makes an enormous difference in the flavor profile.
Liqueur for Depth
This is my go-to move when making cannoli for an adult gathering. A splash of liqueur right into the ricotta before you chill it adds such a lovely, complex warmth. Marsala wine is traditional, but feel free to try a tablespoon of dark rum or even a small splash of Amaretto. Make sure you only add about a tablespoon or two, though. Too much liquid, and you are back to that watery filling problem we worked so hard to avoid!
Nutty Toppings and Mix-Ins
While the chocolate chips are great, you can also change up what you toss in, or what you decorate the ends with. Instead of or in addition to the chips, try finely chopped pistachios or toasted almonds. They add a lovely crunch right inside the filling!
For presentation, consider dipping the exposed filling ends into something extra. You can go for dipping them in melted bittersweet chocolate first, or maybe rolling the ends in finely ground hazelnuts. Seriously, take your perfectly made Irresistible Homemade Cannoli Recipe For Sweet Bliss and turn it into a showstopper with these small additions!

Serving Suggestions for This Sweet Italian Treat
Now that you’ve gone through all the work creating truly perfect, crunchy-on-the-outside, creamy-on-the-inside cannoli, you want to serve them right, don’t you? The presentation doesn’t have to be complicated—these Italian beauties look stunning almost all on their own—but the pairings can really elevate the experience from just dessert to a full-on celebration!
I always think about what they would serve at a little café in Sicily. It’s about simplicity and letting that incredible ricotta shine through. It’s all about balance, especially after a big meal.
Classic Espresso Pairing
You simply cannot beat a cannoli with strong coffee. It’s the absolute perfect foil for all that sweetness. Whether you pull a thick, rich shot of espresso or you brew up some super strong dark roast, that bitterness cuts right through the fresh ricotta and the fried dough beautifully. It cleanses the palate so you can go back for a second bite without feeling overwhelmed!
Simple Fruit for Color
If you’re serving these after a heavy dinner, sometimes you just want something light on the side. Fresh fruit is your simplest friend here. Think berries—strawberries, raspberries, maybe some sliced kiwi for color contrast. You don’t want anything too watery that will mess with the shells, but a little bowl of vibrant, slightly tart fresh fruit on the platter next to the cannoli looks fantastic.
The Wine Companion
If you are serving these in the evening, you need a proper sipping wine! We aren’t going for heavy reds here, no way. You want something slightly sweet, cold, and bubbly to match the festive mood. A chilled glass of Prosecco is wonderful, but honestly, my favorite pairing is a small glass of sweet Italian dessert wine, like Vin Santo, served alongside. It just feels right, celebrating that authentic Italian heritage!
Frequently Asked Questions About Making Cannoli
I know when I first decided to tackle the Irresistible Homemade Cannoli Recipe For Sweet Bliss, I had about a million questions buzzing in my head. It’s easy to feel nervous about frying dough, or what happens if your ricotta isn’t 100% drained! Don’t sweat it. Here are the top things people always ask me so you’re totally prepared! For more inspiration on Italian pastries, check out my guide to making the ultimate Irresistible Homemade Cannoli Recipe For Sweet Bliss again!
Can I bake the shells instead of frying them?
Okay, this is the big one! Technically, yes, you *can* bake cannoli shells. You just wrap your dough around the tubes and bake them until golden. But I have to be honest with you: they won’t taste the same. Frying is what creates that signature light, bubbly, and absolutely crisp texture that makes a cannoli a cannoli. Baked shells tend to be harder, denser, and lack that airy quality. If you’re going to all the trouble of making this authentic recipe, I really encourage you to bite the bullet and fry them—it’s much faster than you think!
What if I absolutely cannot find cannoli tubes?
Don’t panic! You do not need to run to specialty store if you’re missing those metal tubes. You can make an excellent substitute, but you need something sturdy and heat-safe. My favorite trick is taking thick wooden dowels—the kind you use for crafting or cooking—and wrapping them really tightly, layer after layer, with heavy-duty aluminum foil. Make sure the foil is very smooth where the dough touches it! You want to create a nice, smooth metal surface for the dough to cook against. Just remember to use a slightly thicker egg-white seal on the dough overlap, since you might be handling the foil a bit more than a metal tube. Once the shells cool, the foil mold usually slides right out!
How long will the finished, filled cannoli last?
This ties back to that crucial assembly step we talked about! For the absolute best experience, you want to eat them right after filling, within an hour or two. If you absolutely must make them ahead, I’d say pipe the **Irresistible Homemade Cannoli Recipe For Sweet Bliss** filling into the shells no more than 3 to 4 hours before serving. Any longer than that, and that moist ricotta filling starts making friends with the crispy shell, and you lose the crunch you worked so hard for!
What is the best way to drain the ricotta cheese?
This step is seriously the foundation of non-soupy filling! You need a fine-mesh sieve or a colander lined with a few layers of cheesecloth or a durable coffee filter. Place the drainer over a bowl. Scoop your whole milk ricotta into the lined sieve. Cover the top loosely with plastic wrap and stick it in the refrigerator and let it drain for a minimum of 8 hours, but ideally overnight. You’ll be surprised how much watery whey drains out! That heavy, thick cheese left behind is pure gold for a perfect cannoli filling.
Nutritional Snapshot (Estimated Values)
Listen, I’m a cook, not a nutritionist, so take these numbers with a huge grain of salt! Baking is chemistry, but my kitchen isn’t a laboratory, you know? This is just a general idea of what you’re winding up with when you make a batch of those amazing, crunchy, creamy treats. It’s dessert, we aren’t counting macros when we’re enjoying our Italian bliss!
These estimates are based on the recipe making about 12 servings and using standard grocery store ingredients. If you use less sugar or use skim milk ricotta (which I absolutely forbid!), your numbers are going to change!
- Serving Size: 1 shell
- Calories: 280
- Sugar: 18 grams (Wow, I know, but they’re worth it!)
- Protein: 8 grams
- Total Fat: 15 grams
- Carbohydrates: 30 grams
Important caveat, though: Because this is a heavily customized, **Irresistible Homemade Cannoli Recipe For Sweet Bliss**, these figures are estimates! Frying takes up oil, additions like heavy cream or extra chocolate chips change things fast. Always remember that homemade treats are made with love, not standardized testing equipment!
Print
Homemade Cannoli Recipe
- Total Time: 120 min
- Yield: 12 servings 1x
- Diet: Vegetarian
Description
A recipe for making classic Italian cannoli with a sweet ricotta filling.
Ingredients
- 1 1/2 cups all-purpose flour
- 1/4 cup granulated sugar
- 1/4 teaspoon salt
- 1 large egg
- 1/4 cup dry white wine
- 1 tablespoon unsalted butter, melted
- 1 teaspoon white vinegar
- Vegetable oil, for frying
- 15 ounces whole milk ricotta cheese, drained overnight
- 1/2 cup powdered sugar, sifted
- 1/4 teaspoon vanilla extract
- 1/4 cup mini chocolate chips (optional)
- Powdered sugar, for dusting
Instructions
- In a large bowl, whisk together the flour, granulated sugar, and salt.
- Make a well in the center and add the egg, white wine, melted butter, and vinegar.
- Mix until a shaggy dough forms, then turn out onto a floured surface and knead for 5 to 7 minutes until smooth.
- Wrap the dough tightly in plastic wrap and let it rest at room temperature for at least 1 hour.
- While the dough rests, prepare the filling: In a bowl, combine the drained ricotta cheese, powdered sugar, and vanilla extract. Mix until smooth. Stir in chocolate chips if using. Cover and refrigerate for at least 2 hours.
- Roll the dough out very thin, either by hand or using a pasta machine. Cut the dough into 4-inch circles.
- Wrap each dough circle around metal cannoli tubes, overlapping the edges slightly. Seal the edges with a dab of egg white.
- Heat about 2 inches of vegetable oil in a deep pot to 375°F (190°C).
- Carefully fry the cannoli shells, a few at a time, until golden brown and bubbly, about 2 minutes per side.
- Remove the shells with tongs and immediately slide them off the tubes onto a paper towel-lined plate to drain excess oil. Let them cool completely.
- Once cool, remove the tubes. Just before serving, fill the cooled shells with the ricotta mixture using a pastry bag or spoon.
- Dust the filled cannoli with powdered sugar.
Notes
- Drain the ricotta cheese in a fine-mesh sieve lined with cheesecloth in the refrigerator overnight for the best texture.
- If you do not have cannoli tubes, you can use dowels wrapped tightly in aluminum foil as a substitute.
- Fry the shells in small batches to keep the oil temperature stable.
- Prep Time: 45 min
- Cook Time: 15 min
- Category: Dessert
- Method: Frying
- Cuisine: Italian
Nutrition
- Serving Size: 1 shell
- Calories: 280
- Sugar: 18
- Sodium: 65
- Fat: 15
- Saturated Fat: 8
- Unsaturated Fat: 7
- Trans Fat: 0
- Carbohydrates: 30
- Fiber: 1
- Protein: 8
- Cholesterol: 45
Keywords: cannoli, Italian pastry, ricotta filling, fried shells, sweet dessert