
You know those nights when you just absolutely need a sweet, chewy, chocolatey hit, but you don’t have the energy (or frankly, the patience) for baking? I live for those moments! That’s why this recipe for **Rocky Road Candy** is my permanent kitchen staple. Forget complicated tempering or fussy stovetop stirring; this is the easiest, most satisfying version of a classic treat you’ll ever make.
Honestly, this recipe is my go-to because it cures any sugar craving in under 15 minutes of active time. It’s rich, it’s studded with crunch, and it sets up perfectly every single time—no stress involved. This simple Rocky Road formula proves you don’t need an oven to make an amazing dessert!
Why This Easy Rocky Road Candy Recipe Works
Seriously, what’s not to love about a candy that requires zero baking? That’s the beauty of this recipe, and it builds instant confidence for cooks who might be nervous about candy making. Trust me, this is foolproof.
- It’s totally no-bake, so you can whip this up even when the oven is already hot from dinner!
- The active time is ridiculously short—we’re talking 15 minutes max before it heads to the fridge.
- The results are always chewy, crunchy, and perfectly sweet.
If you want to know more about making your baking life generally easier, check out some general tips right here!
Quick Preparation for Rocky Road Candy
The beauty of this speedy Rocky Road Candy is that the 10 minutes of stove time flies by. You’re just gently melting things together. The real work—the waiting—is hands-off refrigeration time. You mix it, spread it, and forget it for a couple of hours while you go do something fun!
Perfect Texture in Every Batch of Rocky Road Candy
The key to that signature chew is that sweetened condensed milk combined with the chocolate. People worry it will come out rock hard, but it won’t! The ratio keeps the candy soft enough to bite into easily, but firm enough to hold its square shape. Remember what I always say: stir gently when you add those marshmallows. We want them coated, not destroyed!
Gathering Ingredients for Your Rocky Road Candy
Okay, let’s get down to brass tacks. With a no-bake recipe like this Rocky Road Candy, the quality of your starting ingredients matters because there’s nowhere for weak flavors to hide! We need just five simple things, and I need you to be specific when you shop. Don’t just grab random chocolate; we need that creamy, familiar melted texture that only comes from the right base.
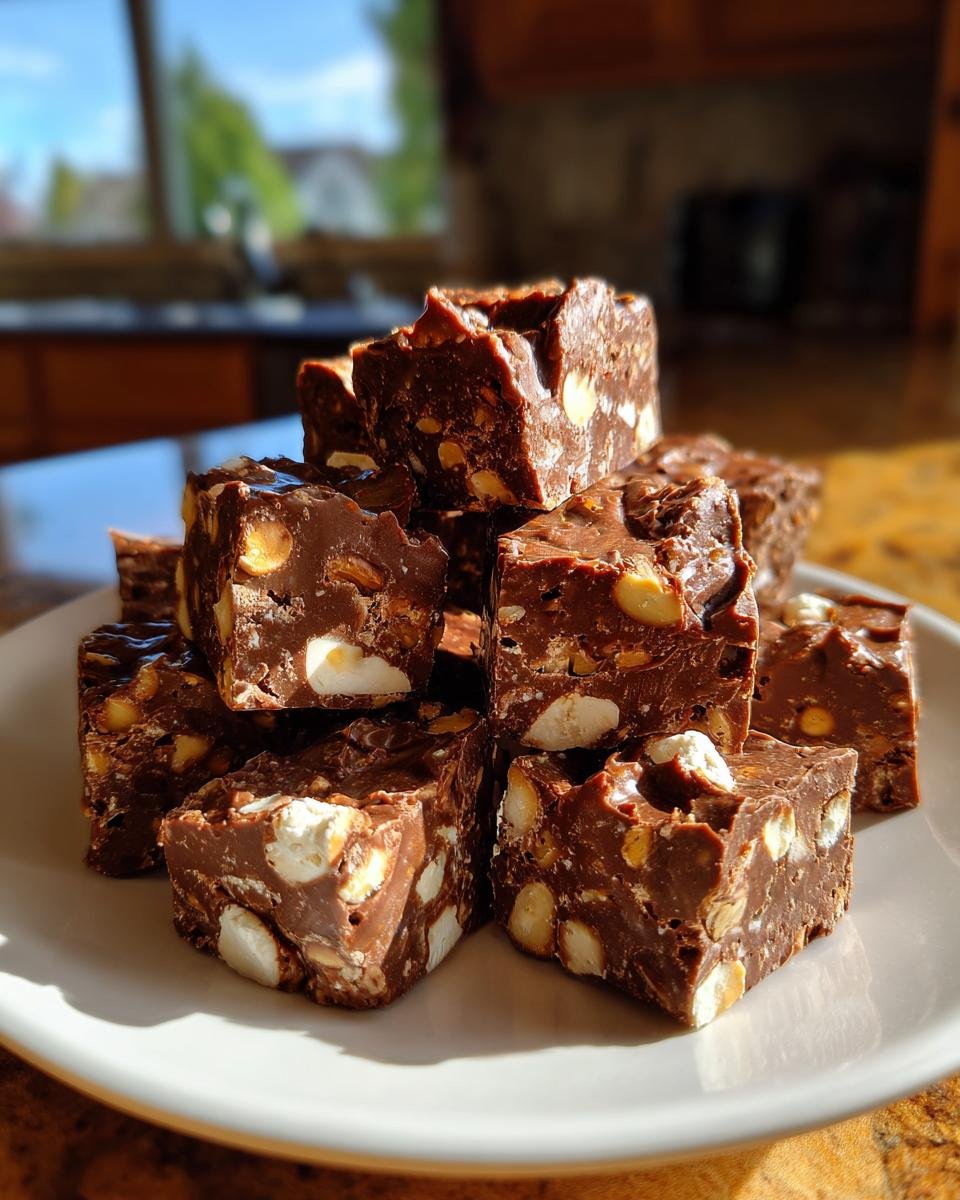
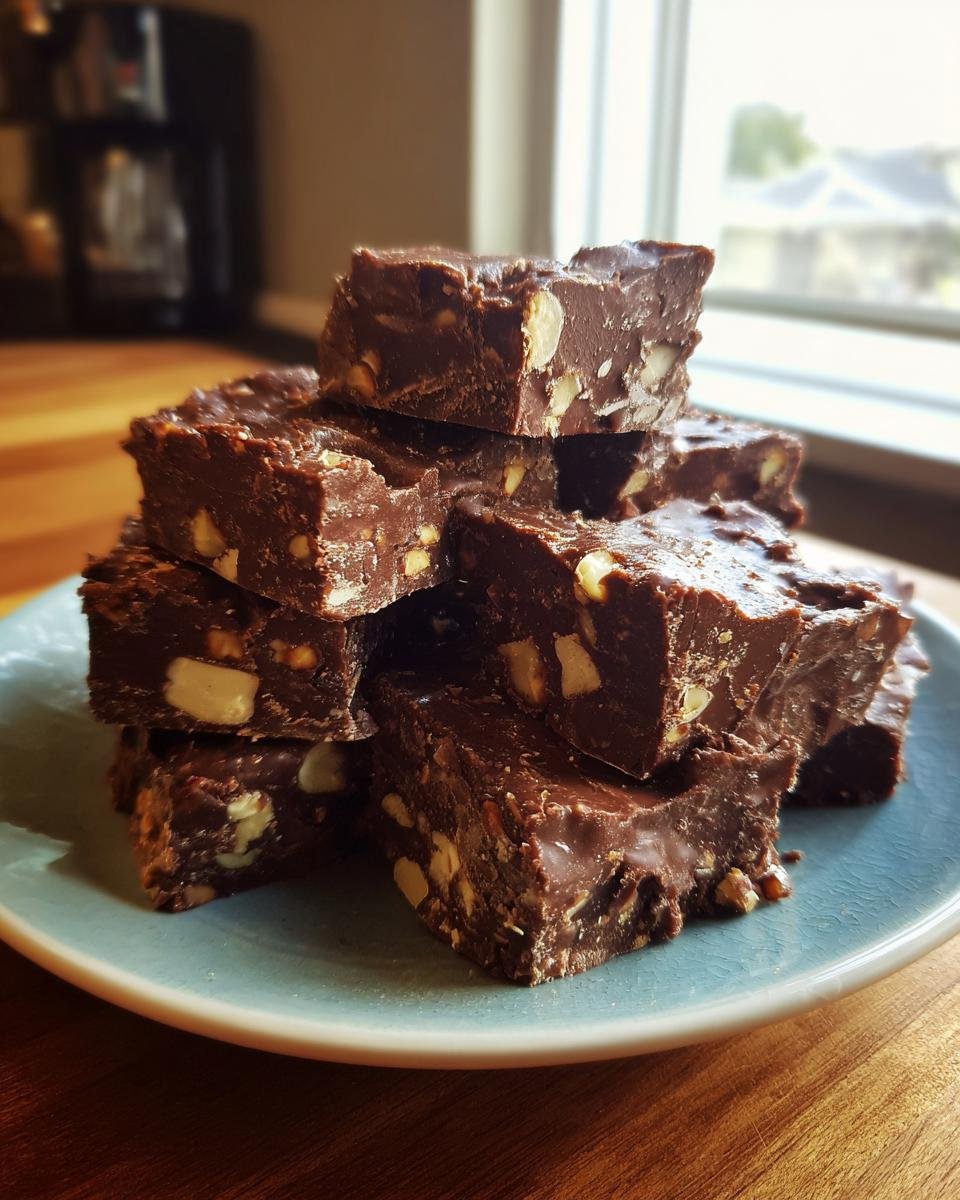
You’ll need 14 ounces of sweetened condensed milk—that’s what makes the magic happen, not evaporated milk, okay? Grab 12 ounces of semi-sweet chocolate chips, two cups of those cute little miniature marshmallows, and one cup of chopped nuts. And don’t forget the vanilla extract! A teaspoon brings everything together beautifully.

Ingredient Notes and Substitutions for Rocky Road Candy
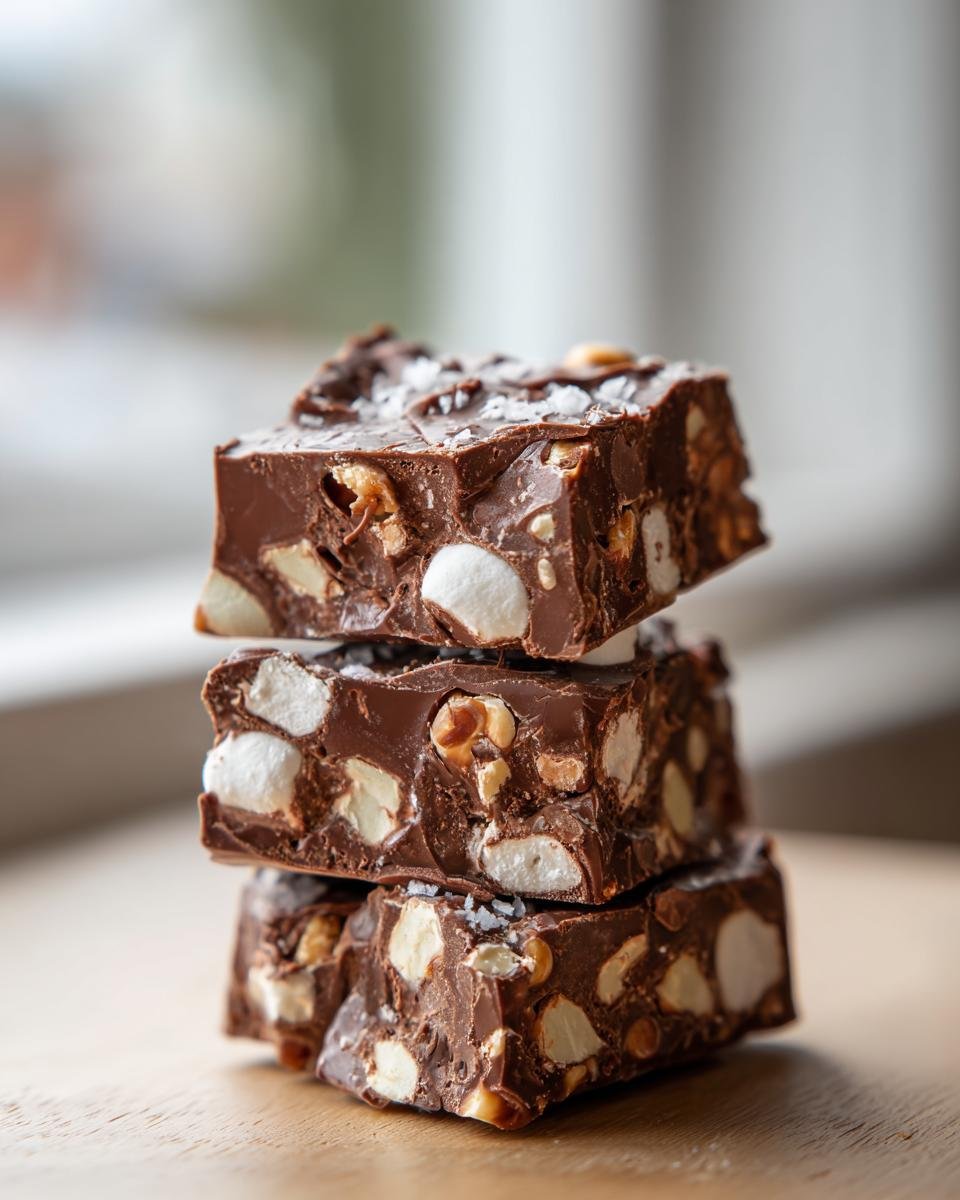
Here are my little secrets to make this already great candy even better. First, if you’re using nuts, please, *please* use lightly salted ones. That tiny hit of saltiness cuts through the sugar and the chocolate so perfectly. It wakes everything up! It makes this Rocky Road Candy taste professionally made, I swear.
Also, about the chocolate! The recipe calls for semi-sweet, which is classic. But if you have a darker craving—maybe you like a more intense flavor—feel free to swap those out for dark chocolate chips. It gives the final product a richer, deeper color and a lovely little edge. Just make sure whatever you choose melts smoothly!
Equipment Needed for Perfect Rocky Road Candy
Before we even think about turning on the stove, let’s chat about what you need on the counter. Because this is a no-bake candy, we’re relying on our tools to do all the heavy lifting. You don’t need a stand mixer or a candy thermometer, which is why I love this recipe! But you do need to have everything ready to go.
First up: lining that pan! Grab an 8×8 inch square baking pan. This specific size is critical for getting the right thickness for your Rocky Road Candy. You MUST line it with parchment paper. I mean it! Leave a good overhang on the sides—like little handles—so when this candy is set, you can just lift the whole slab out in one perfect piece. It saves so much aggravation later.
Next, you’ll need one medium saucepan for melting everything. Make sure it has a good, heavy bottom. We don’t want any hot spots that could scorch that beautiful condensed milk mixture. And grab a good sturdy spatula. You’ll be stirring constantly, so comfort matters! Finally, have a cutting board ready for slicing up those glorious bars once they’re chilled.
Step-by-Step Instructions to Make Rocky Road Candy
Now for the fun part—putting it all together! This is where speed and a gentle hand really pay off. You’ve got your parchment-lined pan ready to go, so let’s get this chocolate melting. Remember, we are treating this nice mixture with respect so it sets up perfectly for your amazing Rocky Road Candy.
First, combine your sweetened condensed milk and chocolate chips in that saucepan we talked about. You’re using low heat here, people! This is crucial. Keep stirring constantly until everything is completely smooth. If you let it get too hot, you’ll risk boiling that condensed milk, and trust me, that changes the whole texture of the final candy.
Once it’s glossy and silky smooth—that means it’s ready—pull it off the heat immediately. Stir in your vanilla extract, and then we move fast to the fun parts! If you want to check out another quick chocolate recipe, you can see how I make a pie in just 15 minutes over here.
Melting Chocolate Base for Rocky Road Candy
Low heat is your best friend for this step. I mean truly low. You’re not trying to boil water here; you’re just convincing stubborn chocolate chips to mingle with the condensed milk. Always stir, stir, stir! If you stop stirring, you’re inviting scorching on the bottom of the pan. We want smooth sailing, not burnt chocolate sticking to the bottom. If it starts to look stiff or thick right away, turn the heat down even further or pull it off the burner entirely—it will keep melting from the residual heat!
Folding in Mix-ins for Your Rocky Road Candy
Okay, the chocolate mixture is off the fire. Now, gently fold in your nuts and those adorable miniature marshmallows. Don’t beat them in like you’re mixing cake batter! Use a spatula and cut down through the middle and then sweep up the side. We’re folding them just enough so that every single marshmallow and nut piece gets a nice, even coating of that chocolatey goo. We aren’t trying to crush the marshmallows; we just want them nestled in there beautifully before pouring.
Setting and Cutting the Rocky Road Candy
Pour that marvelous, chunky mixture into your prepared pan and spread it out evenly. Don’t press it down too hard—just encourage it to fill the corners. Now, patience is required! It needs a solid two hours in the refrigerator. Don’t cheat this step, or it will be a sticky mess when you try to cut it. Once it’s completely firm, use those parchment paper handles to lift the whole slab out in one perfect piece. Flip it onto a cutting board and slice it into 16 neat squares. That’s your perfect Rocky Road Candy, ready to go!
Tips for the Best Homemade Rocky Road Candy
Even though this Rocky Road Candy recipe is designed to be super straightforward, there are always a few little tricks that separate good candy from truly *great* candy. I’ve found over the years that paying attention to tiny details makes a huge difference, even when we aren’t dealing with fussy tempering techniques.
First, let’s talk quality. Since we are literally just melting chocolate and milk, use the best chocolate chips you can afford. Higher quality chocolate melts silkier, which means you don’t have to cook it as long to get that beautiful gloss we talked about. A better melt equals less risk of overheating the condensed milk!
When it comes to preventing sticking—even with all that parchment paper—I always give the top of the candy a very quick, very light spray with a neutral cooking spray right after I spread it out in the pan. It sounds unnecessary, but it helps the surface firm up without grabbing onto the air, making slicing cleaner. Just a tiny spritz!
Also, if you are ever worried about your candy setting up too soft because maybe your kitchen is really warm, try chilling your marshmallows and nuts briefly in the freezer for about ten minutes before you fold them in. This keeps them a little firmer when they hit the warm chocolate base, which helps them maintain their shape better throughout the entire setting process. For more general kitchen wisdom that applies everywhere, you can always check out my baking tips here!
Storing Your Delicious Rocky Road Candy
Now that you’ve spent zero time making this amazing Rocky Road Candy, we certainly don’t want to ruin it by storing it incorrectly! These bars are sturdy thanks to that condensed milk base, but they are still chocolate and marshmallows, so they need a little special care, especially depending on how warm your kitchen is.
For the very best texture and longevity, I always recommend keeping the finished candy in an airtight container in the refrigerator. Since this is a no-bake treat, the cool temperature helps keep the marshmallows from getting too soft and sticky, and it locks in that perfect snap we worked so hard to achieve. Make sure you separate the layers of candy with wax paper or parchment paper. If you stack them right on top of each other, you’ll end up with a messy, melted pile when you pull them apart later!
What about room temperature? Well, if you plan on eating them all within a day or two, and your house isn’t terribly humid, they’ll be fine sitting in a sealed container on the counter. However, the texture will soften up considerably faster. If it’s a hot summer day, keep them cold! Humidity is the enemy of nice, clean-cut squares.
They actually freeze beautifully, too! If you’re making a huge batch for a party, wrap the blocks tightly in plastic wrap, then foil, and pop them into the freezer. They last for ages that way. When you want some more of that crunchy, chewy goodness, just pull a piece out. Let it defrost on the counter for about 45 minutes before cutting or serving, and it tastes like it was just made. Easy storage for an easy candy!
Frequently Asked Questions About Rocky Road Candy
I know when you’re tackling a new recipe, even a super simple one like this Rocky Road Candy, questions pop up! It’s totally normal. I’ve gathered the things I hear most often after people try this recipe. Hopefully, this covers anything that might be kicking around in your head before you pour that chocolate!
Can I use different types of chocolate in my Rocky Road Candy?
Absolutely! Honestly, this candy is pretty forgiving, which is why I love it. While I specified semi-sweet because it gives you that perfect classic balance between rich chocolate and sweet marshmallow, feel free to swap it out. Milk chocolate works great, but just a heads-up: it tends to melt a little thinner and get slightly softer when chilled than semi-sweet does. If you use white chocolate chips, you’ll get a totally different, sweeter candy—it’s delicious, but it sets up even softer, so you absolutely have to keep that batch cold!
How long does this Rocky Road Candy stay fresh?
Since this is a no-bake candy that relies on condensed milk, it’s got a decent shelf life if you treat it right. If kept sealed up tight and stored in the refrigerator (which is highly recommended to keep those marshmallows chewy and not sticky), you can expect it to stay perfectly delicious for about two weeks. If you wrap it well and pop an airtight container in the freezer, it honestly lasts for months! Just make sure to let it warm up just a tiny bit before slicing it, or you’ll chip a tooth!
What nuts are best for this simple Rocky Road Candy?
I always sing the praises of almonds or walnuts because they give you that sharp, satisfying crunch that contrasts beautifully with the smooth chocolate and chewy marshmallow. And don’t forget my tip about using *salted* versions! However, this recipe is a wonderful canvas for experimentation. If you’re looking to switch things up next time, try pecans—they offer a buttery flavor that is unbelievable in chocolate.
But I’ll let you in on my slightly chaotic secret variation: skip the nuts entirely sometimes and throw in some crushed pretzels instead! You get salty, sweet, and crunch all in one bite. It makes for truly unpredictable and amazing Rocky Road Candy. If you have any other brilliant mix-in ideas, please let me know about them when you reach out or leave a comment on my contact page!
Estimated Nutritional Profile for Rocky Road Candy
I always encourage people to enjoy homemade treats without worrying too much about the numbers, but knowing what’s in this fantastic Rocky Road Candy is important too! Since this recipe uses sweetened condensed milk and rich chocolate, it’s definitely a wonderful, decadent dessert square.
Here’s what you can generally expect for one square, based on standard ingredient measurements. Remember, if you use dark chocolate instead of semi-sweet, or decide to sneak in salted peanuts instead of walnuts, these numbers will shift just a bit! Consider these figures a really solid estimate to help you plan your indulgence.
- Serving Size: 1 square
- Calories: 220
- Sugar: 25 grams (Yep, it’s candy—it’s sweet!)
- Fat: 12 grams (This is where the chocolate richness comes from!)
- Protein: 4 grams
We always have to add the standard disclaimer here: these figures are calculated estimates based on the ingredients listed in the recipe, assuming roughly 16 servings. If you cut them bigger or smaller, or if your brand of condensed milk is slightly different, your actual values might vary slightly. But trust me, every single calorie is worth it!
Share Your Rocky Road Candy Creations
That’s it! You now have the blueprint for the easiest and most addictive Rocky Road Candy you will ever make at home. I sincerely hope you love the simplicity and the results as much as my family does. This candy just feels special, even when it takes almost no effort!
Now, I’m dying to know what you thought! Did you stick to the classic almonds, or did you try something wild in there? Did you use dark chocolate, or did you go straight for milk chocolate? The best part about baking—or in this case, *no-baking*—is seeing how you make the recipe your own.
Please, take a moment and leave me a rating right down below. Five stars if it made your life easier! And whatever you did, share it in the comments. I read every single one, and I love hearing which variation you settled on. If you have specific questions about ingredients or want to chat more about candy making, you can always find my contact information on the privacy policy page—yes, I hide the contact info there sometimes, sneaky!
Until next time, enjoy every single chewy, crunchy square!
Print
Simple Rocky Road Candy
- Total Time: 2 hours 25 min
- Yield: 16 servings 1x
- Diet: Vegetarian
Description
A straightforward recipe for making classic Rocky Road candy at home.
Ingredients
- 14 ounces sweetened condensed milk
- 12 ounces semi-sweet chocolate chips
- 1 cup chopped nuts (almonds or walnuts)
- 2 cups miniature marshmallows
- 1 teaspoon vanilla extract
Instructions
- Line an 8×8 inch pan with parchment paper, leaving an overhang on the sides.
- Combine the sweetened condensed milk and chocolate chips in a medium saucepan.
- Heat the mixture over low heat, stirring constantly until the chocolate is fully melted and the mixture is smooth. Do not let it boil.
- Remove the pan from the heat and stir in the vanilla extract.
- Fold in the chopped nuts and marshmallows until they are evenly coated.
- Pour the mixture into the prepared pan and spread it evenly.
- Refrigerate for at least 2 hours, or until firm.
- Lift the candy out of the pan using the parchment overhang. Cut into squares before serving.
Notes
- Use lightly salted nuts for a contrasting flavor.
- If you prefer a darker chocolate flavor, substitute dark chocolate chips for semi-sweet.
- Prep Time: 15 min
- Cook Time: 10 min
- Category: Dessert
- Method: No-Bake
- Cuisine: American
Nutrition
- Serving Size: 1 square
- Calories: 220
- Sugar: 25
- Sodium: 35
- Fat: 12
- Saturated Fat: 7
- Unsaturated Fat: 5
- Trans Fat: 0
- Carbohydrates: 28
- Fiber: 1
- Protein: 4
- Cholesterol: 15
Keywords: Rocky Road, chocolate, marshmallows, nuts, candy, no-bake