
There is just something magical about a perfectly rich, cool slice of chocolate cream pie after a big dinner, isn’t there? It’s pure, unadulterated comfort food sitting right there on a plate. Forget those complicated desserts that require three days of planning! I’m here to tell you my secret for making the absolute best, richest **Chocolate Cream Pie** you’ll ever taste, and we’re doing it all with ingredients you probably already have in your pantry right now.
Seriously, this recipe is my weeknight hero. When I need something deeply satisfying but I’m already tired from the day, this pie comes to the rescue in under an hour of active time. My kids beg for it whenever the fridge looks bare. It’s so reliably good; it’s become my standard dessert offering when someone needs a quick, meaningful treat.
Why This Simple Chocolate Cream Pie Recipe Works
If you’ve ever shied away from making a homemade cream pie because you thought it was tricky, trust me, this one is a game-changer. We’re skipping the whole fuss of baking a crust right before pouring in the filling, and we’re using simple stovetop techniques to get that incredible texture right every time.
This recipe truly shines because it delivers that decadent, deep chocolate flavor without taking over your entire afternoon. If you want to brush up on some foundational baking skills while you’re here, check out my tips on baking tips to make you a better baker.
Key Benefits of Our Chocolate Cream Pie
- That texture is pure velvet! Seriously smooth, never grainy, which comes from nailing that cornstarch blend.
- It’s lightning-fast. Since we start with a fully baked crust, the active time is super short.
- The flavor is intensely chocolatey—we don’t skimp on the cocoa powder!
- It’s totally customizable. The filling is perfect on its own, but the topping is your canvas.
Gathering Ingredients for Your Chocolate Cream Pie
Okay, the secret to a perfect **Chocolate Cream Pie** isn’t just the cooking; it’s getting your ingredients ready before you even turn on the stove. Seriously, don’t skimp here, and measure everything out first! We have two main teams here: the filling that needs to set up like a dream, and the topping that needs to be light and fluffy. You absolutely need a fully baked pie crust ready to go; don’t even think about pouring that gorgeous filling into a raw shell!
If you ever worry about swaps or substitutions for things like milk, I have a little guide on how to make buttermilk substitutes that might come in handy down the road!
For the Rich Chocolate Cream Pie Filling
This is where the magic happens. You need:
- One 9-inch pie crust, already baked until golden brown—this is non-negotiable!
- 1/2 cup of granulated sugar.
- 1/4 cup of unsweetened cocoa powder; please, please sift this to avoid lumps.
- 1/4 cup of cornstarch—our powerhouse thickener.
- Just 1/4 teaspoon of salt to wake up that chocolate flavor.
- 2 cups of milk (whole milk works best for creaminess).
- 2 large egg yolks—these give it body, so don’t toss those whites!
- 2 tablespoons of unsalted butter, waiting patiently.
- 1 teaspoon of pure vanilla extract.
For the Whipped Cream Topping
Keep this stuff cold until the very last second! We need:
- 1 cup of heavy whipping cream; make sure this is straight from the fridge.
- 1 tablespoon of powdered sugar (this helps it stabilize beautifully under the mixer).
Step-by-Step Instructions for the Perfect Chocolate Cream Pie
Now that all your ingredients are lined up, it’s time to get this beautiful **Chocolate Cream Pie** filling going. Remember, this is all happening on the stovetop, so keep your eyes on it! Unlike baking, cream pie fillings can go from perfect to scorched in about ten seconds flat, so stay close.
If you want to get really fancy with your crust—though my recipe uses store-bought for ease—you can check out my tips for achieving the flakiest texture ever right here: flaky pie crust secret to success.
Preparing the Stovetop Chocolate Filling
First, grab your medium saucepan. Whisk together your sugar, cocoa powder, cornstarch, and salt. Make sure you really break up any cocoa clumps now; this prevents lumps later. Next, slowly whisk in the two cups of milk until everything looks smooth and uniform.
Set the heat to medium. You have to stir this constantly! Seriously, keep that whisk moving until it thickens up enough to boil, and then let it boil hard for exactly one minute while you keep stirring. Take it off the heat right away.
Now for the yolks! In a separate little bowl, whisk those two egg yolks lightly. This next part is crucial for tempering: slowly drizzle about half a cup of the hot chocolate mixture into the yolks while whisking them like crazy. Whisk the tempered yolk mixture rapidly back into the saucepan to prevent scrambling. Put the pan back on medium heat until it boils again and hold that boil for one minute. Remove it and stir in your butter and vanilla until everything is melted and glossy. Pour it straight into your waiting baked crust!

Chilling and Topping the Chocolate Cream Pie
This next move is the absolute most important step if you hate that weird brown skin that forms on top of pudding: take a sheet of plastic wrap and press it *directly* onto the surface of the warm filling. No air space allowed! Pop the whole thing into the fridge. It needs to chill for a minimum of three hours, but honestly, four or five hours is better for it to truly firm up.
Once your pie is rock solid and perfectly chilled, it’s topping time! Beat that cold heavy whipping cream with the tablespoon of powdered sugar until you get stiff peaks. Don’t over-beat, or you’ll end up with butter!
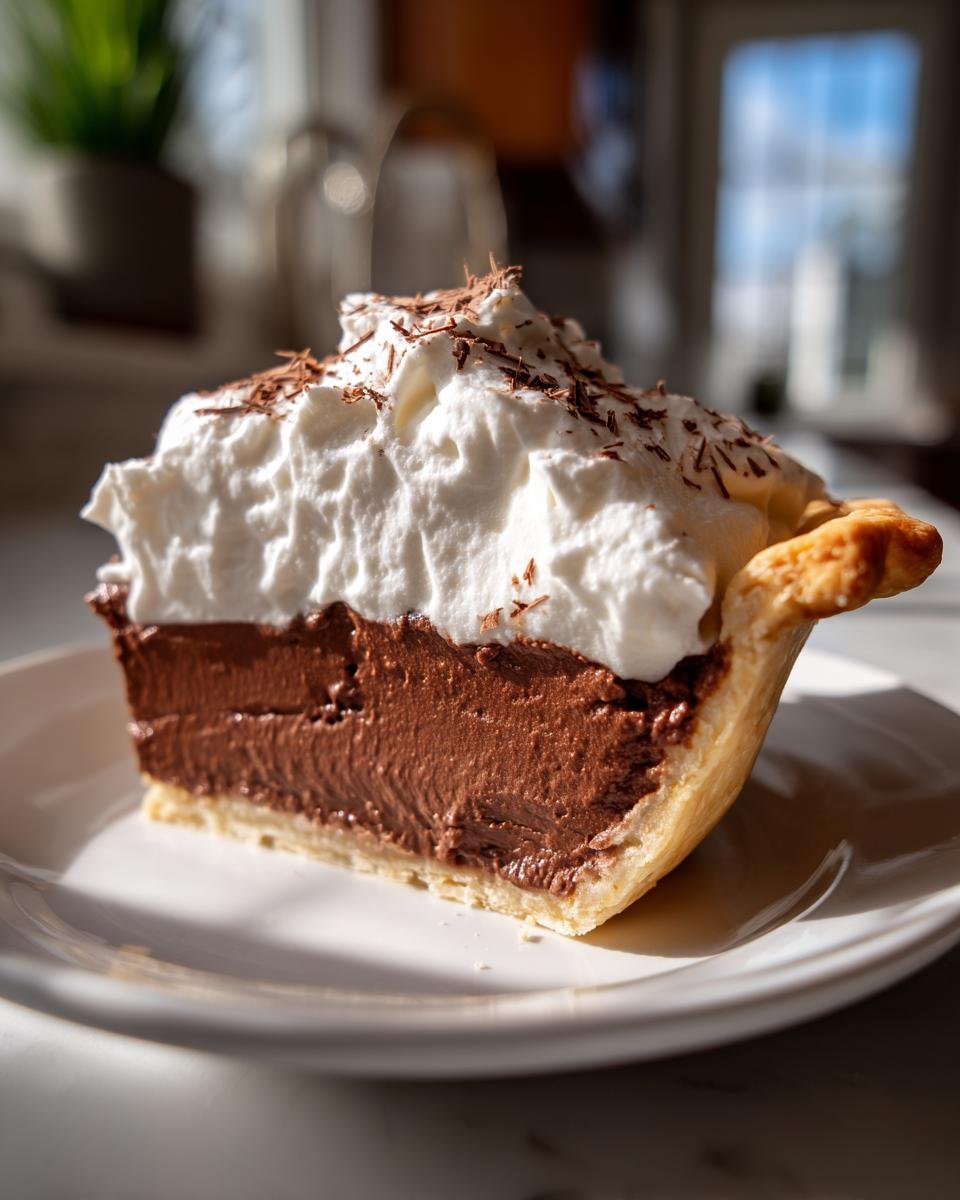
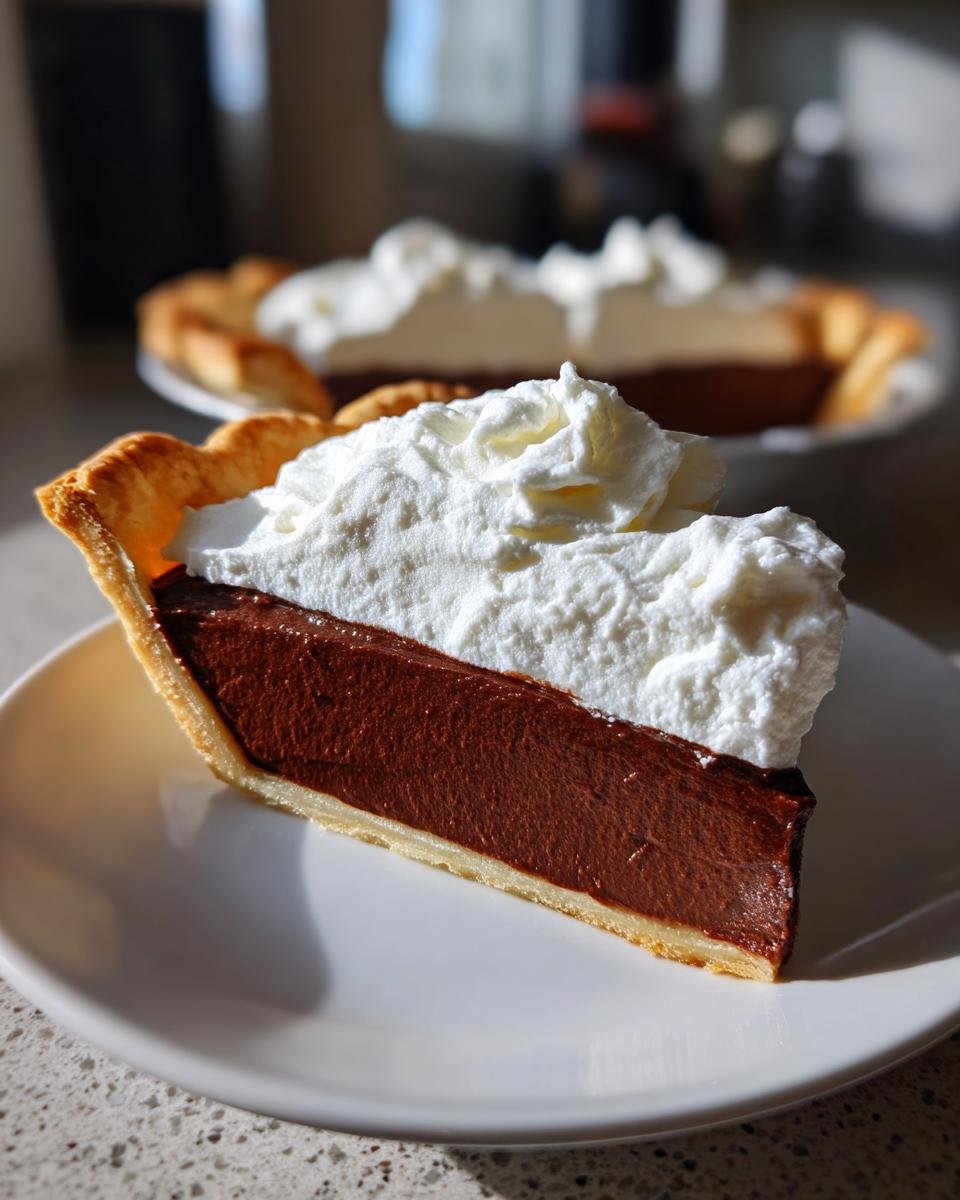
Gently spread all that fluffy whipped cream over the completely set **Chocolate Cream Pie** just before you slice it. That fresh topping hitting that cool, dense chocolate filling? Pure happiness, I tell you.
Tips for Achieving the Best Chocolate Cream Pie Texture
Listen, I learned this the hard way! My first attempt at a homemade chocolate cream pie turned into a soupy, lumpy disaster. The filling was runny, and it had a weird rubbery skin because I was impatient. Rookie mistake! Now, I treat the chilling and cooking steps with total respect.
The biggest thing is heat management. Don’t let that filling boil fiercely once the egg yolks are in there; it just needs a steady, confident simmer to activate the cornstarch, but too much agitation will break down the egg stabilizers. Remember to check out my general kitchen wisdom, especially on baking tips to make you a better baker, if you’re trying to avoid common fails.
When chilling, don’t skip pressing that plastic wrap right onto the surface. That one tiny step saves you from scraping off that dry blanket of skin that nobody wants on their slice. Seriously, this is how you get that unbelievably smooth, velvety texture we are aiming for!
Ingredient Notes and Substitutions for Your Chocolate Cream Pie
I always try to encourage people to use what they have, but for something like this glorious **Chocolate Cream Pie**, a few ingredients really make or break the texture. For starters, the recipe notes suggest you can absolutely pull a switcheroo on the crust—if you’re out of time or don’t have pastry on hand, switch to a graham cracker crust. It gives the overall pie a slightly sweeter, crunchier base, which is fantastic!
Here’s my expert swap suggestion, though: if you happen to only have half-and-half instead of the whole milk, go for it! Just know that the final texture of the filling will be a touch lighter—it won’t be quite as deeply rich or thick as it would be with whole milk, but it still sets up beautifully. If you’re exploring dairy swaps for other recipes, check out my thoughts on how to make buttermilk substitutes!
The one thing I never cheat on is the cornstarch. It has to be cornstarch for the structure here, not flour. Flour just doesn’t yield that signature satiny finish the way cornstarch does in those cooked fillings.
Serving Suggestions for Your Homemade Chocolate Cream Pie
Once that beautiful **Chocolate Cream Pie** has set up perfectly and you’ve dolloped on that glorious billowy whipped cream, it’s time for the presentation! I like to keep the toppings simple because the dark chocolate filling truly speaks for itself. A light, almost dusting of extra cocoa powder sifted gently over the top of the whipped cream looks stunning against the white peaks.
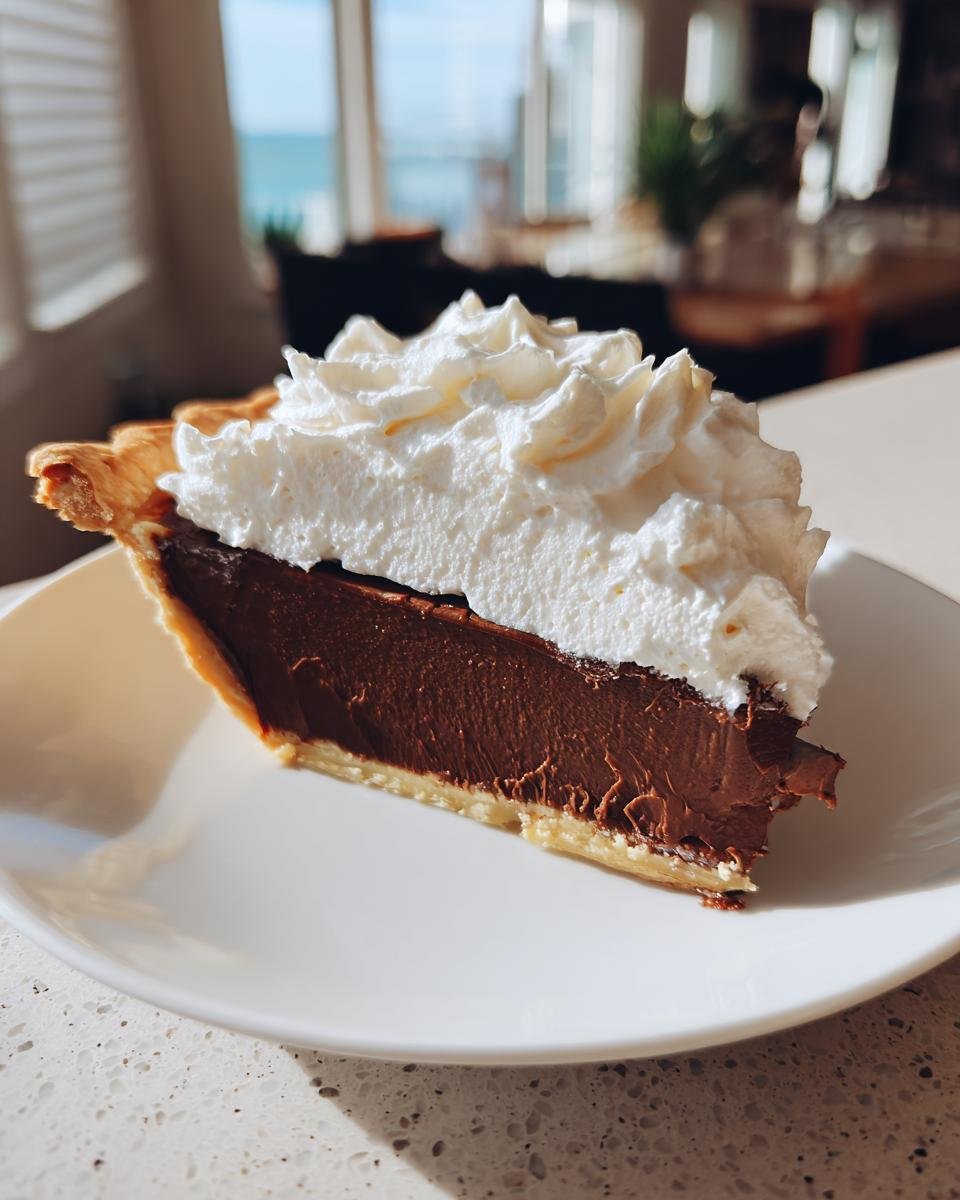
If you want a little something extra, a few shavings of good quality dark chocolate sprinkled across the top add a bit of visual texture. We sometimes even add a tiny drizzle of chocolate syrup for my husband, though I usually prefer things simpler. Remember, if you’re ever looking to experiment with fancy frostings on other cakes, I have some great ideas over on my post about simple white frosting!
Storage and Make-Ahead Options for Chocolate Cream Pie
Because this delicious **Chocolate Cream Pie** is totally built on a tender stovetop custard, keeping it happy means keeping it cold. Don’t even think about leaving this beauty out on the counter! Once the filling has fully set in the fridge (after those crucial three or four hours), you need to keep it chilled until serving time. It does best when stored right in the refrigerator. It’s generally good for up to three days, but honestly, it rarely lasts past day two in my house!
Here’s my big make-ahead tip, and it has everything to do with that fluffy topping. You absolutely must, under no circumstances, put that whipped cream on ahead of time if you plan to store the pie for more than a few hours. Sugar in the whipped cream lets it weep and deflate over time, and nobody wants a sad, sunken topping!
Wait until you are about 30 minutes away from serving to whip up your cream and spread it over the cold, firm **Chocolate Cream Pie** filling. If you need to make the filling completely ahead of time, just store it under that plastic wrap pressed firmly against the surface, and then whip the cream fresh right before you’re ready to eat. Trust me, whipping the cream fresh makes all the difference!
Frequently Asked Questions About Making Chocolate Cream Pie
I know when you’re diving into a new recipe, your brain starts buzzing with questions. Don’t worry, I’ve definitely been there! I’ve answered the most common things folks ask me about getting this **Chocolate Cream Pie** just right so you can skip the second-guessing and get straight to dessert.
If you have a super specific question about the recipe or want to share your brilliant results, feel free to drop me a line on my contact page!
Can I use instant pudding mix instead of making the filling from scratch for this Chocolate Cream Pie?
Oh, you certainly *can* use instant pudding mix if you’re in a real bind! However, I have to be honest—the texture won’t be the same. The scratch filling thickened with cornstarch and egg yolks gives you that intense, rich, almost bittersweet chocolate flavor and a deeply smooth custard body. Instant mix tends to be lighter and sweeter, lacking that classic, heavy cream pie satisfaction.
Why did my chocolate filling curdle or become lumpy?
Usually, curdling or lumps come down to two things: either you didn’t whisk the dry ingredients well enough before adding the milk, or, more commonly, you didn’t temper those egg yolks correctly. If you dump the hot liquid into the cold yolks too fast, you essentially scramble them right there in the saucepan! Remember to add that hot liquid slowly while whisking constantly to bring the yolks up to temperature gently before mixing them back into the main batch.
How long does this Chocolate Cream Pie need to chill before serving?
This is crucial for structure! You absolutely must chill your **Chocolate Cream Pie** for a minimum of three hours. However, I highly recommend aiming for four to five hours, or even chilling it overnight if you can manage it. That time allows the cornstarch to fully hydrate and set up the filling into that firm, sliceable body we want. If you try to slice it early, the beautiful filling will just ooze out.
Estimated Nutritional Snapshot for Chocolate Cream Pie
I always feel a little guilty looking at the numbers after eating a huge slice of something this decadent, but here we are! I pulled these figures together based on standard pantry items. Just remember, these are only estimates, and your actual counts will change based on the type of crust you use or if you use whole milk versus skim.
- Serving Size: 1 slice
- Calories: 350
- Sugar: 35g
- Fat: 18g (with 10g Saturated Fat)
- Carbohydrates: 45g
See? Not as bad as you think for such a rich dessert! Just enjoy every bite!
Print
Simple Chocolate Cream Pie
- Total Time: 3 hours 35 min
- Yield: 8 servings 1x
- Diet: Vegetarian
Description
A straightforward recipe for a rich chocolate cream pie with a flaky crust.
Ingredients
- 1 pre-made 9-inch pie crust, baked
- 1/2 cup granulated sugar
- 1/4 cup unsweetened cocoa powder
- 1/4 cup cornstarch
- 1/4 teaspoon salt
- 2 cups milk
- 2 large egg yolks
- 2 tablespoons unsalted butter
- 1 teaspoon vanilla extract
- 1 cup heavy whipping cream
- 1 tablespoon powdered sugar
Instructions
- In a medium saucepan, whisk together the granulated sugar, cocoa powder, cornstarch, and salt.
- Gradually whisk in the milk until smooth.
- Cook over medium heat, stirring constantly, until the mixture thickens and boils. Boil for 1 minute, stirring constantly. Remove from heat.
- In a small bowl, whisk the egg yolks. Slowly temper the yolks by whisking about 1/2 cup of the hot chocolate mixture into the yolks.
- Pour the tempered yolk mixture back into the saucepan with the remaining chocolate mixture. Cook over medium heat, stirring constantly, until the mixture returns to a boil. Boil for 1 minute. Remove from heat.
- Stir in the butter and vanilla extract until the butter melts completely.
- Pour the chocolate filling into the baked pie crust. Press plastic wrap directly onto the surface of the filling to prevent a skin from forming. Chill for at least 3 hours, or until firm.
- In a separate bowl, beat the heavy whipping cream and powdered sugar until stiff peaks form.
- Spread or pipe the whipped cream over the chilled pie before serving.
Notes
- You can substitute a graham cracker crust for the pre-made pastry crust.
- Chill the pie completely before adding the whipped cream topping.
- Prep Time: 20 min
- Cook Time: 15 min
- Category: Dessert
- Method: Stovetop
- Cuisine: American
Nutrition
- Serving Size: 1 slice
- Calories: 350
- Sugar: 35
- Sodium: 150
- Fat: 18
- Saturated Fat: 10
- Unsaturated Fat: 8
- Trans Fat: 0
- Carbohydrates: 45
- Fiber: 2
- Protein: 5
- Cholesterol: 70
Keywords: chocolate cream pie, homemade pie, easy dessert, chocolate filling