
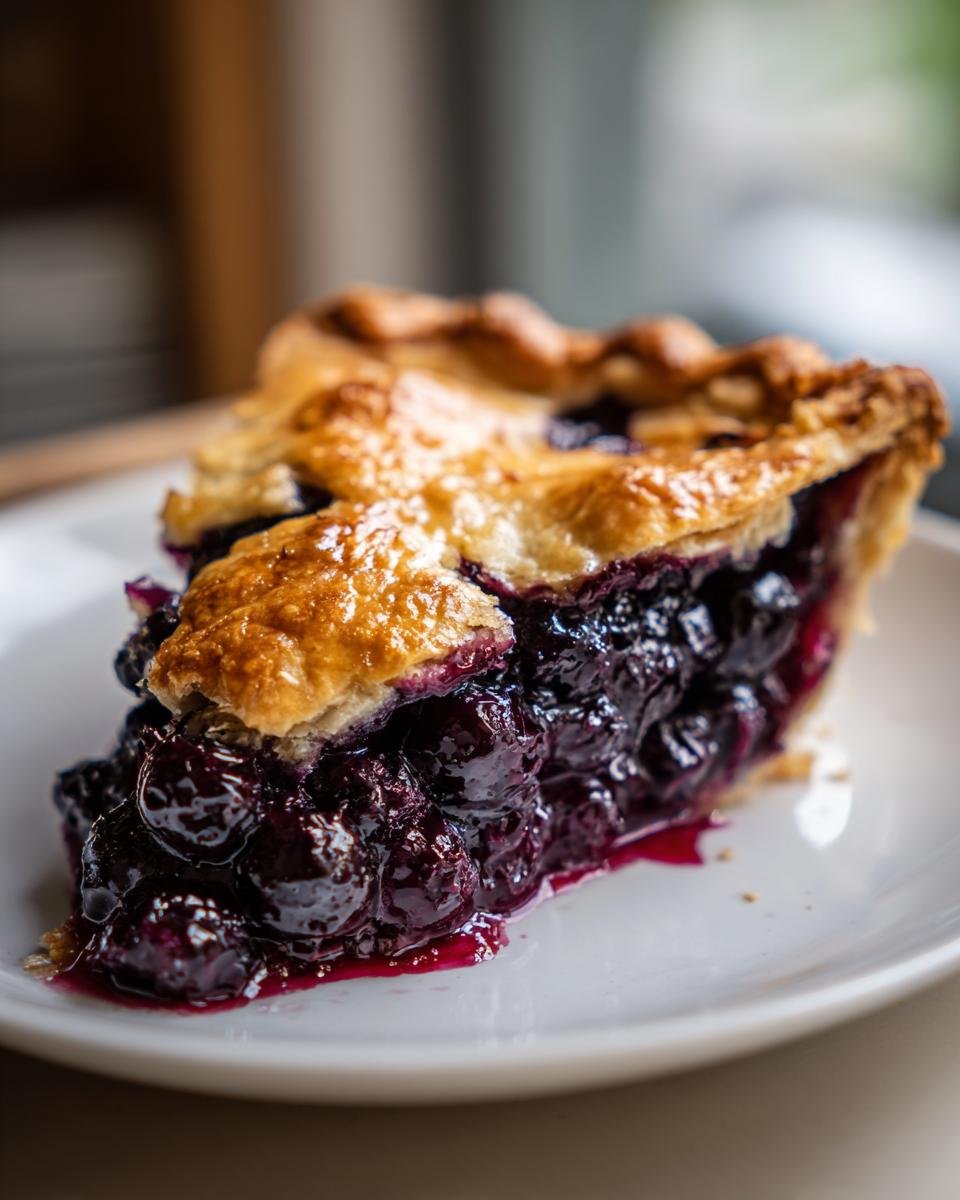
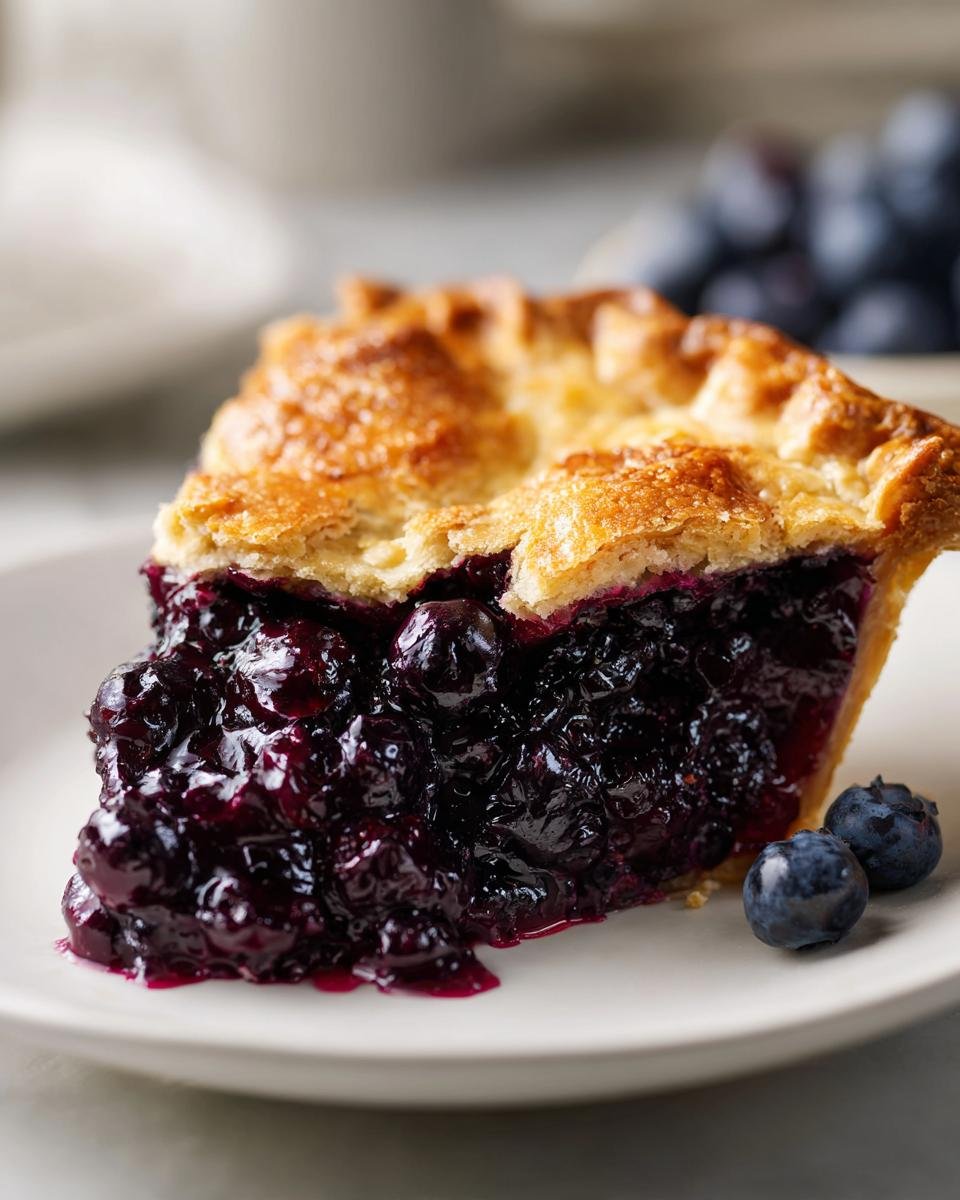
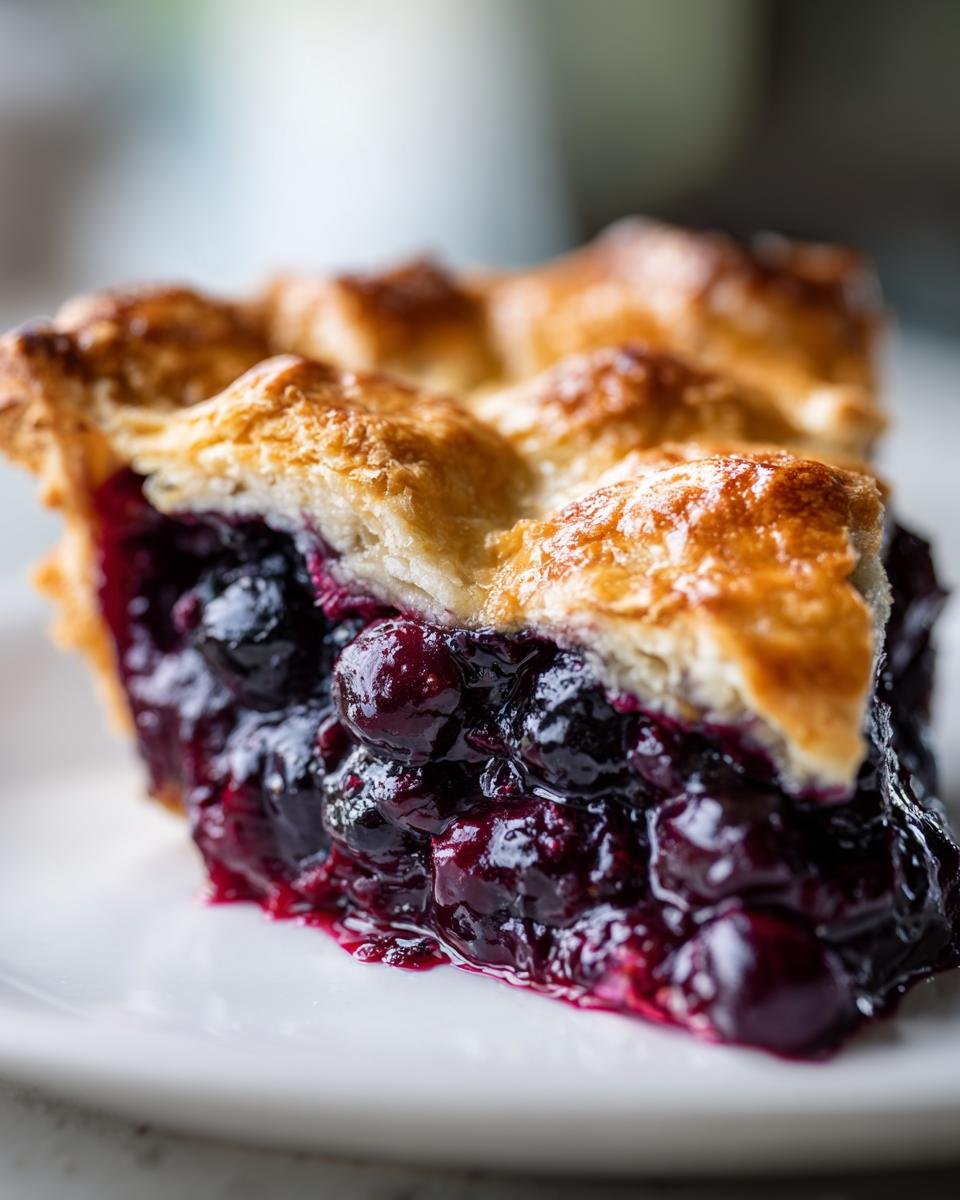
There’s just nothing like biting into a slice of homemade pie. It instantly takes me back to childhood summers, waiting by the porch swing for whatever Grandma was pulling out of the oven. Honestly, a perfectly made fruit pie is the ultimate comfort food, and this **Blueberry Pie**? It’s my absolute go-to because it’s just so straightforward. Don’t let the double crust intimidate you! I struggled for ages to get that flaky texture just right, but once I figured out the ice-cold butter trick, everything changed. Trust me, this simple recipe gives you that classic, satisfying fruit dessert without any fussy nonsense. You’re going to love how easy this comes together.
If you want to see all the little tricks that elevate any baking project, check out my general guide on baking tips to make you a better baker. It really helps set the foundation for success!
Crafting the Perfect Flaky Crust for Your Blueberry Pie
I won’t lie to you; the secret sauce to any great pie, especially a classic **Blueberry Pie**, is definitely the crust. If your crust isn’t flaky, you might as well be eating a cracker with jam! The absolute most important thing here is temperature. Seriously, if you remember nothing else, remember this: the butter and the water must be ice cold. I mean colder than you think necessary!
I keep my butter cubes in the freezer for about ten minutes right before I blend them in. If the butter melts even a little bit while you’re mixing, you end up with a tough, tough crust instead of those lovely, layered flakes we want. These little pieces of cold fat are what create steam in the oven, puffing up the dough beautifully. For more tips on making your baking life easier, peek at my guide to common kitchen substitutions—it might help if you’re missing something!
Ingredients for the Flaky Crust
You only need four things for this dough, but precision matters. Don’t try doubling this recipe into one big dough ball; keeping it in two discs helps with chilling!
- 2 1/2 cups all-purpose flour
- 1 teaspoon salt
- 1 cup (2 sticks) cold unsalted butter, cubed
- 1/2 cup ice water, plus more if needed
Mixing and Chilling the Blueberry Pie Dough
You mix the flour and salt first, and then you cut in that cold butter. I switch between my hands and a pastry blender. You’re looking for crumbs, some the size of oats and some maybe the size of a small pea. Those pea-sized chunks are the magic right there! Once the butter is incorporated, drizzle in that ice water super slowly—just a tablespoon at a time. Stop mixing the actual second the dough starts holding together when you squeeze a handful.
Divide it quickly into two flat discs, wrap them tight in plastic wrap, and send them to the fridge. They need to chill for a minimum of one hour. Honestly? I usually let my **Blueberry Pie** dough chill for two hours. Patience pays off here. They need that time so the water can fully hydrate the flour without melting the butter.
Preparing the Sweet and Simple Blueberry Pie Filling
Okay, now for the star of the show: the blueberries! While your crust is chilling out and getting nice and cold, we whip up the gorgeous sweet filling for our **Blueberry Pie**. This step is ridiculously fast, but you have to promise me you’ll be super gentle here. We want whole, beautiful berries, not purple mush!
I usually use fresh berries, but if you’re making this in the off-season, frozen works beautifully. If you go the frozen route, please don’t thaw them first! Just toss them straight in. I use cornstarch because it’s my favorite thickener; it gets the filling perfectly jammy without being gloppy. If you want more ideas about fruit fillings, take a look at my fruit pie secrets.
Assembling the Blueberry Pie Ingredients
Get yourself a big mixing bowl—honestly, the bigger the better so you have room to stir without everything spilling over the side! Measure everything in and use a rubber spatula for mixing.
- 6 cups fresh or frozen blueberries
- 3/4 cup granulated sugar
- 1/4 cup cornstarch
- 1 tablespoon lemon juice
Gently fold these together. The sugar will start pooling at the bottom, and the cornstarch needs to coat those berries evenly so the **Blueberry Pie** doesn’t end up soupy. That little splash of lemon juice cuts the sweetness just enough to make the blueberry flavor truly pop. It’s perfection!

Assembling and Baking Your Classic Blueberry Pie
Alright, the dough is chilled and the filling is ready—time for the glorious assembly! First thing first, get that oven preheated to 425 degrees F (220 degrees C). That high heat shock is essential for setting the bottom crust just right before things get steamy in there. Get one of those chilled dough discs and roll it out carefully onto a lightly floured surface. You want it about an inch wider than your 9-inch pie plate.
Lay that bottom crust right into the plate. Now, scoop in all your beautiful blueberry filling. Don’t pack it down! Leave it loose so the berries have room to bubble up. Then, roll out your second disc for the top crust of your **Blueberry Pie**. Place it gently over the top, trim the excess dough, and go around the edges sealing them together. You have to crimp those edges—give them a good pinch and twist! Make sure you cut several vents on the top crust so the steam can escape, otherwise, you’ll have a crust explosion!
The finishing touch is the glaze. Give that top crust a good brush with the beaten egg wash—this is what guarantees that gorgeous, deep golden color we all crave on a perfect pie. It makes all the difference!
Oven Temperature and Timing for Blueberry Pie
Baking this requires a little finesse, which is why I love this method. Start it hot at 425 degrees F for 15 minutes. That initial blast of heat sets the butter in your crust right away, preventing that dreaded soggy bottom on your **Blueberry Pie**. After those 15 minutes, you MUST reduce the heat down to 375 degrees F (190 degrees C).
When you drop the heat, let it bake for another 40 to 50 minutes. We drop the temperature so the crust doesn’t burn before the center of the filling has a chance to fully heat up and thicken properly thanks to that cornstarch. You know it’s done when the crust is deep golden brown and you can see those gorgeous blueberry juices bubbling thick through the slits. If the edges start looking too dark before the center is bubbly, don’t panic! Just cover those rims lightly with strips of foil, like little hats for the crust.
Tips for Success When Making Blueberry Pie
Now that we’ve got the dough made and the filling ready, let’s talk about making sure your **Blueberry Pie** comes out looking professional and tasting divine. I’ve learned a few things the hard way over the years, so pay attention to these little secrets! Preventing a soggy bottom is always the biggest battle, right?
Remember that two-stage baking? Starting hot is crucial, but if your edges look like they are getting too tanned before the filling is done, cover them immediately with a ring of aluminum foil. Seriously, they act like little shields for your crust!
Also, if you are using frozen berries, please, please skip the thawing step. If you thaw them, they release too much liquid upfront, and that leads to a runny mess, no matter how much cornstarch you added to the **Blueberry Pie** filling. Toss them frozen straight from the bag. For a deeper dive into troubleshooting your crusts, you can always check back on my main baking tips page!
Storing and Serving Your Homemade Blueberry Pie
This is the hardest part, I won’t lie—waiting for the pie to cool! You have to let your **Blueberry Pie** cool completely on a wire rack before you even think about slicing it. If you cut it warm, all that beautiful, thickened filling will just run right out onto the plate, and you’ll have a soupy disaster instead of beautiful slices.
It really needs 3 or 4 hours sitting on the counter. Once it’s totally cool, you can store the leftovers wrapped loosely on the counter for up to two days. If you need to keep it longer, move it to the fridge, but try to let it sit out for about 30 minutes before serving so the crust doesn’t feel hard and cold.
My favorite way to eat it? Still slightly warm from sitting on the counter, topped with a giant scoop of vanilla ice cream that melts right into the fruity crevices. Pure heaven!
Variations on the Traditional Blueberry Pie
While this classic **Blueberry Pie** is absolutely perfect as written, sometimes you just want to jazz things up a tiny bit, right? I love experimenting when the season changes. A simple addition can completely transform the flavor profile without messing up that beautiful crust we worked so hard on.
For a warmth boost, try mixing in about half a teaspoon of ground cardamom with your sugar and cornstarch. It’s subtle, but it gives the filling a lovely, sophisticated perfume that goes amazingly well with the tartness of the blueberries. Or, if you’re feeling fruity, swap out half of the blueberries for sliced strawberries or even some tart raspberries. If you decide to add softer fruit, just bump up that cornstarch by one extra teaspoon to keep the filling set.
If you’re looking for other amazing flavor combinations, check out my cookie recipes, like these chocolate chip pumpkin oatmeal cookies for a totally different kind of sweet treat!
Frequently Asked Questions About Blueberry Pie
It always seems like once you get into the details, a few little questions pop up, right? That’s totally normal! Baking a classic, double-crust **Blueberry Pie** has a few specific spots where folks usually need an extra bit of guidance. Let’s clear those up so you can get that perfect slice!
Can I make this Blueberry Pie with a lattice top?
Oh, absolutely you can! A lattice top is gorgeous, and honestly, it lets even more steam escape, which is great for a juicy filling. If you decide to swap the solid top crust for strips, you’ll still need to roll out the second disc and cut it into strips—usually about an inch wide. Weave those strips right over the top of your beautiful blueberry mound.
The only real adjustment is that egg wash. You’ll want to brush the stripes you crisscross over the bottom crust for adhesion, and then brush the whole lattice when you’re done weaving. It looks so incredibly professional when it comes out of the oven!
What is the best way to thicken the pie filling?
For this recipe, I rely entirely on that 1/4 cup of cornstarch mixed right in with the sugar and the berries. It’s the best way to ensure a nice, thick, glossy filling for your **Blueberry Pie**. That cornstarch activates with the heat and that lovely liquid the berries give off, turning everything into a perfect, spoonable sauce.
Now, if you cut into your pie too soon—which, trust me, I have been guilty of many times—it will look runny because it hasn’t cooled yet. If you let your **Blueberry Pie** cool completely (we’re talking a full four hours!) and *then* it’s still super liquidy, that means you under-measured your cornstarch or you didn’t bake it long enough for the filling to reach its peak temperature. Next time, add just one tiny extra teaspoon of cornstarch to the mix, but make sure you let it cool completely first!
Estimated Nutritional Information for Blueberry Pie
Now listen, I am a baker, not a nutritionist! You know how I feel about recipes being perfect in taste and texture, but when it comes to the numbers, these are just my best estimates based on what standard pantry staples usually total up to. Please don’t hold me to this if you swap out butter for bacon grease—though please don’t do that!
This big, beautiful **Blueberry Pie** makes 8 generous slices, and these figures reflect one of those servings. It’s a dessert, so it’s going to have high sugar and fat content, but wow, is it worth every single bite!
- Serving Size: 1 slice
- Calories: 350
- Sugar: 35
- Sodium: 150
- Fat: 18
- Saturated Fat: 10
- Unsaturated Fat: 8
- Trans Fat: 0
- Carbohydrates: 48
- Fiber: 3
- Protein: 4
- Cholesterol: 45
Remember, these numbers are based on our traditional recipe components—the flaky crust and the simple fruit filling. If you decide to go wild and serve it with extra-creamy ice cream, well, you’ll have to do some calculating on your own! I suggest skipping the math and just enjoying the pie!
Share Your Simple Blueberry Pie Experience
That’s it! You’ve made my favorite classic **Blueberry Pie**! I really hope you loved the process as much as I do. There’s nothing quite like that first slice—that satisfying crack of the golden crust gives way to those warm, jewel-toned blueberries.
I put all my secrets into this recipe so that you get the same perfect result I do every time. If you followed the steps and ended up with a pie that sings, please let me know! Head down to the comments below and give this recipe a rating—it truly helps other bakers know if they should try this method.
And hey, if you snap a picture of your stunning, bubbly **Blueberry Pie**, tag me on social media! I absolutely live for seeing your creations. If you have any burning questions that I didn’t cover in the FAQ, you can always reach out to me directly via my contact page. Happy baking, friends!
Print
Simple Blueberry Pie
- Total Time: 105 min
- Yield: 8 servings 1x
- Diet: Vegetarian
Description
A straightforward recipe for a classic blueberry pie with a flaky crust.
Ingredients
- 2 1/2 cups all-purpose flour
- 1 teaspoon salt
- 1 cup (2 sticks) cold unsalted butter, cubed
- 1/2 cup ice water, plus more if needed
- 6 cups fresh or frozen blueberries
- 3/4 cup granulated sugar
- 1/4 cup cornstarch
- 1 tablespoon lemon juice
- 1 large egg, beaten (for egg wash)
Instructions
- Prepare the crust: Mix flour and salt in a large bowl. Cut in the cold butter until the mixture resembles coarse crumbs with some pea-sized pieces remaining. Gradually add ice water, mixing until the dough just comes together. Divide the dough in half, form into discs, wrap, and chill for at least 1 hour.
- Prepare the filling: In a separate bowl, gently combine blueberries, sugar, cornstarch, and lemon juice.
- Assemble the pie: Preheat your oven to 425 degrees F (220 degrees C). Roll out one dough disc and place it in a 9-inch pie plate. Pour the blueberry filling into the crust.
- Roll out the second dough disc for the top crust. Place it over the filling. Trim and crimp the edges to seal. Cut several slits in the top crust to allow steam to escape.
- Brush the top crust with the beaten egg wash.
- Bake for 15 minutes at 425 degrees F (220 degrees C). Reduce the oven temperature to 375 degrees F (190 degrees C) and continue baking for 40 to 50 minutes, or until the crust is golden brown and the filling is bubbly.
- Cool completely on a wire rack before slicing.
Notes
- If using frozen blueberries, do not thaw them before mixing with the other filling ingredients.
- If the crust edges brown too quickly during baking, cover them loosely with aluminum foil.
- Prep Time: 45 min
- Cook Time: 60 min
- Category: Dessert
- Method: Baking
- Cuisine: American
Nutrition
- Serving Size: 1 slice
- Calories: 350
- Sugar: 35
- Sodium: 150
- Fat: 18
- Saturated Fat: 10
- Unsaturated Fat: 8
- Trans Fat: 0
- Carbohydrates: 48
- Fiber: 3
- Protein: 4
- Cholesterol: 45
Keywords: blueberry pie, fruit pie, dessert, baked pie, classic pie