
When the evening chill sets in and you just need something warm, sweet, and utterly comforting sliding out of the oven, forget those complicated layer cakes. We’re talking about the king of cozy desserts: Apple Crisp! And honestly, this isn’t just *another* recipe; this is my absolute go-to, can’t-fail, simplest version of Apple Crisp you will ever need. It comes together in a flash when you need that sweet fix fast. After years of messing around, I can guarantee the topping-to-apple ratio in this batch is just right. If you’re looking for a fantastic pairing, you absolutely have to check out my recipe for the Apple Crisp Cheesecake later this week!
Why This Simple Apple Crisp Recipe Works So Well
If you’ve ever tried a crisp where the topping got soggy or the fruit was still hard, don’t worry—I’ve fixed those problems right here! This simple Apple Crisp recipe is designed for maximum reliability. It’s all about getting those perfect contrasts without fussing in the kitchen for hours.
For more advice on improving your baked goods overall, check out my post on baking tips to make you a better baker.
- The ingredient list is short, but it hits all the right notes. You get that signature warmth from cinnamon and a perfect mix of sugars.
- It’s designed to be fast! You can have this dessert ready to slide into the oven before you even finish making dinner.
Perfect Balance in Every Apple Crisp Bite
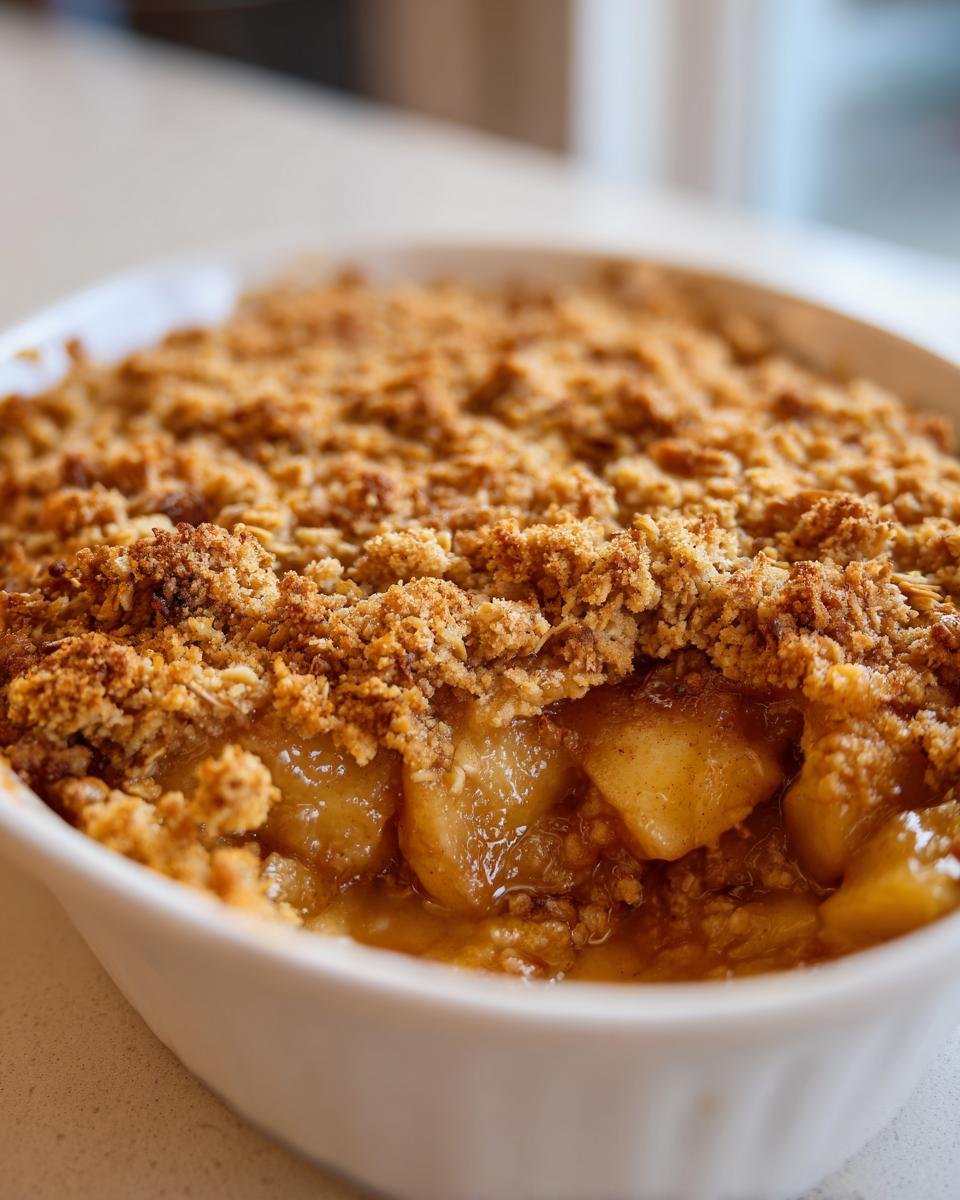
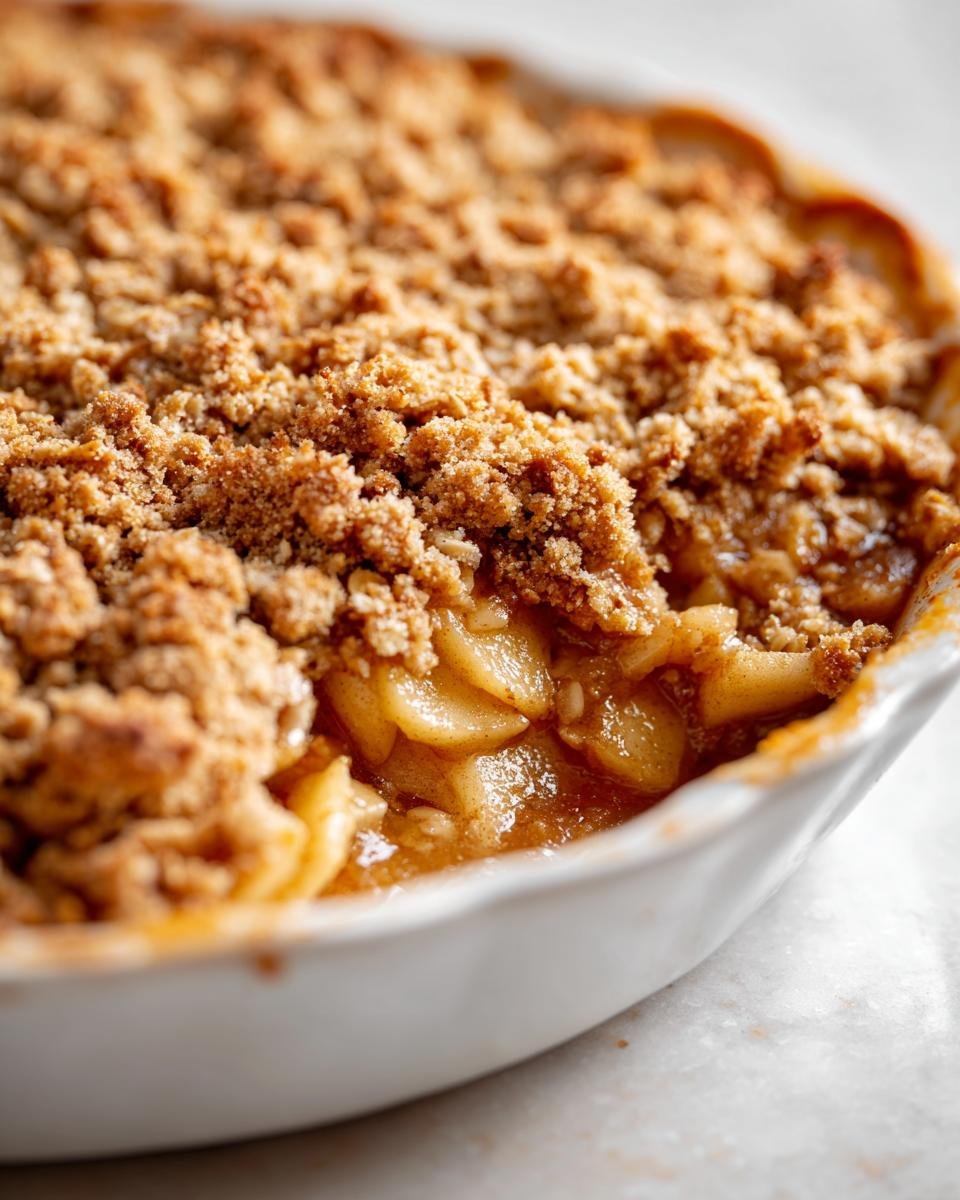
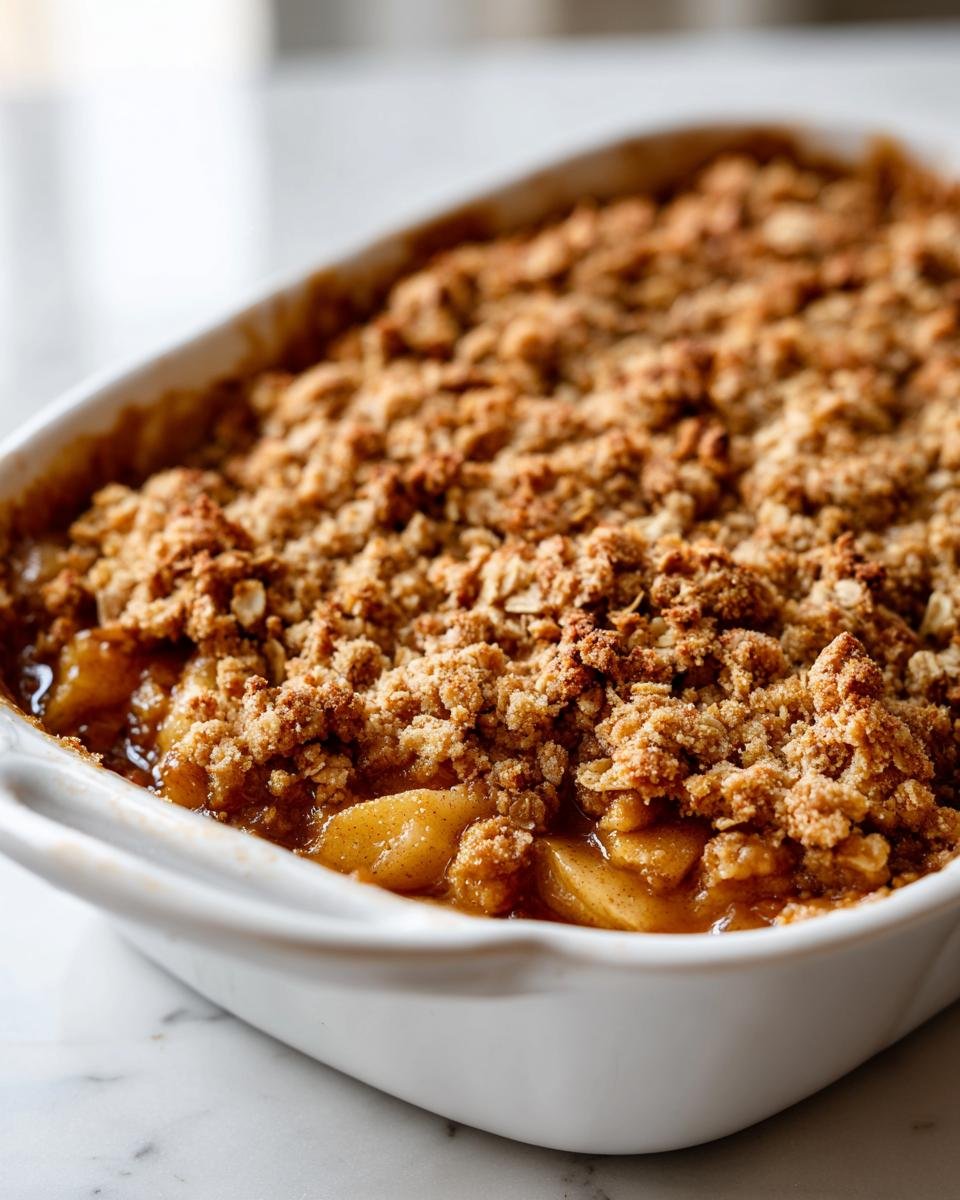
The magic is in the texture. We are aiming for baked apples that have just softened—they should be tender but still offer a tiny bit of resistance when you bite them. That tartness from the apples cuts through the richness of the topping beautifully. The topping itself is exactly what a great Apple Crisp needs: buttery, crunchy, and studded with those lovely rolled oats.

Quick Prep Time for Your Apple Crisp
Look at those times! Prep is only 15 minutes. Seriously, 15 minutes! And only 40 minutes in the oven. That means if you start this right after dinner, you’re eating dessert before most people even finish cleaning up their prep dishes. It’s weeknight-friendly comfort food, plain and simple.
Gathering Ingredients for the Best Apple Crisp
Alright, let’s get down to the nitty-gritty. The reason this recipe is so foolproof isn’t because of any fancy technique, but because we use simple ingredients handled exactly right. Get these things gathered first, and you’ve already won half the battle for a perfect Apple Crisp. Seriously, don’t skip measuring your butter correctly; that’s key!
If you’re ever wondering about ingredient swaps for other recipes, I’ve got a great guide on buttermilk substitutions, but stick to the list for this crisp!
Apple Filling Components for Your Apple Crisp
For the fruit base, you’ll need 6 medium apples. Make sure they are peeled, cored, and sliced evenly—I aim for about a quarter-inch thick. Toss them right away with 1/4 cup of your regular white sugar, 1 tablespoon of fresh lemon juice, and 1 teaspoon of ground cinnamon. That lemon juice is non-negotiable; it stops the apples from turning gross and brown while you make the topping, plus it adds a tiny bit of necessary zing to balance the sweet.
The Signature Apple Crisp Topping Mixture
Now for the best part! For the topping, we need 1 cup of all-purpose flour, 1/2 cup of packed brown sugar (that molasses flavor is crucial), and 1/2 cup of rolled oats. The most important part here is the fat: we use 1/2 cup of cold unsalted butter, cut into small pieces. It *must* be cold! If it’s soft, you’ll end up with a greasy paste instead of those wonderful, crunchy clumps that define a great Apple Crisp topping.
Step-by-Step Instructions to Make Perfect Apple Crisp
This is where we put it all together! Don’t let the steps scare you; they are simple, organized moves that guarantee success. Remember, organization is the secret weapon in the kitchen, especially when you are waiting for that amazing apple crisp aroma to fill your house!
If you are looking for more fundamental baking techniques, make sure you check out my guide on basic baking methods—it helps explain *why* we do things a certain way.
Preparing the Apples and Baking Dish for the Apple Crisp
First things first—get that oven ready! We need it hovering at 375 degrees F (that’s 190 degrees C). While it heats up, grab your 8×8 inch baking dish and lightly grease it. Now, move onto the apples. Take those sliced beauties we prepared and toss them really well in a bowl with the white sugar, the lemon juice, and the cinnamon.
Once they are nicely coated and glistening, spread them out in an even layer across your prepared dish. They shouldn’t be piled too high; we want them to cook evenly, which is why a standard 8×8 pan works so well for this recipe.
Creating and Applying the Apple Crisp Topping
Time to whip up that beautiful topping! In a separate bowl, which should be totally dry, whisk together the flour, the brown sugar, those rolled oats, and the touch of nutmeg. You need the 1/2 cup of cold butter pieces in there now. Use your fingers—yes, your actual hands—to quickly rub the butter into the dry ingredients. You’re squishing and pinching until the mixture looks like coarse crumbs. If you’ve got a pastry blender, great, but I find my fingertips work faster and keep the butter colder longer! Once you hit that coarse crumb texture, sprinkle that topping evenly all over the layer of apples you set aside earlier.
Baking Times and Testing Tenderness for Your Apple Crisp
Into the oven it goes! We bake this Apple Crisp for about 35 to 40 minutes. You are looking for two things: the topping should be perfectly golden brown, and if you poke a fork into the apples through a gap in the topping, they should feel nicely tender. Once it’s out, please, please let it rest for about ten minutes before you even think about serving it. That little bit of cooling time lets the juices settle so you don’t end up with hot apple soup on your plate!
Expert Tips for the Ultimate Apple Crisp
You’ve got the basic recipe down, but if you want to move from good to absolutely unforgettable, a few little secrets can make all the difference! This section is all about those tiny tweaks that separate a nice dessert from the one everyone asks for again and again.
If you ever felt like your crisp topping was missing something, sometimes adding nuts or a splash of vanilla to the mix helps, just like they do in my classic rhubarb crisp. Trust me on this next part:
I once got lazy and used slightly softened butter because I was in a rush, and the topping melted right into a weird, greasy shell. Never again! That’s why keeping things cold matters so much.
Choosing the Right Apples for Your Apple Crisp
The apple choice really dictates the flavor profile, so pick wisely! If you like a little zing, stick to Granny Smith—they hold their shape beautifully and offer that lovely tartness to balance the sweet oat topping. If you prefer something softer and naturally sweeter, Honeycrisp or Fuji are fantastic choices. No matter which apple you grab, the important thing is that they don’t turn to mush in the oven. Fresh, firm apples are your best friend here!
Achieving Maximum Crunch in the Apple Crisp Topping
The biggest enemy of a crunchy topping is heat transferring to the butter too soon. If you’re baking in the summer, or just have one of those warm kitchens, try this trick: put your flour, oats, and brown sugar mixture into the fridge for about 15 minutes before you start cutting the butter in. Keep your hands cold, work fast, and the result will be the crunchiest, most wonderfully textured Apple Crisp topping you can imagine.
Serving Suggestions for Your Warm Apple Crisp
Listen, you made an amazing Apple Crisp, and trying to eat it plain feels like a crime! The classic presentation is non-negotiable: a scoop of good vanilla ice cream melting slowly over the hot, spiced fruit is pure heaven. Alternatively, fresh whipped cream adds a light contrast, but don’t stop there!
I’ve recently gotten obsessed with giving it a tiny little savory twist. Try serving your warm Apple Crisp with a very thin slice of sharp cheddar cheese placed on the side of the plate. The saltiness and bite completely elevate those sweet baked apples! It’s brilliant, trust me. If you love apples and caramel, you’ve got to check out my apple cake with caramel frosting recipe next!
Storage and Reheating Instructions for Apple Crisp
The hardest part about making this amazing Apple Crisp is having leftovers, but if you do, cleaning up is easy. Once it’s completely cooled, cover the dish tightly with plastic wrap or foil. I usually keep leftovers right on the counter for a day if it’s cool in the house, but if you’ve got time, the fridge is safer! When you’re ready for seconds, please skip the microwave.
That damp heat ruins the crunch! Reheat servings in a toaster oven or air fryer if you can, just for a few minutes until warmed through. That brings back that perfect crispy topping texture our Apple Crisp is known for.
Frequently Asked Questions About Making Apple Crisp
I know you might have a few last-minute questions before you dive into making this dessert. It’s smart to ask! Getting these small details right is what keeps the recipe sliding smoothly from my kitchen to yours. People ask me all sorts of things, from ingredient swaps to the proper terminology for this baked apple treat.
If you’re curious about similar baked recipes, you might enjoy digging into my thoughts on Grandma’s Apple Strudel Recipe while you wait for your crisp to bake!
Can I make this simple Apple Crisp vegan?
You absolutely can! Since we rely on that cold butter for the crumbly texture, you just need a good vegan substitute that stays firm when cold. I’d suggest using solid coconut oil or a high-quality vegan butter stick; make sure it’s chilled when you cut it in, just like the dairy butter. It works beautifully!
What is the difference between Apple Crisp and Apple Crumble?
That’s a classic question! Most folks, myself included, draw the line right here: an Apple Crisp usually includes oats in the topping, which gives it that extra crunch and texture we are aiming for here. An Apple Crumble tends to skip the oats, relying just on flour, sugar, and butter for a slightly softer topping. My recipe is definitely in the ‘Crisp’ camp because I love that hearty oat texture.
How can I make the topping sweeter for my Apple Crisp?
If your apples are tasting a bit too tart that day, or you just have a raging sweet tooth—I totally get it! The brown sugar is doing most of the heavy lifting in the topping, so to increase the sweetness, just add 1 or 2 more tablespoons of packed brown sugar right into your dry topping mixture. You won’t need to change anything else!
Estimated Nutritional Profile for This Apple Crisp
Now, I never stress too much about the numbers when I’m baking something this comforting, but for those of you who like to keep track, here’s a rough idea of what you’re looking at per serving. Keep in mind these figures are estimates based on my exact measurements and the types of ingredients I usually buy.
You know how it is—if you use extra butter or a different brand of oats, things are going to shift a little! But generally, this is a sweet treat, so enjoy it!
- Serving Size: 1 serving
- Calories: 350
- Fat: 18g (with 11g of that being Saturated Fat)
- Sugar: 35g
- Carbohydrates: 48g
- Protein: 4g
Share Your Perfect Apple Crisp Experience
I truly hope this simple Apple Crisp brings you as much warmth and joy as it brings to my family every single time I bake a batch! Now that you’ve got the recipe down, I desperately want to hear how it turned out for you.
Did the topping get super crunchy? Did you use Granny Smiths like I suggested? Head down to the comments section right now and let me know! I always check them, and I love seeing your photos and hearing your twists. Don’t be shy—give this recipe a star rating out of 5 stars so other bakers know it’s a winner!
If you run into any questions while you’re baking, or if you just want to say hello, you can always reach out directly through the contact page. Happy baking, and enjoy that perfect warm dessert!
Print
Simple Apple Crisp
- Total Time: 55 min
- Yield: 6 servings 1x
- Diet: Vegetarian
Description
A straightforward recipe for a warm apple dessert with a crisp topping.
Ingredients
- 6 medium apples, peeled, cored, and sliced
- 1/4 cup granulated sugar
- 1 tablespoon lemon juice
- 1 teaspoon ground cinnamon
- 1 cup all-purpose flour
- 1/2 cup packed brown sugar
- 1/2 cup rolled oats
- 1/4 teaspoon ground nutmeg
- 1/2 cup cold unsalted butter, cut into small pieces
Instructions
- Preheat your oven to 375 degrees F (190 degrees C). Lightly grease an 8×8 inch baking dish.
- In a bowl, toss the apple slices with granulated sugar, lemon juice, and cinnamon. Place the apple mixture evenly in the prepared baking dish.
- In a separate medium bowl, combine the flour, brown sugar, oats, and nutmeg.
- Cut in the cold butter using a pastry blender or your fingers until the mixture resembles coarse crumbs.
- Sprinkle the topping mixture evenly over the apples.
- Bake for 35 to 40 minutes, or until the topping is golden brown and the apples are tender.
- Let the crisp cool slightly before serving.
Notes
- Serve warm with vanilla ice cream or whipped cream for the best flavor.
- You can substitute Granny Smith apples with Honeycrisp or Fuji apples.
- Prep Time: 15 min
- Cook Time: 40 min
- Category: Dessert
- Method: Baking
- Cuisine: American
Nutrition
- Serving Size: 1 serving
- Calories: 350
- Sugar: 35
- Sodium: 5
- Fat: 18
- Saturated Fat: 11
- Unsaturated Fat: 7
- Trans Fat: 0
- Carbohydrates: 48
- Fiber: 4
- Protein: 4
- Cholesterol: 45
Keywords: apple crisp, baked apples, oat topping, cinnamon dessert, simple dessert