
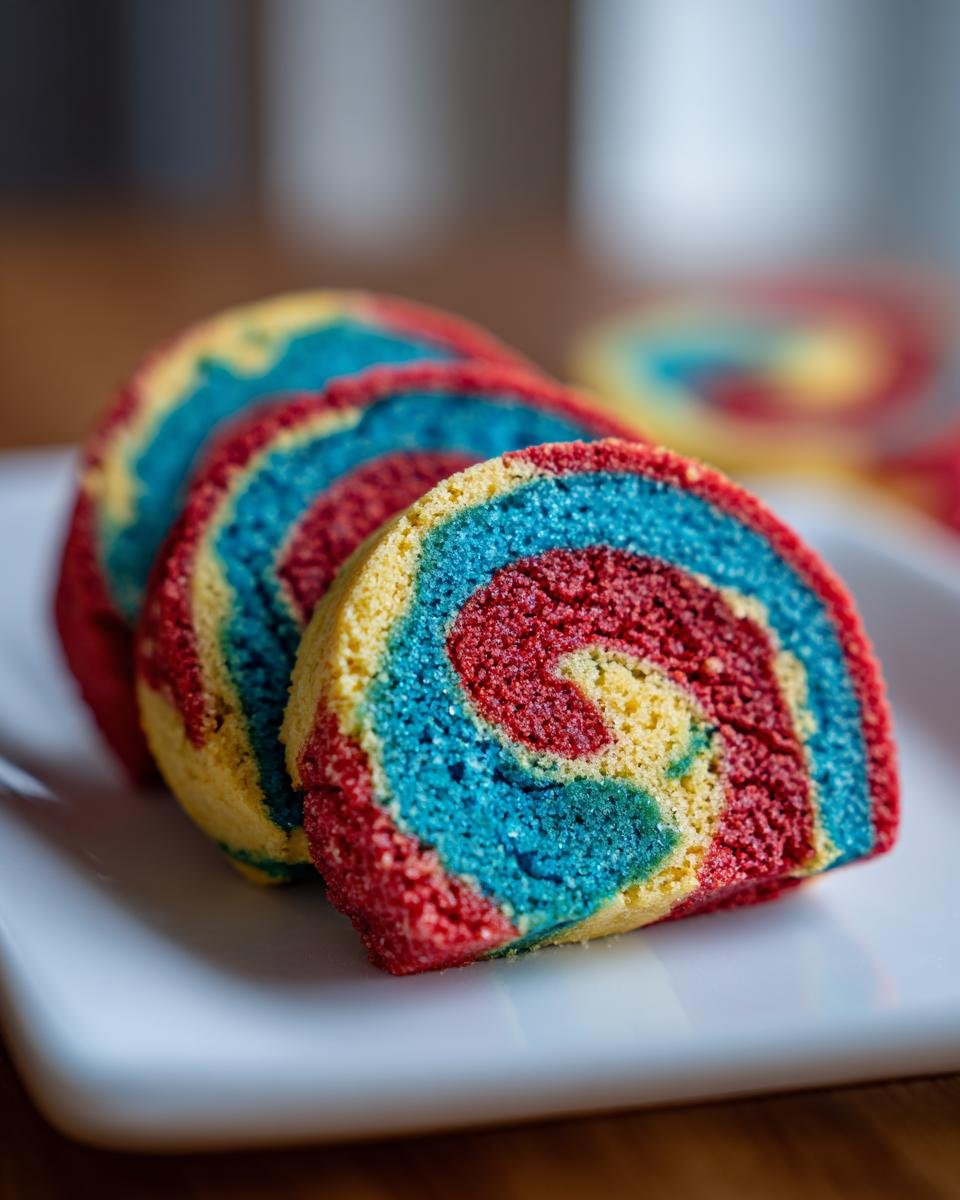
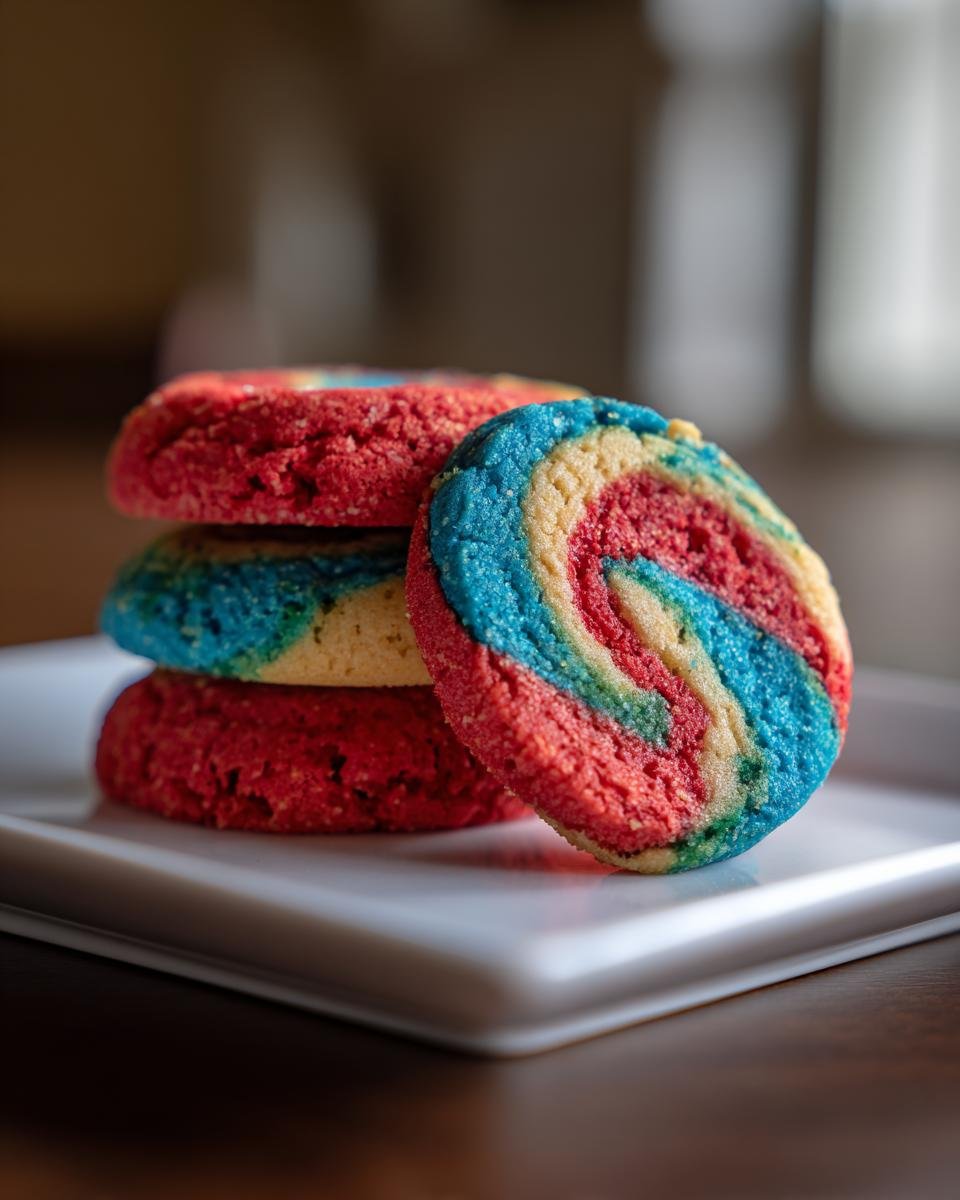
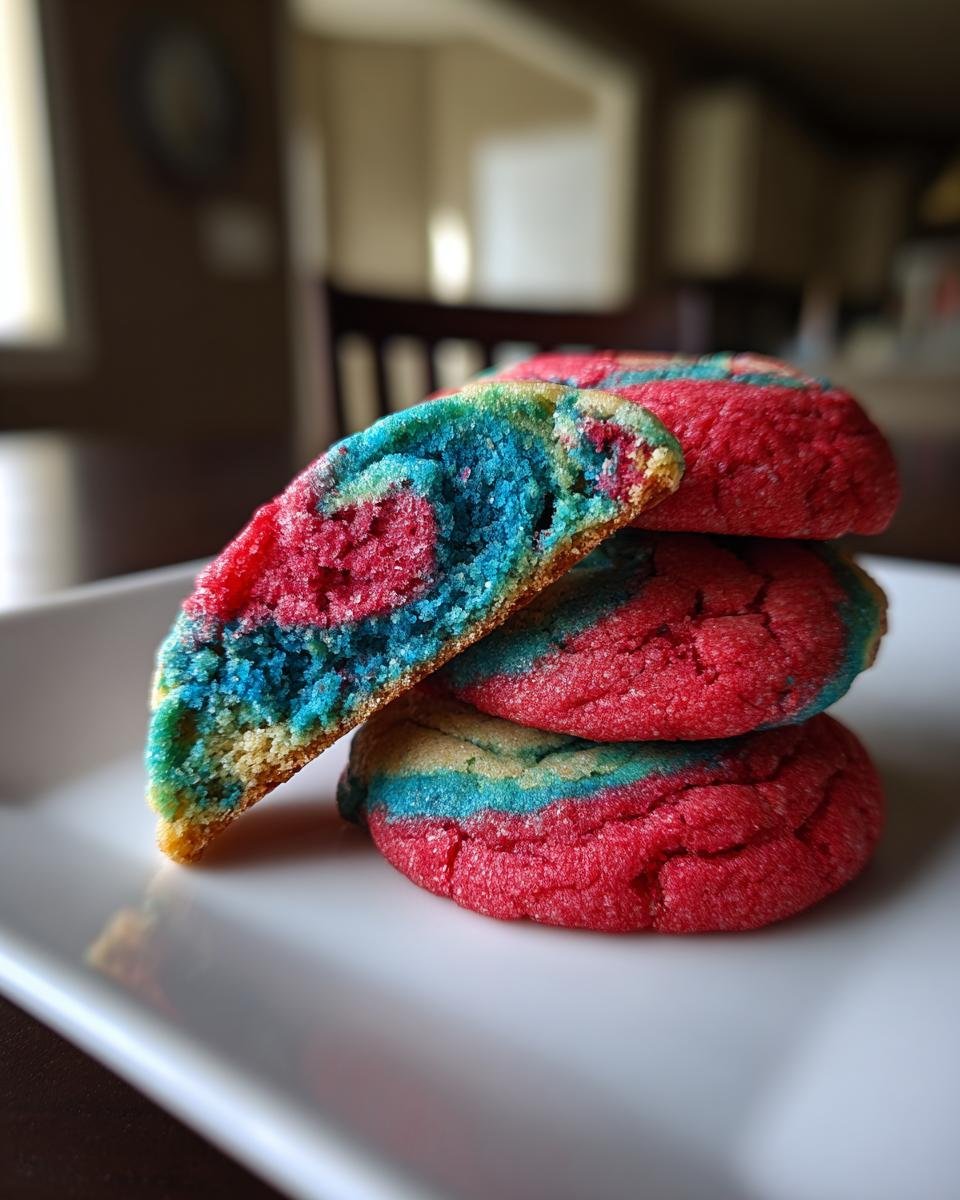
Oh my gosh, if you need a cookie that looks like it took hours but actually takes just a lazy afternoon, you have to try these! I live for days when I can whip up something visually stunning without needing ten different bowls and specialized tools. These **Fun And Easy Pinwheel Cookies A Colorful Treat Recipe** are my absolute go-to when I need a burst of color on the dessert table. Seriously, they bake up perfectly swirly every single time—it’s magic! The simple sugar cookie base lets the colors pop, and watching that little spiral appear when you slice them? That’s the best part of baking, right there. Trust me, once you make these, they’ll become a staple in your kitchen, too. You can even check out some general tips on how to become a better baker over here: baking tips to make you a better baker.

Gathering Ingredients for Fun And Easy Pinwheel Cookies A Colorful Treat Recipe
Okay, so getting ready to bake these beauties is super straightforward. We’re using basic pantry staples, but the secret weapon here is having your butter perfectly softened—not melted, just soft! You’ll need a full cup of that goodness, along with sugar, an egg, and vanilla for the base.
Then, for the color show, grab your favorite food dyes. I’m calling for red, blue, and green today, but honestly, use whatever colors you feel like using! Make sure you have your flour, baking powder, and salt handy too. You know, if you ever run out of something like buttermilk for another recipe, I have a post about buttermilk substitutions that might save your bacon later!
- 1 cup unsalted butter, softened
- 1 cup granulated sugar
- 1 large egg
- 1 teaspoon vanilla extract
- 2 3/4 cups all-purpose flour
- 1 teaspoon baking powder
- 1/2 teaspoon salt
- 1/4 teaspoon red food coloring
- 1/4 teaspoon blue food coloring
- 1/4 teaspoon green food coloring
Step-by-Step Instructions to Master Fun And Easy Pinwheel Cookies A Colorful Treat Recipe
Alright, this is where the fun really starts, but listen closely—we need to be gentle with this dough! We’re aiming for delicate swirls, not dense bricks, so don’t rush the mixing phases. Once you get the hang of the layering, it flies by, but prep is everything here.
Preparing the Base Dough for Fun And Easy Pinwheel Cookies A Colorful Treat Recipe
First things first, get that butter and sugar beating until they look light and fluffy—like sweet, pale clouds. Then, splash in your egg and vanilla and mix just until everything comes together. Next, mix your flour, baking powder, and salt in a separate bowl. Now, this is important: add the dry stuff to the wet stuff gradually. Stop mixing as soon as you see no more streaks of flour. Seriously, overmixing the flour turns these cookies tough, and we want them tender!
Coloring and Layering the Dough for Fun And Easy Pinwheel Cookies A Colorful Treat Recipe
Time for the pretty part! Divide your plain dough into four equal piles. Leave one alone, and then work in your coloring for the other three—red, blue, and green. Mix each one until it’s uniform; you don’t want white patches in your final swirl. Lay out some plastic wrap. Roll your plain dough into a thin rectangle, about a quarter-inch thick. Then, lay the colored rectangles right on top of the plain one, slightly overlapping if you need to cover the whole area.
Here’s my little trick for a tight swirl: when you go to roll the entire stack up like a jelly roll, start rolling *very* tightly from the edge closest to you. If you roll it gently, the colors will just smudge together. When it’s a nice tight log, wrap it up really snug. This log needs a good, long chill—at least two hours. Don’t cheat this part; it makes slicing SO much easier!
Chilling, Slicing, and Baking Your Fun And Easy Pinwheel Cookies A Colorful Treat Recipe
Once that dough is firm, preheat your oven to 375 degrees F (190 degrees C) and get your sheets ready with parchment paper. Slice the chilled log into rounds that are about 1/4 inch thick. If they are too thin, they fall apart before the swirl sets. Space them about two inches apart because they spread a tiny bit while baking.
Pop them into the oven for about 8 to 10 minutes. You’re looking for the edges to just barely start turning a delicate light gold. As soon as you see that, they’re done! Let them sit right on that hot pan for five minutes so they firm up before you move them to a rack to cool completely. You can find some great general baking wisdom right here if you want a refresher: baking tips to make you a better baker.
Tips for Success with Your Fun And Easy Pinwheel Cookies A Colorful Treat Recipe
Listen, I’ve messed these up before, and it usually comes down to two things: rushing the chill or mixing too hard! Seriously, if you skip chilling the dough, you end up with colorful puddles, not pretty spirals. You absolutely must give that log a full two hours, or even longer if your kitchen is warm.
The other big mistake people make is in that first mixing stage. Remember what I said? Don’t overmix the dough once that flour goes in! Mix just until it comes together. Too much energy equals tough cookies, and we want tender little delights here.
My best tip for getting those crisp lines is to use high-quality food coloring, like gel paste varieties if you have them. Liquid coloring adds too much extra moisture which can make the dough sticky. A tight roll and a cold dough are the keys to perfect pinwheels every time. For anyone looking to level up their baking in general, I always recommend looking at some extra baking tips to make you a better baker!
Ingredient Notes and Substitution Options
Let’s talk specifics about these ingredients because using the right ones makes a huge difference in how well your colors show up and how the cookie texture ends up. The butter, for instance, absolutely has to be softened. When we cream it with the sugar, we’re making all those tiny air pockets that give us a tender bite later on. If your butter is too cold, it won’t cream right, and if it’s melted, well, forget about it—you’ll end up with greasy disks.
For the coloring, I used standard liquid colors, but if you’re an advanced baker, gel food coloring is fantastic because it gives you super intense color payoff without adding extra liquid to the dough. If your dough gets too sticky, it won’t roll tightly enough for a good effect!
Now, the recipe calls for standard all-purpose flour, which is great for structure. If you ever try swapping out ingredients in other recipes, like if you need a binder, I made a whole guide on buttermilk substitutions that can help you pivot when you’re missing something.
Since this is a pure sugar cookie base, there aren’t a lot of substitutions that won’t change the look of the swirl, to be honest. Stick to unsalted butter for best control over the saltiness. But for the colors? Go wild! Want purple and lime green? You totally can!
Storage and Keeping Your Fun And Easy Pinwheel Cookies A Colorful Treat Recipe Fresh
One of the best things about these gorgeous cookies is that they just keep well, which makes them perfect for making ahead for parties! Once they are completely cooled down—and I mean totally cool—you need to tuck them into an airtight container. Don’t use a plastic bag; that lets air sneak in and makes them stale fast.
If you store them correctly, they stay perfectly crisp on the outside and just a little chewy in the middle for a solid week. I know because I always hide a few in the back of the pantry just for me! They taste just as good on day six as they do when they first come out of the oven.
Freezing the Dough Logs for Later
This is my favorite trick for emergency cookie situations! The unbaked dough log is a rock star when frozen. Once you’ve wrapped that colorful log up super tight in plastic wrap after you rolled it, go ahead and pop it right into the freezer. If you want extra protection against freezer burn, wrap that plastic-wrapped log in a layer of foil or pop it into a sturdy freezer bag.
You can totally keep them frozen for up to three months! When you’re ready to bake, just pull the log out of the freezer, unwrap it, and let it sit on the counter for about 20 to 30 minutes until you can slice through it easily. You might need to add a minute or two to your baking time since the dough will still be quite cold, but honestly, the swirl looks even better when the dough stays super cold going into the oven!
Storing the Baked Pinwheels
After they’ve cooled completely on the rack, transfer them to your airtight container. If you’re stacking them, put a small piece of parchment paper between the layers. This stops any residual moisture from making them stick together, and you certainly don’t want to ruin those lovely pinwheel patterns!
Don’t try to refrigerate these unless your kitchen is unbelievably hot and humid, because the fridge can actually make sugar cookies soften up weirdly. Room temperature storage in a cool, dark spot is the absolute best way to keep these beauties crisp and colorful for about seven days.
Serving Suggestions for Fun And Easy Pinwheel Cookies A Colorful Treat Recipe
These colorful pinwheels are definitely show-stoppers on their own, but every good cookie deserves an equally good companion, right? Since the base of this recipe is a classic, slightly sweet sugar cookie, they pair up beautifully with just about anything comforting.
First, you absolutely cannot go wrong with a big, cold glass of milk. It’s the classic pairing for a reason! The cool milk cuts through the buttery sweetness perfectly, and it’s just nostalgic—instant childhood vibes, even if you’re an adult.
The Coffee Connection
If you’re having these cookies in the afternoon (which is really the only acceptable time to eat something this fun), strong black coffee or a latte is divine. The slight bitterness of the coffee plays off the vanilla and the simple sweetness of the dough so nicely. If you’re feeling ambitious later that week, you could even pair them with a slice of my simple coffee cake recipe for an elaborate brunch spread!
Pairing with Other Desserts
Because these cookies are already so visually busy and brightly flavored, you want to serve them with simpler desserts if you’re creating a spread. Skip the heavily frosted cakes. They look amazing next to something plain, like a bowl of fresh strawberries or perhaps a scoop of high-quality vanilla bean ice cream. The colors just pop right off the plate when they aren’t fighting other strong flavors!
They also travel really well on a platter for parties. Just arrange them neatly, maybe alternating colors slightly, and they do all the decorating work for you!
FAQ About Making Fun And Easy Pinwheel Cookies A Colorful Treat Recipe
Why aren’t my pinwheel swirls defined? They look smudged!
Oh, I totally get that frustration! Smudged pinwheels usually happen for one of two reasons, and it always boils down to temperature or technique. First, if your dough wasn’t chilled long enough—less than two hours is risky—the dough is too soft when you slice it, and the colors start bleeding into each other while they sit on the tray.
Second, and this is key for a crisp swirl appearance, you have to roll that dough log as tightly as humanly possible! Think of it like rolling up a yoga mat—you want it compact! If you leave any tiny air pockets when you roll up those colored layers, the heat melts those gaps together in the oven, and poof, your beautiful defined pattern disappears. Make sure you let that log get rock hard in the fridge!
Can I use gel food coloring instead of the liquid ones I have?
Yes, absolutely! In fact, I prefer gel food coloring for these colorful cookies if I have time to run to the store. The big reason is that standard drops of liquid coloring contain a lot of water, and water is the enemy of a perfect, non-sticky sugar cookie dough. You need to keep that dough as dry as possible for easy rolling and slicing.
Gel paste food coloring gives you that brilliant, vibrant color—like that intense blue or red—using way less liquid, so your dough stays perfectly workable. Just remember that if you use gel, you might need to stop mixing a tiny bit sooner because the color gets darker as it sits.
How thick should I slice the dough for the best results?
The recipe calls for 1/4 inch thick slices, and I really recommend sticking to that measurement, especially for your first time making these fun and easy pinwheel cookies. That thickness gives the cookie just enough structure to hold that beautiful swirl pattern together without spreading too much or becoming too dense.
If you slice them too thin—say, less than 1/8 inch—they bake almost instantly and the edges burn before the center swirl has time to set, so they usually end up cracking apart when you move them. If you like a chewier cookie, you can carefully push it to almost 3/8 inch, but you’ll need to watch the baking time because those thicker ones will need an extra minute or two in the oven.
How do I keep the colors from running together while baking?
The biggest defense against colors running is making sure the dough is super chilled right up until it goes into the oven—that’s non-negotiable for defined swirls! If your dough sits out too long while you’re prepping the baking sheets, those colors wake up and start softening against each other.
Another trick is to work quickly when you slice the dough. Don’t let the slices sit on the counter for more than five minutes before they go onto the baking sheet. And, of course, make sure your oven is fully preheated to 375 degrees! A cold oven leads to slow spreading, and slow spreading is what causes the beautiful patterns to melt into one another. Bake them until the edges are just set, and you’ll have perfect colorful treats!
Quick Facts and Yield for Fun And Easy Pinwheel Cookies A Colorful Treat Recipe
When you need to plan your baking schedule, sometimes you just want the hard numbers without reading through all my rambling stories about dough consistency! Don’t worry, I totally get it. These cookies are fast once the dough is chilled, but that chilling time adds up, so plan ahead!
Here’s the quick rundown on what you’re looking at, timing-wise, for these colorful treats:
- Prep Time: A quick 30 minutes of active work while you’re mixing and coloring the dough.
- Cook Time: Seriously fast! Only about 10 minutes in the oven per batch.
- Total Time: This is where the patience comes in because you need a solid 2-hour chill. Don’t forget that! Total time averages out to about 160 minutes if you factor in everything from start to finish.
- Yield: You should end up with roughly 3 dozen cookies, depending on how thickly you slice them. Always great for sharing or hiding a few for yourself!
Also, just a fun reminder that the method is strictly Baking, and these are classified as a Vegetarian American Dessert. Easy peasy!
Estimated Nutritional Data Per Serving
Now, let’s talk numbers. I’m not a nutritionist, so take these figures as a general guideline, okay? Baking is all about enjoyment, but it’s nice to have an idea of what you’re munching on when you grab one of these colorful treats. Remember, since we’re using real butter and sugar to get that perfect flavor, these are definitely a delicious treat, not a health food!
These estimates are based on getting about 3 dozen cookies from the whole batch. If you slice your logs thicker or thinner, those numbers will shift around, so treat this as a helpful starting point for your Fun And Easy Pinwheel Cookies A Colorful Treat Recipe.
- Serving Size: 1 cookie
- Calories: About 110
- Fat: 5 grams (with 3 grams coming from saturated fat—that’s the butter loving on you!)
- Carbohydrates: 15 grams
- Sugar: 8 grams (Remember, this is where most of the flavor comes from!)
- Protein: 1 gram
- Sodium: 45 milligrams
- Cholesterol: 25 milligrams
Also, these cookies are completely vegetarian, which is great. Just keep in mind that if you substitute margarine for butter, or if you use different types of flour mixtures, your final count will change. Enjoy them responsibly, but most importantly, enjoy them!
Print
Fun and Easy Pinwheel Cookies
- Total Time: 160 min
- Yield: About 3 dozen cookies 1x
- Diet: Vegetarian
Description
A simple recipe for colorful, swirled sugar cookies.
Ingredients
- 1 cup unsalted butter, softened
- 1 cup granulated sugar
- 1 large egg
- 1 teaspoon vanilla extract
- 2 3/4 cups all-purpose flour
- 1 teaspoon baking powder
- 1/2 teaspoon salt
- 1/4 teaspoon red food coloring
- 1/4 teaspoon blue food coloring
- 1/4 teaspoon green food coloring
Instructions
- Beat the butter and sugar together until creamy.
- Beat in the egg and vanilla extract.
- In a separate bowl, whisk together the flour, baking powder, and salt.
- Gradually add the dry ingredients to the wet ingredients, mixing until just combined.
- Divide the dough into four equal parts.
- Leave one part plain. Add red coloring to the second part, blue to the third, and green to the fourth. Mix each colored portion until the color is uniform.
- On plastic wrap, roll each dough portion into a rectangle approximately 1/4 inch thick.
- Place the plain dough rectangle on top of one colored dough rectangle. Repeat with the remaining colors, layering them on top of each other.
- Tightly roll the layered dough stack into a log. Wrap the log in plastic wrap and chill for at least 2 hours.
- Preheat your oven to 375 degrees F (190 degrees C). Line baking sheets with parchment paper.
- Slice the chilled dough log into 1/4 inch thick rounds.
- Place the slices about 2 inches apart on the prepared baking sheets.
- Bake for 8 to 10 minutes, or until the edges are lightly golden.
- Let the cookies cool on the baking sheets for 5 minutes before transferring them to a wire rack to cool completely.
Notes
- Do not overmix the dough after adding the flour.
- Chill the dough for the full 2 hours for easier slicing.
- You can use any combination of food coloring you prefer.
- Prep Time: 30 min
- Cook Time: 10 min
- Category: Dessert
- Method: Baking
- Cuisine: American
Nutrition
- Serving Size: 1 cookie
- Calories: 110
- Sugar: 8
- Sodium: 45
- Fat: 5
- Saturated Fat: 3
- Unsaturated Fat: 2
- Trans Fat: 0
- Carbohydrates: 15
- Fiber: 0
- Protein: 1
- Cholesterol: 25
Keywords: pinwheel cookies, sugar cookies, colorful cookies, easy cookies, rolled cookies